HVAC / Underfloor Heating
User Manual for Warmup konekt Wireless 10-Channel Wiring Centre 230V
Comprehensive user manual for the Warmup konekt Wireless 10-Channel Wiring Centre (KW-WC10CH). This guide covers installation, wiring diagrams, pairing with the Smart Hub, troubleshooting LED codes, and technical specifications.
Table of contents
Manual images
Click an image to enlargeQuick guide from the manual
The Warmup konekt Wireless 10-Channel Wiring Centre is designed for underfloor heating control. Before starting, ensure the mains power is disconnected and discharged. The device must be installed by qualified personnel. The system requires the konekt Wireless Smart Hub and the konekt App for full functionality. If the device is already connected to other systems, perform a factory reset before pairing.
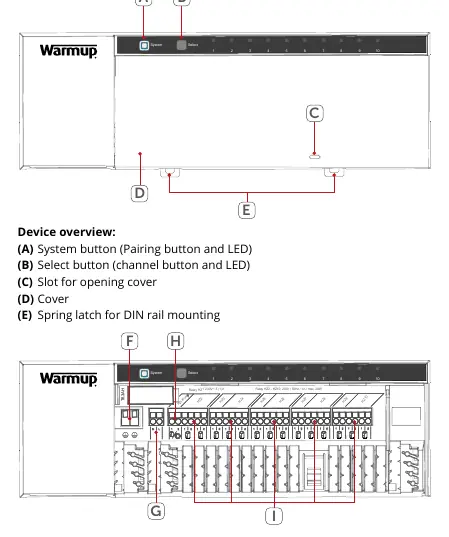
Device overview
The wiring centre features a system button (A) for pairing, a select button (B) for channel selection, and a cover (D) protecting the terminals. It includes a spring latch (E) for DIN rail mounting. Terminals are provided for PE, N, L, and individual heating zones (HZ1-HZ10). Zone 1 can also be used for a mixing unit circulator.
Installation
The device can be mounted using the supplied screws or a DIN rail.
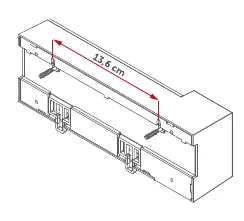
Screw mounting
- Identify a location close to the manifold and within cable reach of actuators and the circulator.
- Mark two bore holes with a distance of 13.6 cm.
- Secure the unit to the wall using the supplied screws and wall plugs.
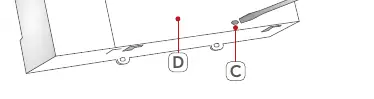
DIN-rail mounting
- Place the wiring centre onto the DIN rail.
- Secure it by pressing the spring latches (E) upwards until it clicks into place.
Wiring
Follow the wiring diagram carefully:
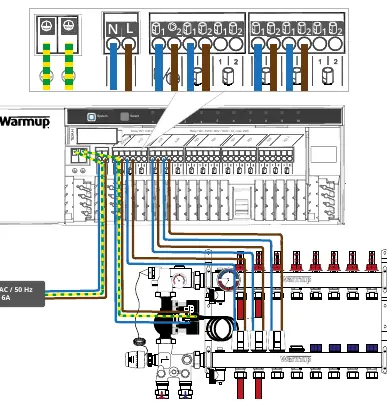
- Connect the 230 V AC live and neutral conductors to the L and N terminals.
- Wire the valve actuators and the pump to the respective zone terminals.
- Ensure all cables are fixed and secured within the cable bushings before closing the cover.
- Use a flat-head screwdriver to open the wiring terminals.
Pairing and setup
The wiring centre must be paired with the konekt Wireless Smart Hub via the konekt App.
- Open the konekt app and select Pair device.
- If required, press the system button (A) once; the LED will flash orange.
- Scan the QR code on the device or enter the last four digits of the device number (SGTIN).
- If successful, the LED (B) will light up green.
- After pairing, allocate the wiring centre to a room and assign channels to specific actuators.
Troubleshooting
If the LED (B) lights up red, it indicates a command failure. Possible causes include radio interference, unreachable devices, or mechanical blocks. If the duty cycle limit is exceeded, the device may stop working for up to 1 hour. Refer to the error codes section for specific flashing sequences of the system and channel LEDs.
Maintenance and factory reset
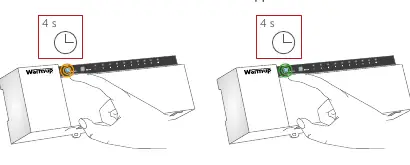
The device requires no specific maintenance. To clean, use a soft, lint-free cloth; do not use detergents. To restore factory settings, press and hold the system button (A) for 4 seconds until it flashes orange, release, then press and hold again until the LED lights green.
Practical help
Common problems
LED (B) lights up red
Device cannot be reached, load failure, or defective. Check for radio interference or mechanical blocks.
Duty cycle exceeded
The device may stop working for up to 1 hour. It will resume normal operation automatically.
Channel LED slow flashing
Emergency operation activated. Change batteries in the wall thermostat or re-position it.
Channel LED short double flashing
Radio connection to wall thermostat failed. Re-position thermostat or add a WiFi repeater.
Before use
- Ensure mains power is disconnected and discharged before installation.
- Verify that the mounting surface is suitable for the wiring centre.
- Ensure cable sizes match terminal requirements (0.75-1.50 mm²).
- Download the konekt app.
- Ensure the Smart Hub is set up before adding the wiring centre.
Specs in practice
- Supply voltage
- 230 V AC / 50 Hz.
- Max heating zones
- 10 zones (or 9 if using a pump).
- Max actuators
- 15 actuators (or 14 if using a pump).
Images and diagrams
- Page 5: Device overview showing buttons (A, B) and terminal layout (F-I).
- Page 8: Wiring diagram showing connections for L, N, pump, and actuators.
Model compatibility
- Compatible with konekt Wireless Smart Hub (KW-UKHUB).
- Compatible with konekt Wireless wall thermostat (KW-STATH).

Manual page author
David Miller
Documentation analyst
Organizes user manual content into clear summaries, with attention to model details, product context, and everyday usability.