Lighting / Fixtures
User Manual for Accord Lighting 1321LED Pendant
Quick guide for the Accord Lighting 1321LED pendant light. Includes installation steps, height adjustment, electrical wiring instructions, and technical specifications.
Table of contents
Manual images
Click an image to enlargeQuick Guide
This document provides installation and safety instructions for the Accord Lighting 1321LED pendant. The fixture must be installed by a qualified electrician in accordance with local codes. Ensure the mains supply voltage is compatible with the fixture requirements before starting.
Installation
Follow these steps to install the fixture on the ceiling:
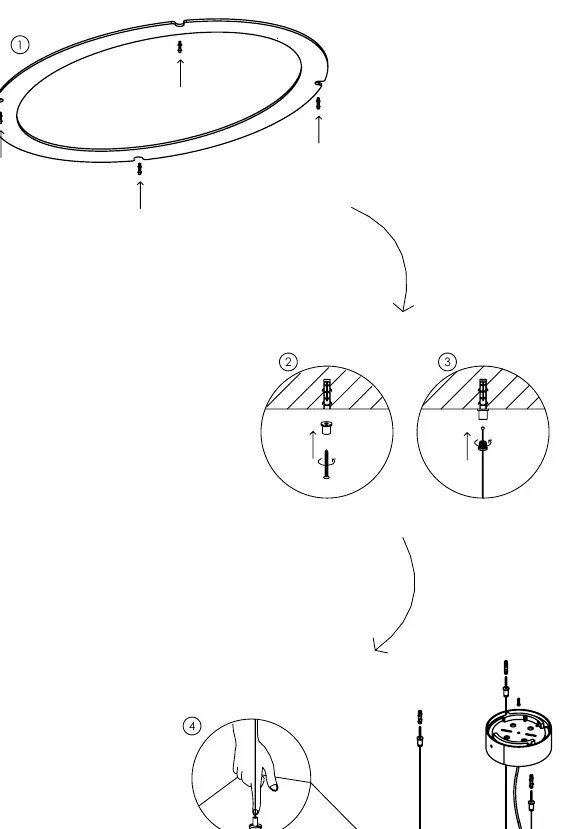
- Turn OFF the power before starting the installation.
- Align and mark the position of the holes on the ceiling where anchors will be installed.
- Drill using an 8mm drill bit and install the supplied plastic plugs.
- Screw the anchors into the plastic plugs.
- Pass the support steel cables through the holes on the anchors, ensuring the ball-end of the cables is on the inner part. Screw these assemblies into each anchor fixed on the ceiling.
- Insert the other end of each cable into the adjustable anchors mounted on top of the luminaire until they are tight.
- Reserve extra cables by wrapping them inside the luminaire. Ensure cables do not touch any electrical connections.
Height Adjustment
To adjust the height (H) of the luminaire:
- Push on the anchor to release tension.
- While pressing the tip, move the cable until it reaches the desired length.
- Release the tip to lock the cable in place.
- Final adjustments can be made after the fixture is mounted.
Electrical Connections
Follow these steps to connect the wiring:
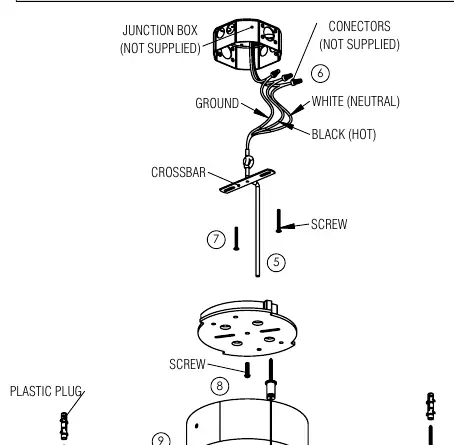
- Pass the power supply cable through the strain relief cone, threaded tube nipple, canopies, and crossbar.
- Attach the crossbar to the junction box using the supplied screws.
- Attach the base to the junction box using the supplied screws.
- Connect the electrical supply wires to the junction box in accordance with local codes (Black to Hot, White to Neutral, Ground to Ground).
- Bring the canopy to the ceiling and secure it by screwing the side of the canopy at its base.
- Turn ON the electrical power.
Technical Specifications
- Input Voltage: 110V or 277V
- Input Frequency: 60 Hz
- Total Power: 22W
- Luminous Flux: 858lm
- CRI: 90
- Color Temperature: 2700K, 3000K, 3500K, or 4000K
- Height Adjustment Limit: 160cm / 63in
- Isolation: Class II
Dimmer Compatibility
The LED driver included with this fixture is designed to operate with most standard dimmers. Always follow the power ratings and installation instructions provided by the dimmer manufacturer.
Practical help
Common problems
LED life reduction
Never touch the LED surface with bare hands during installation or maintenance.
Fixture height adjustment issues
Push on the anchor to release tension before moving the cable. Ensure the tip is released to lock the cable.
Excess cable management
Wrap extra cables inside the luminaire. Do not cut the excess off, but ensure cables do not touch electrical connections.
Before use
- Ensure electrical power is turned OFF at the main breaker.
- Verify the mains supply voltage is compatible with the fixture (110V or 277V).
- Ensure you have an 8mm drill bit for ceiling anchors.
- Confirm the ceiling structure can support the fixture weight.
- Ensure a qualified electrician performs the installation.
Specs in practice
- Height Adjustment Limit
- The maximum length the fixture can hang from the ceiling is 160cm (63 inches).
Images and diagrams
- Page 1 illustrates the ceiling anchor installation and the cable insertion process.
- Page 2 provides a wiring diagram showing the connection of the junction box, crossbar, and canopy.
Model compatibility
- Compatible with most standard dimmers.
- Designed for 110V or 277V mains supply.

Manual page author
Emily Carter
User documentation editor
Prepares concise manual descriptions and highlights the most useful setup, operation, and maintenance information for readers.