Lighting / Fixtures
Rutec VARDAFLEX Paket 4 - RGB LED Strip User Manual
Quick guide for the Rutec VARDAFLEX Paket 4 - RGB LED strip. Includes installation steps, connector assembly, technical specifications, and safety instructions.
Table of contents
Manual images
Click an image to enlargeImportant information from the manual
The Rutec VARDAFLEX Paket 4 - RGB is an LED strip system designed for dry indoor use. This manual provides essential instructions for installation, shortening the strip, and assembling the connectors. Always ensure installation is performed by a qualified electrician to maintain warranty coverage and safety.
Scope of delivery
- 1 x 5 meter LED strip
- 1 x LED power supply 24 V, 60 W
- 1 x Push-infeeder
- 1 x Push-connector
- 1 x Controller
- 1 x Remote control
Technical data
- Power supply: 24 V DC constant voltage
- Power: 36 W
- Current strength: 1.5 A
- Beam angle: 120°
- Quantity LED: 150
- Operating length: Maximum 5 meters per connection
- Dimensions: 5000 x 10 x 2.2 mm
- Bending diameter: 30 mm
Installation
Before installation, ensure the power is switched off and cannot be accidentally turned back on. The surface must be even, dust-free, grease-free, and dry. If the surface is current-carrying, apply an insulating layer between the LED strip and the surface.

- Prepare the surface.
- Shorten the LED strip if necessary.
- Remove the protective foil and press the LED strip on, avoiding direct pressure on electronic components.
- Connect the LED strip to the controller, then to the power supply.
Shortening the LED strip
Always switch off the power supply before shortening. The LED strip can be separated after every five LEDs (166.7 mm) at the marked points. Use a micro side cutter or a cutter if necessary.
Mounting the connector
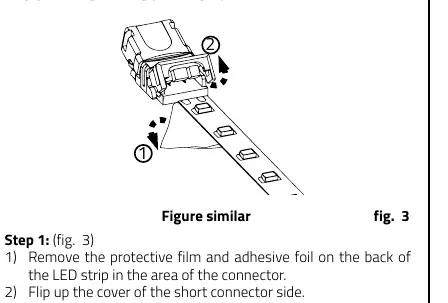
- Remove the protective film and adhesive foil on the back of the LED strip in the connector area.
- Flip up the cover of the short connector side.
- Insert the LED strip into the gap, ensuring it is flush at the back.
- Fold down the cover and press it down.
- Use a tool (e.g., pliers) to carefully press the connector together until a clicking sound is heard on both sides.
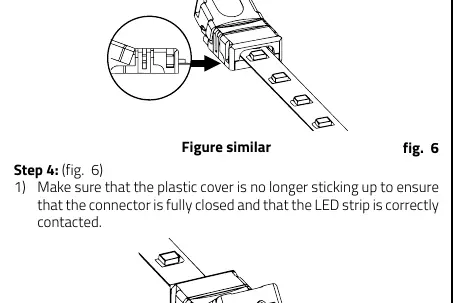
- Ensure the plastic cover is not sticking up and the strip is correctly contacted.
- Insert the cable into the connector, ensuring it is positioned at the very back and in the two notches.
- Close the cover and press the connector together in the center to secure.
Safety instructions
- Installation must be performed by a qualified electrician.
- The LED controller is not waterproof; protect it from direct sunlight and rain. For outdoor use, install in a waterproof housing.
- Ensure the installation location has good ventilation.
- Verify that the voltage and power adapter are suitable for the controller.
- Ensure correct polarity (anode and cathode) matches the controller.
- Do not connect cables while the power is on; check for short circuits before switching on.
- Do not attempt repairs yourself, as this invalidates the warranty.
Disposal
Dispose of electrical and electronic equipment in an environmentally sound manner. Contact your local authority for more information.
Manufacturer information
rutec Licht GmbH & Co. KG
Practical help
Common problems
LED strip does not light up
Check power supply connection, ensure correct polarity (anode/cathode), and verify controller connection.
Connector not closing properly
Ensure the LED strip is fully inserted into the gap and flush at the back before closing the cover.
Strip length exceeds capacity
The maximum operating length is 5 meters per connection. Do not exceed this length.
Before use
- Ensure installation area is dry and indoors.
- Verify the power supply is 24V DC.
- Check that the surface is even, dust-free, and grease-free.
- Ensure you have a qualified electrician for installation.
- Verify all components (strip, power supply, controller, remote) are present.
Images and diagrams
- Wiring Diagram: Shows connection from 230V AC to power supply, then to controller and LED strip.
- Connector Assembly: Detailed 8-step process for attaching the push-connector to the LED strip.
Model compatibility
- Not waterproof; requires a waterproof housing for outdoor use.
- Only connect LED strips in parallel.

Manual page author
Michael Turner
Technical manual editor
Reviews PDF manuals for structure, safety notes, and practical product details so readers can find the right information quickly.