Plumbing / Showers & Tubs
User Manual for American Standard 10-US-AS-3 Food Waste Disposer
Quick guide for the American Standard 10-US-AS-3 food waste disposer. Includes installation steps, wiring instructions, operating tips, and troubleshooting.
Table of contents
Manual images
Click an image to enlargeQuick Guide
This manual provides instructions for the American Standard 10-US-AS-3 food waste disposer. Before installation, ensure your electrical supply is 110-120V, 60Hz. The unit must be connected to a switch-controlled receptacle. Always follow safety precautions, including keeping hands out of the disposer and using long-handled tools to clear jams.
Installation of Mounting Assembly
The mounting assembly is pre-assembled at the factory. Pay close attention to the order of parts: Sink Flange, Fiber Gasket, Support Flange, Upper Mount Ring, Retainer Ring, Cushion Ring, and Lower Mount Ring.
- Clean the sink area thoroughly.
- Apply plumber's putty to the underside rim of the sink flange.
- Push the sink flange into the sink opening and hold it down with a heavy object.
- From under the sink, install the Fiber Gasket, Support Flange, and Upper Mount Ring.
- Attach the Retainer Ring by snapping it into the groove of the sink flange.
- Tighten the three Mount Screws evenly against the Support Flange.
Dishwasher and Discharge Elbow Connection
If using a dishwasher, knock out the plug using a blunt instrument (steel punch or wooden dowel) before installation. Connect the waste elbow to the disposer by sliding the flange against the rubber gasket and tightening the screws. Connect the dishwasher hose using a hose clamp and ensure all plumbing connections are tight.
Electrical Connections
Plug-in Models: Ensure the unit is plugged into a properly grounded outlet controlled by a switch.
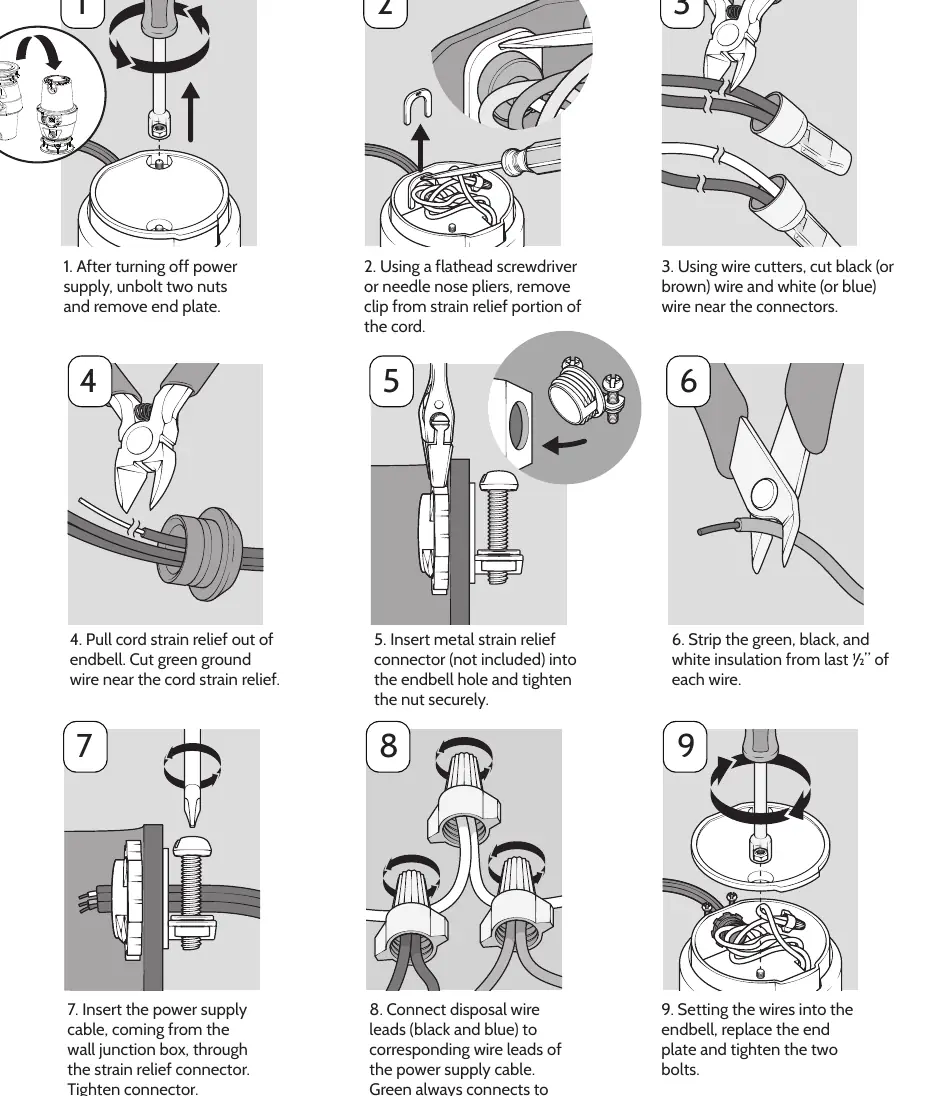
Permanent Wire Installation: If not using a plug, the unit must be hardwired. Turn off power at the breaker. Open the end bell plate, install a cable fitting, and connect wires: black/blue to the power supply lead, and green to the green ground screw. Ensure all wiring complies with local electrical codes.
Operating Instructions
To operate, remove the sink stopper, turn on a medium flow of cold water, and switch the disposer to ON. Scrape in food waste. After grinding, let the water and disposer run for approximately 15 seconds to flush the drain. Do not use hot water while the disposer is running.
Cleaning and Maintenance
The motor is permanently lubricated and does not require oil. The unit is self-cleaning. Never put lye or chemical drain cleaners into the disposer, as they cause corrosion. Mineral deposits on the turntable are normal and do not indicate rust.
Troubleshooting
- Unit does not start: Check the power supply, reset button (red button on the front), and ensure the turntable rotates freely.
- Loud noises: Usually caused by foreign objects (spoons, bottle caps). Turn off power, remove the splash guard, and retrieve the object with long-handled tongs.
- Leaks at top: Check sink flange seating, gasket, and support ring tightness.
- Leaks at elbow: Tighten the elbow flange screws.
Practical help
Common problems
Unit does not start
Check power supply, reset button on the front of the unit, and ensure the turntable rotates freely using a wooden broom handle.
Loud noises
Turn off power, remove splash guard, and use long-handled tongs to remove foreign objects like spoons or bottle caps.
Leaks at the top
Check if the sink flange is seated properly, the gasket is centered, or the support ring is tightened.
Leaks at the waste elbow
Ensure the elbow flange screws are tightened properly.
Before use
- Ensure electrical power is off before installation.
- Verify the sink flange is clean and dry.
- Confirm the splash guard is in place.
- Check that the electrical supply is 110-120V, 60Hz.
- Ensure the unit is empty before using the dishwasher.
Specs in practice
- Reset Button
- Located on the front of the disposer; press if the unit stops due to a jam or overload.
- Mounting System
- 3-Bolt Mount system.
Images and diagrams
- Mounting Assembly: Shows the correct order of parts from the sink flange down to the rubber gasket.
- Locking Mechanism: Illustrates how to rotate the lower mount ring to lock the disposer onto the upper mount ring.
- Permanent Wiring: Shows the step-by-step process of connecting the power supply cable to the disposer's internal wiring.
Model compatibility
- Do not grind: glass, plastic, metal, large bones, fibrous waste, or hot grease.
- Not recommended to use hot water while running the disposer.
- Air gap may be required for dishwasher installations depending on local plumbing codes.

Manual page author
Emily Carter
User documentation editor
Prepares concise manual descriptions and highlights the most useful setup, operation, and maintenance information for readers.