Garden / Gutter Systems
User Manual for AQUA FLO AQUV-12R22 and AQUV-20R22 Ultraviolet Disinfection System
Comprehensive user guide for the AQUA FLO AQUV-12R22 and AQUV-20R22 Ultraviolet Disinfection System. Includes installation instructions, water quality requirements, lamp replacement procedures, ballast operation, maintenance, and...
Table of contents
Manual images
Click an image to enlargeQuick Guide
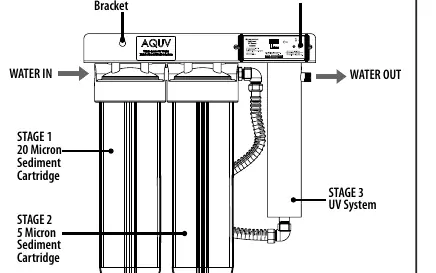
The AQUA FLO AQUV-12R22 and AQUV-20R22 are three-stage ultraviolet disinfection systems designed for point-of-entry (POE) water treatment. The system uses two sediment filters (20 micron and 5 micron) followed by a UV chamber to destroy pathogenic bacteria. The system requires a constant 110V AC power supply and should be installed on the cold water line. The UV lamp must be replaced annually, and the system includes a ballast with an integrated timer to track lamp life.
Safety Guidelines
- Electrical Safety: Always unplug the unit before cleaning or maintenance. Use a properly grounded, GFCI-protected outlet.
- UV Safety: Never look directly at the UV lamp when it is on. Do not operate the lamp outside the disinfection chamber.
- Handling: Handle the lamp and quartz dome by the ends using soft, dry gloves or a cloth. Fingerprints can reduce lamp life.
- Water Safety: If the system is shut off for several hours, follow the disinfection procedure before consuming water.
Water Quality Requirements
For the system to function effectively, the feed water must meet these minimum criteria:
- Turbidity/Suspended Solids: Less than 1 NTU.
- Hardness: Less than 7 GPG (120 mg/L). A water softener is recommended if hardness is higher.
- Iron & Manganese: Iron less than 0.3 PPM and Manganese less than 0.05 mg/L.
- Tannins and Colour: Must be removed by a pre-treatment system as they reduce UV transmissivity.
Installation
The system should be installed indoors in a protected area (above 4°C/40°F) on the cold water line. It must be wall-mounted vertically with the lamp connector at the top. Provide at least 3 feet of clearance above the unit for lamp replacement.
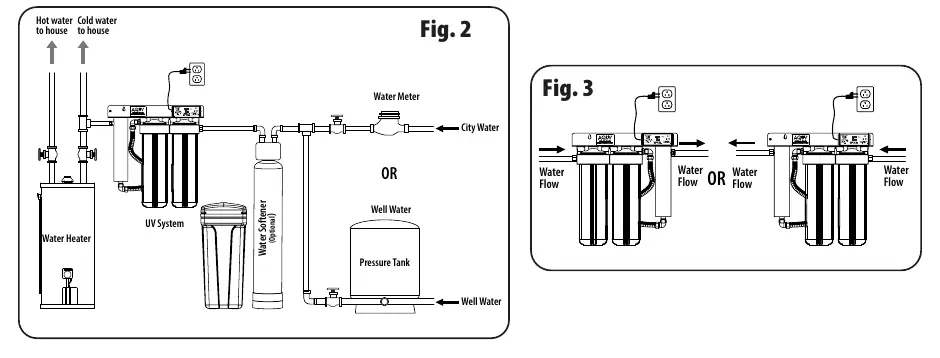
- Plumbing: Install bypass piping with a shut-off valve to allow for service. Use only Teflon tape for connections.
- Electrical: A dedicated circuit with a surge protector is strongly recommended.
- Mounting: Mount directly to a wall stud using the provided lag bolts. Do not mount on drywall without reinforcement.
Disinfection Procedure
Disinfect plumbing lines during initial installation, after power outages, or if the unit was shut off. Shut off the supply valve, depressurize the lines, remove the filter cartridge, and add 1-2 cups of unscented household bleach to the housing. Reinstall the housing, open the supply valve, and run water until chlorine is detected at all faucets. Let the solution sit for 6-8 hours, then flush the system thoroughly.
Ballast Operation
The ballast features an audio/visual alarm and a 365-day countdown timer.
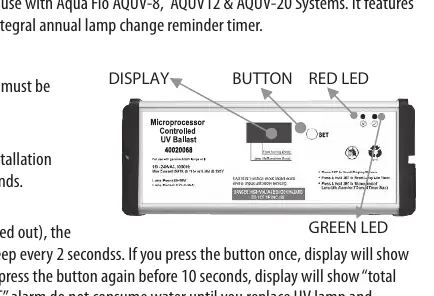
- Normal: Displays days remaining until lamp expiry.
- LF (Lamp Fault): Red LED on, beeping every 2 seconds. Indicates lamp is disconnected or defective.
- A3 (Lamp Expiry): Red LED on, beeping every 5 seconds. Lamp has expired; replace immediately.
- Resetting: After replacing the lamp, press and hold the button for ~10 seconds until "rSET" appears and a long beep sounds.
Maintenance
- UV Lamp: Replace annually when the display reaches 0.
- Quartz Dome: Clean at every lamp change. Replace every 3 years.
- Sediment Filters: Replace every 4-6 months or when pressure drops by 10 psi.
- O-Rings: Replace annually.
Troubleshooting
- Leak at gland nut: Hand-tighten gland nut and replace O-rings.
- Condensation: Normal in high humidity; install a dehumidifier.
- Hot water from taps: Flush water for 2 minutes after periods of non-use.
- Sump difficult to remove: Release pressure by opening a faucet; use a pipe on the wrench handle for extra leverage.
Technical Specifications
- Lamp Service Life: 9000 Hours.
- Max Operating Pressure: 100 psi.
- Water Temperature: 2 - 40°C (36-104°F).
- Reactor Material: 304 Stainless Steel.
Practical help
Common problems
Leak at gland nut
Hand-tighten the gland nut and replace the O-rings.
Condensation outside the UV chamber
This is normal in high humidity. Install a dehumidifier to protect the ballast.
Hot water coming out of taps
Flush water for about 2 minutes before use after long periods of non-use.
Sump is difficult to remove
Ensure the system is depressurized. Use a pipe on the wrench handle for extra leverage. Never use a wrench to tighten the sump.
Before use
- Ensure water quality meets minimum criteria (Turbidity < 1 NTU, Hardness < 7 GPG).
- Install on the cold water line only.
- Ensure a constant 110V AC power supply with a surge protector.
- Mount vertically with the lamp connector at the top.
- Provide 3 feet of clearance above the unit for lamp replacement.
- Use Teflon tape for all connections.
Specs in practice
- Lamp service life
- 9000 hours, which equates to approximately 1 year of continuous use.
- Maximum operating pressure
- 100 psi. Install a pressure regulator if pressure exceeds this.
- Water temperature range
- 2 - 40°C (36-104°F). Protect from freezing.
Images and diagrams
- Fig 1: Overview of the three-stage system components.
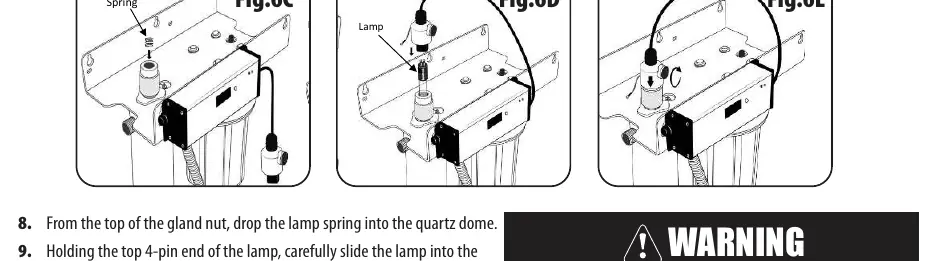
- Fig 4-6: Detailed steps for installing the quartz dome and lamp into the gland nut.
- Fig 2: Recommended installation layout with bypass piping.
Model compatibility
- Requires 5 micron sediment pre-filter for optimal performance.
- Use only genuine AQUA FLO AQUV lamps to avoid warranty voiding and safety risks.
- If using plastic pipes (e.g., PEX), use 6-12 inches of UV-resistant material (e.g., copper) at the inlet/outlet.

Manual page author
Emily Carter
User documentation editor
Prepares concise manual descriptions and highlights the most useful setup, operation, and maintenance information for readers.