Automotive / RV Water Systems
Aussie Traveller 12V RV Water Pump
Quick guide for the Aussie Traveller 12V RV Water Pump. Includes installation steps, wiring instructions, plumbing setup, operation, maintenance, and troubleshooting for 7.6LPM and 11.4LPM models.
Table of contents
Manual images
Click an image to enlargeQuick Guide
The Aussie Traveller 12V RV Water Pump is designed for indoor use in recreational vehicles to transfer potable water. It is an on-demand pump that automatically primes and cycles based on system pressure. Always read the full manual before installation and operation to ensure safety and prevent voiding the warranty.

Installation
Proper installation is critical for performance and safety. Follow these steps:

- Mounting: Mount the pump on a solid surface in a dry, ventilated area. It can be mounted in any horizontal position. If mounting vertically, ensure the pump head is facing down to prevent fluid from entering the motor in case of a leak. Secure with #8 fasteners, ensuring the rubber feet are not over-compressed to maintain vibration isolation.
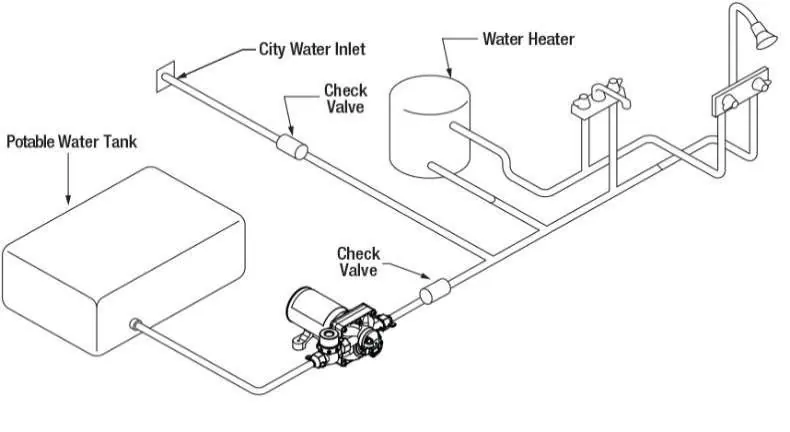
- Plumbing: Use flexible, potable-water-rated tubing. Rigid pipe is not recommended. Use the included swivel or quick-connect fittings. A 50-mesh strainer is required to prevent debris from entering the system.
- Wiring: Connect the pump to a dedicated 12V DC circuit. Use #14 AWG (2.5mm²) wire or heavier. Connect the red wire to the positive (+) terminal and the black wire to the negative (-) terminal using twist-on wire nuts.
- Testing: Fill the tank with clean water, turn on the power, and check the entire system for leaks.
Operation
The pump operates automatically based on demand. When the faucet is opened, the pressure drops, and the pump starts. When the faucet is closed, the pump builds pressure and shuts off.
- Leaving Unattended: Always disconnect power and relieve system pressure if the pump will be left unattended.
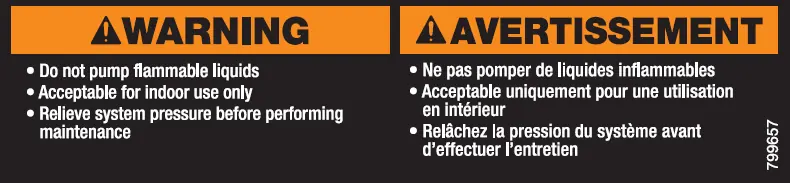
- Safety: Wear personal protective equipment when servicing. Do not operate the pump if it becomes clogged or inoperative; disconnect power immediately.
Storage and Sanitization
To prevent damage from freezing, prepare the pump for storage:
- Winterizing: Run non-toxic RV antifreeze through the system until fluid is distributed.
- Sanitizing: If the system has been in storage, sanitize it using a 5% sodium-hypochlorite solution (chlorine bleach). Mix the bleach with water according to the tank size (e.g., 1 cup of bleach per 40 gallons of water). Run the mixture through all lines, let it sit for at least 4 hours, then flush thoroughly with fresh water.
Troubleshooting
If you experience issues, follow these guidelines:
- Pump will not turn on: Check battery connections, wiring condition, fuse, and the pressure switch.
- Pump will not prime: Check for air leaks, ensure the tank is not empty, and check for clogged intake valves or tubes.
- Low pressure/flow: Inspect for air leaks, worn diaphragm or valves, and remove any restrictions in the tubing.
- Pump leaks: Tighten fasteners or replace seals/diaphragm.
- Rough operation: Ensure the pump is mounted on a rigid surface and that plumbing is flexible, not rigid.
Specifications
The pump is available in two models:
- 7.6LPM: 2.0 GPM flow, 60 PSI max pressure, 3/4" QC ports.
- 11.4LPM: 3.0 GPM flow, 55 PSI max pressure, 1/2" NPS-M ports.
- Common Specs: 12V DC, 5.5A average draw, 9.5A max draw.
Practical help
Common problems
Pump will not turn on
Check battery connections, wiring condition, fuse, or replace the pressure switch.
Pump will not prime
Check for air leaks, ensure the water tank is not empty, or remove obstructions in the intake.
Low pressure/flow
Check for air leaks, worn diaphragm/valves, or restrictions in the tubing.
Pump leaks
Tighten fasteners or replace the pump seals/diaphragm.
Rough operation
Mount the pump on a rigid surface, tighten the pump head, or replace rigid plumbing with flexible tubing.
Before use
- Inspect hoses and fittings for cracks or leaks.
- Ensure the system is flushed and sanitized.
- Verify power is OFF before inspection or servicing.
- Check that the tank has clean potable water.
- Ensure the pump is mounted on a solid surface.
Specs in practice
- 7.6LPM / 11.4LPM
- Maximum flow rate capacity of the specific pump model.
- 1/2" NPS-M / 3/4" QC
- Port connection types for plumbing.
Images and diagrams
- Plumbing Schematic: Illustrates the connection of the pump to the potable water tank, city water inlet, and water heater.
- Wiring Diagram: Shows the connection of the red (positive) and black (negative) wires to the power supply.
Model compatibility
- For indoor use only.
- Use flexible tubing; rigid pipe is not recommended.
- Requires a potable water approved 50-mesh strainer.
- If using a check valve, cracking pressure must be no more than 2 psi (0.14 bar).

Manual page author
Michael Turner
Technical manual editor
Reviews PDF manuals for structure, safety notes, and practical product details so readers can find the right information quickly.