Home Appliances / Small Kitchen Appliances
User Manual for Bella Pro Series 1.6QT Deep Fryer
Quick guide for the Bella Pro Series 1.6QT Deep Fryer. Learn how to assemble the basket, operate the fryer, clean the unit, and find cooking times for various foods.
Table of contents
Manual images
Click an image to enlargeQuick guide from the manual
This deep fryer is designed for household use only. Before first use, ensure all packaging is removed, and the oil tank and basket are cleaned and dried thoroughly. Always operate on a flat, heat-resistant surface and keep the appliance at least 4 inches away from walls. Never use the appliance to boil water.
Getting to know your deep fryer
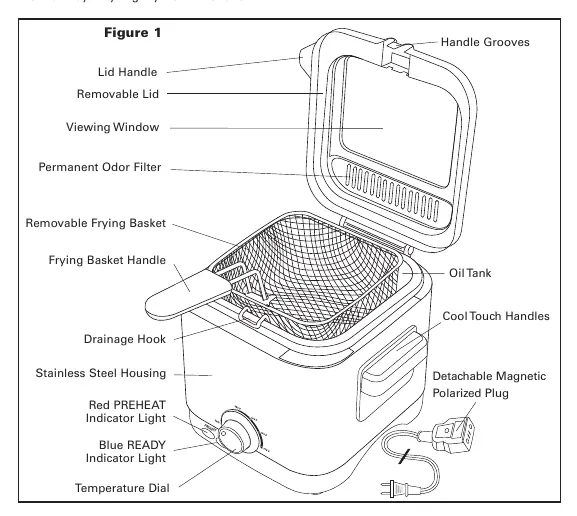
The unit features a stainless steel housing, a removable frying basket with a handle, a lid with a viewing window and odor filter, and a temperature dial with PREHEAT and READY indicator lights. The power cord is a detachable magnetic type for safety.
Assembling the frying basket handle
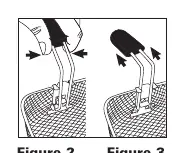
The handle is shipped in the storage position. To assemble: hold the arms of the handle inside the frying basket, squeeze them to fit into the eyelets, and push the handle against the back of the basket until it locks into place.
Operating instructions
- Place the appliance on a clean, dry, flat surface.
- Remove the frying basket and pour 1.5 liters (6 cups) of cooking oil into the tank, ensuring the level is between the MIN and MAX marks.
- Set the temperature dial to MIN.
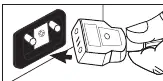
- Connect the magnetic power cord to the appliance (ensure THIS SIDE UP is facing up) and plug into a 120V AC outlet.
- Turn the dial to the desired temperature and wait 7-10 minutes for preheating.
- Once the READY light illuminates, place food in the basket, lower it into the oil, and close the lid.
- When cooking is complete, lift the basket using the handle, hook it to the rim to drain for 5-10 seconds, and remove the food.
Care and cleaning
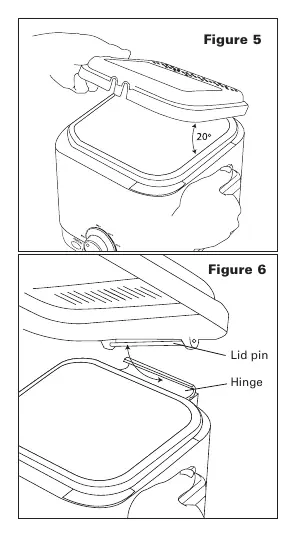
Always allow the unit to cool completely before cleaning. The frying basket and lid are dishwasher-safe. To remove the lid for cleaning, open it to a 20-degree angle and pull the lid pin up and out of the hinge. Never immerse the appliance housing in water. Use a stiff nylon brush to clean the oil tank with hot, soapy water.
Helpful hints
- Fry smaller batches for better results.
- Pat food dry before frying to prevent oil spattering.
- Do not mix different types of oil.
- Do not add salt or spices to food while it is frying or draining.
- Label oil containers with the type of food previously fried to avoid flavor transfer.
Manufacturer information
bella PRO
Practical help
Common problems
Appliance does not operate
Ensure the detachable power supply cord is properly attached to the appliance receptacle.
Oil temperature is too high
Check the oil level; it must be between the MIN and MAX fill lines. Add oil if necessary.
Oil bubbles over
Do not fill oil above the MAX line, do not overfill the frying basket, and ensure food is patted dry before frying.
Food tastes greasy or not crisp
Use high-quality oil (vegetable, canola, or corn), fry smaller batches, and ensure the unit has preheated to the correct temperature.
Before use
- Remove all packing materials and labels.
- Clean the oil tank with a damp cloth and wipe dry.
- Wash the lid and frying basket in hot soapy water or the dishwasher.
- Ensure the oil tank is completely dry before adding oil.
- Assemble the frying basket handle.
Images and diagrams
- Figure 1: Overview of the deep fryer components including lid, basket, oil tank, and controls.
- Figure 2 & 3: Assembly steps for the frying basket handle.
- Figure 4: Correct orientation for connecting the magnetic power cord.
- Figure 5 & 6: Lid removal and replacement procedure.
Model compatibility
- Use only with 120V AC electrical outlets.
- Do not use an extension cord.
- Use only high-quality oils like vegetable, canola, or corn oil.

Manual page author
Emily Carter
User documentation editor
Prepares concise manual descriptions and highlights the most useful setup, operation, and maintenance information for readers.