Garden / Water Features
Installation Guide for Blue Thumb 1-IYL Real Stone Tall Triple Fountain Kit
Comprehensive installation and maintenance guide for the Blue Thumb 1-IYL Real Stone Tall Triple Fountain Kit. Includes step-by-step instructions for basin excavation, plumbing, fountain placement, and system care.
Table of contents
Manual images
Click an image to enlargeQuick Guide and Important Information
This manual provides instructions for installing the Blue Thumb Real Stone Tall Triple Fountain Kit. Before beginning, ensure you have access to water and electricity near the installation site and check for underground utilities. The kit includes specific tubing lengths (8', 7', and 5') corresponding to fountain heights, with the longest hose intended for the tallest fountain. A support stand is required for any stone fountain 36 inches or taller.
Basin Installation
1. Location and Excavation: Choose a location near water and electricity. Trace the basin outline with marking paint. Dig a hole slightly wider and as deep as the basin, ensuring the bottom is level. Remove sharp rocks or roots.
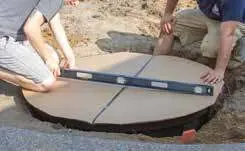
2. Leveling and Backfilling: Level the bottom of the hole, adding sand or gravel if necessary. Tamp the ground to prevent settling. Place the basin in the hole and verify it is level. Backfill around the basin with excavated soil or self-compacting material like pea gravel, compacting regularly with a tamper.
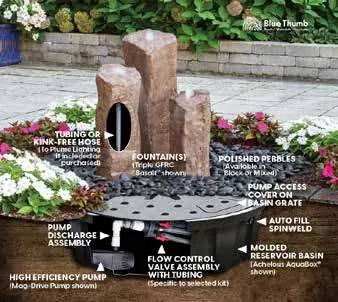
Plumbing and Grate Setup
1. Grate Orientation: Identify the top side of the grate, which features a lip for the Pump Access Cover. The grate halves are designed to meet over two support columns.
2. Plumbing Connections: The Triton Assembly includes three barbed connectors with flow control valves. Slide the 3/4 inch tubing onto the barbed connectors, ensuring no kinks or twists. Attach the 90-degree elbow discharge assembly to the pump and connect the 3-way splitter valve.
3. Finalizing Grate: Place the PVC center support under the grate for added strength. Pull the tubing through the grate so it extends about 12 inches above the basin.
Fountain Installation
1. Without Lighting: If the fountain is 36 inches or taller, slide the stone column onto the provided support stand. Feed the tubing from the bottom to the top of the column, ensuring it extends 1-2 inches past the top. Secure the tubing using the 1-inch tubing extension and O-ring.
2. With Lighting: If installing a lighting kit, no O-ring or extender is needed. Feed the light cord through the top of the fountain and down through the stand. Connect the tubing to the barbed connector and ensure the light sits just below the opening.
Testing and Maintenance
1. Testing: Fill the basin with water to the bottom of the grates. Plug in the pump and adjust the flow using the red valve keys on the Triton assembly. Use plastic shims to level the fountains if necessary.
2. General Maintenance: Regularly check water levels to prevent pump failure. Use Muck Buster (PB2682) every few weeks to prevent muck buildup and Algae D-Solv (PB2002) to manage algae. An optional Auto Fill Kit (ABDAUTO) can be installed to maintain water levels automatically.
3. Winterizing: In freezing climates, remove the pump and store it in a bucket of water in a non-freezing location. Do not drain the basin; allow the water to freeze to prevent the basin from shifting.
Practical help
Common problems
Water level drops below pump
Check for leaks or excessive evaporation. Refill water or install an Auto Fill Kit (#ABDAUTO).
Algae buildup on columns
Brush off columns and use Crystal Clear Algae D-Solv (#PB2002).
Muck buildup in basin
Add Muck Buster (#PB2682) every couple of weeks.
Uneven water flow
Use the included plastic shims to level the fountains.
Before use
- Locate fountain near water and electricity sources.
- Check for underground utilities before digging.
- Ensure the basin bottom is level and compacted.
- Clean the basin of all dirt and debris before filling.
- Verify tubing has no kinks or twists.
- Ensure the longest hose is connected to the tallest fountain.
Specs in practice
- Tubing Lengths
- Fixed lengths of 8', 7', and 5' provided; longest hose must go to the tallest fountain.
- Support Stand
- Required for all stone columns 36 inches or taller.
- Auto Fill Kit (#ABDAUTO)
- Optional accessory to automatically maintain water levels.
Images and diagrams
- Triton Assembly: Features 3 barbed connectors with flow control valves for adjusting individual fountain water flow.
- Grate Orientation: The top side has a specific lip where the Pump Access Cover rests.
Model compatibility
- Support Stand is required for fountains 36 inches or taller.
- Auto Fill Kit (#ABDAUTO) is compatible with this system.

Manual page author
David Miller
Documentation analyst
Organizes user manual content into clear summaries, with attention to model details, product context, and everyday usability.