Tools / Power Tools
Bosch GWS 12V-76 Professional Angle Grinder User Guide
Quick guide for the Bosch GWS 12V-76 Professional angle grinder, covering battery installation, disc mounting, safety warnings, and operation instructions.
Table of contents
Manual images
Jump to the sectionQuick guide from the manual
This document provides essential information for the safe and efficient use of the Bosch GWS 12V-76 Professional angle grinder. It covers assembly, operation, and maintenance. Always read the full manual for complete safety instructions.
Device description
The GWS 12V-76 is a cordless angle grinder designed for cutting and roughing metal, stone, wood, plastic, non-ferrous metals, and tiles without water. It features a spindle lock, battery charge indicator, and temperature/overload protection.

Assembly
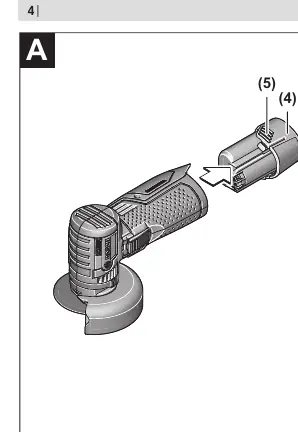
Battery: Insert the charged battery into the handle until it clicks into place. To remove, press the release buttons and pull the battery out.


Protective Guard: For cutting, always use the cutting guard (10) attached to the grinding guard (7). No tools are required for adjustment.
Abrasive Tools: Clean the grinding spindle (8) before mounting. Use the spindle lock button (2) to fix the spindle while tightening or loosening the clamping bolt (11) with the hex key (13).
Operation
Switching On/Off: Push the switch (3) forward to start. To lock, push the front of the switch down until it clicks. To switch off, release the switch or press the back of the switch if locked.
Temperature/Overload Protection: The red LED (6) indicates battery overheating or motor overload. If it lights up permanently, the battery is too hot; if it flashes, the tool is blocked.
Maintenance
Always remove the battery before performing maintenance. Keep the tool and ventilation slots clean for safe operation.
Manufacturer information
Bosch
Practical help
Common problems
Tool stops automatically (LED flashes red)
The tool is blocked. Remove it from the workpiece and clear the blockage.
Tool stops automatically (LED lights red)
Battery is overheated. Switch off the tool and allow the battery to cool down.
Before use
- Ensure the battery is fully charged.
- Check that the abrasive tool is correctly mounted and rotates freely.
- Perform a test run for at least 1 minute without load.
- Ensure the protective guard is securely attached and adjusted.
- Verify that the abrasive tool does not touch the guard or other parts.
Specs in practice
- Max. disc diameter
- 76 mm; do not use larger discs.
- Mounting diameter
- 10 mm; must match the mounting flange.
Images and diagrams
- (1) Direction of rotation arrow
- (2) Spindle lock button
- (3) On/off switch
- (6) Battery charge indicator
- (10) Cutting guard
Model compatibility
- Use only GBA 12V series batteries.
- Use only recommended chargers (GAL 12..., GAX 18...).
- Do not use adapters or reducers for mounting discs.

Manual page author
Emily Carter
User documentation editor
Prepares concise manual descriptions and highlights the most useful setup, operation, and maintenance information for readers.