Tools / Power Tools
Bosch GPO 12V-77 Professional Polishing Machine User Guide
Quick guide for the Bosch GPO 12V-77 Professional Polishing Machine, covering setup, operation, speed settings, timer configuration, and maintenance.
Table of contents
Quick guide from the manual
The Bosch GPO 12V-77 is a professional cordless polishing machine designed for polishing coated surfaces. This guide provides essential information for safe and efficient operation.
Device Description
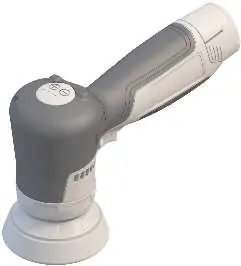
The device features an on/off switch with a locking mechanism, a spindle with a rotation direction arrow, a polishing disc, a handle with an insulated gripping surface, an LED indicator, and buttons for speed and timer settings.
Operation
To start the tool, press the on/off switch. Use the locking mechanism to keep the switch in the 'on' position. To switch off, release the switch or, if locked, press it briefly and release. Always check polishing tools for proper mounting and free rotation before use. Perform a one-minute test run without load.
Speed and Timer Settings
The tool allows for speed preselection and permanent speed settings using the two control buttons. A timer can also be set for automatic shutdown. Detailed instructions for entering the settings menu and saving preferences are provided in the full manual.
Assembly and Maintenance
Always remove the battery before performing any maintenance or changing accessories. To change the polishing pad, lift it from the side and pull it off the polishing disc. To change the polishing disc, hold the spanner flat with an open-ended spanner and turn the disc to remove or tighten it.
Safety
Always wear safety goggles. Keep the work area clean and well-lit. Avoid using the tool in explosive atmospheres. Ensure the tool is switched off before inserting the battery. Keep the tool and ventilation slots clean for safe operation.
Manufacturer information
Bosch
Practical help
Common problems
Tool stops or speed is reduced during use.
The tool is likely overloaded or the battery temperature is outside the permitted range. Switch off, allow the battery to cool, and restart.
Battery charge indicator shows red or yellow.
Yellow indicates the battery is almost empty (1-20%); red indicates it is empty (0-1%). Replace or charge the battery.
Tool vibrates or runs unevenly.
Check that the polishing tool is mounted correctly and is not damaged. Do not use damaged or vibrating tools.
Before use
- Ensure the polishing tool is correctly mounted and rotates freely.
- Perform a one-minute test run without load.
- Check that the battery is fully charged.
- Ensure the work area is clean and well-lit.
- Wear appropriate personal protective equipment, including safety goggles.
Specs in practice
- Rated voltage
- 12V DC, indicating the battery system required.
- Max. polishing disc diameter
- 77 mm, the maximum size of the disc that can be used.
Images and diagrams
- Figure A: Changing the polishing pad.
- Figure B: Disassembly of the polishing disc using the spanner.
- Figure C: Assembly of the polishing disc using the spanner.
- Figure D: Proper holding positions for fatigue-free work.
Model compatibility
- Use only GBA 12V series batteries.
- Use only recommended chargers (GAL 12V, GAX 18 series).

Manual page author
Emily Carter
User documentation editor
Prepares concise manual descriptions and highlights the most useful setup, operation, and maintenance information for readers.