General / Other Manuals
User Manual for Bresser 9652100 Digital Microscope with LCD
Quick guide for the Bresser 9652100 Digital Microscope with LCD. Includes assembly, power setup, PC connection, WIFI, zoom, and troubleshooting.
Table of contents
Manual images
Click an image to enlargeQuick guide from the manual
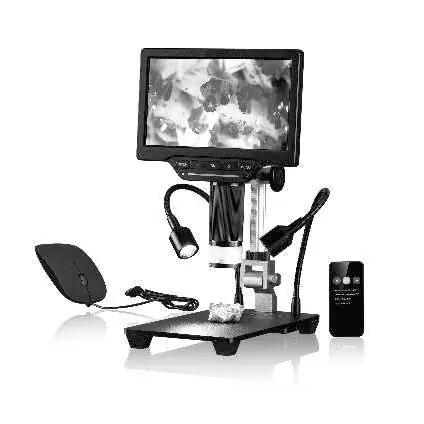
The Bresser 9652100 is a digital microscope with an integrated LCD screen, designed for magnified observation of objects. It supports image and video recording, WIFI connectivity, and PC integration. Before use, ensure the device is placed on a stable, level, and vibration-free surface.
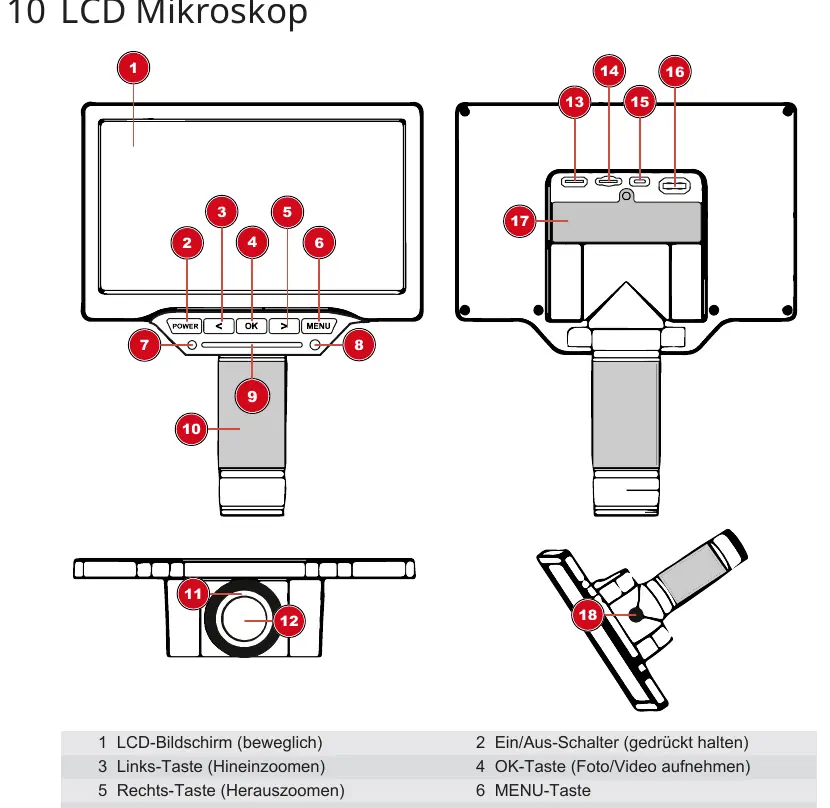
Parts overview
The microscope consists of the LCD microscope unit, a stand, a remote control, and a mouse. Key components include the zoom ring, coarse focus knob, LED ring illumination, and a touch bar for brightness control. The LCD screen is movable for optimal viewing angles.
Assembly
- Insert the LCD microscope into the holder on the stand.
- Hand-tighten the two fixing screws to secure the microscope.
- If observing taller objects, screw the supplied extension piece into the mounting thread first, then attach the rail to the extension piece.
Power supply
The device can be powered via USB or an optional 18650 Li-Ion battery.
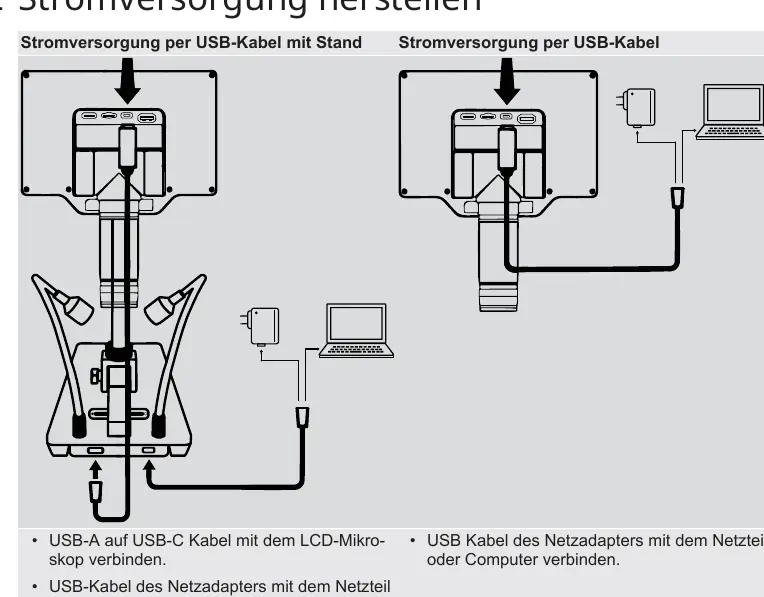
- USB Power: Connect the USB-A to USB-C cable to the microscope and the other end to a power adapter or computer.
- Battery Power: Remove the battery compartment cover, insert a 18650 battery (observing correct polarity), and replace the cover.
Lighting adjustment
The microscope features an LED ring light and two gooseneck LEDs on the stand. Use the LED touch bar on the stand or microscope to adjust brightness continuously. Use the diffuser to reduce reflections.
PC connection
Connect the microscope to a Windows PC via USB. Upon connection, the device can operate in two modes:
- USB UVC Mode: For live streaming/webcam usage.
- MSDC Mode: For mass storage access to photos and videos.
- Press the OK button to switch between modes.
WIFI function
To control the microscope via smartphone or tablet:
- Download the iSmartDV app (iOS or Android).
- Navigate to WIFI in the microscope menu and press OK.
- Connect your mobile device to the microscope's WIFI network (HG700PRO_xxxxx, password: 1234567890).
- Launch the app and select the microscope.
Zoom and focusing
The device offers both optical and digital zoom. Use the zoom ring for optical zoom and fine focusing. Use the left/right arrow buttons on the microscope for digital zoom (1x-16x). Always adjust the coarse focus knob on the stand to sharpen the image after changing the zoom level.
Recording and playback
The OK button can be assigned to take photos, videos, or freeze the image. To play back files, navigate to the Playback menu. Use the arrow buttons to navigate through files and the OK button to confirm actions.
Settings and measurement
The menu allows for advanced configuration, including image settings (exposure, white balance, effects), marking functions (crosshairs, lines), and measurement tools (point, line, shape, circle, angle). Use the mouse for easier navigation within these menus.
Troubleshooting
If the device fails to turn on, check the power connection or battery. If the screen is blank, ensure the monitor is on and set to HDMI output mode. If the touch bar is unresponsive, check for interference or moisture on fingers. If saving fails, format the SD/TF card.
Technical data
- Screen: 17.8 cm (7") LCD, 1024x600 resolution.
- Optical Zoom: 2x to 44x.
- Digital Zoom: 1x to 16x.
- Sensor: 4MP (2688x1512).
- Storage: microSD/TF card up to 64 GB.
- Power: 5V USB or 18650 battery.
Manufacturer information
Bresser GmbH
Practical help
Common problems
Microscope does not turn on
Check if the power is connected properly or if the battery is inserted correctly.
LCD screen shows nothing
Ensure the monitor is turned on and switched to HDMI output mode.
LED touch bar is unresponsive
Check if fingers are too dry or wet, ensure no interference sources are nearby, and use the supplied power adapter.
Cannot save images or videos
Format the SD/TF card or replace it with a new one.
Before use
- Place the device on a stable, level, and vibration-free surface.
- Check cables and connections for damage.
- Ensure the lens and filter are clean.
- Insert an 18650 battery if not using USB power.
- Ensure the lens is focused on the observation object.
Specs in practice
- Optical Zoom
- 2x to 44x magnification range using the zoom ring.
- Digital Zoom
- 1x to 16x magnification using software buttons.
- Working Distance
- 22mm to approx. 195mm from the object.
- Sensor Resolution
- 2688x1512 pixels (4MP).
Images and diagrams
- The parts overview diagram identifies the zoom ring, coarse focus, LED touch bar, and various ports.
- The power supply diagram shows connections for USB-C power via stand or direct cable.
Model compatibility
- Supports microSD cards up to 64 GB.
- Compatible with Windows PC via USB (UVC/MSDC modes).
- WIFI app: iSmartDV (iOS and Android).
- Optional battery: 1x Li-Ion 18650.

Manual page author
David Miller
Documentation analyst
Organizes user manual content into clear summaries, with attention to model details, product context, and everyday usability.