General / Other Manuals
User Manual for Bresser Analyth STR Trino Microscope
Quick guide for the Bresser Analyth STR Trino microscope. Learn how to set up illumination, adjust focus, mount a camera, and maintain your optical instrument.
Table of contents
Quick guide from the manual
The Bresser Analyth STR Trino is a stereo microscope designed for optical observation. Before use, ensure the device is placed on a stable, level surface. The microscope can be powered via the included power supply or by batteries (AA type). Always start observations at the lowest magnification (1x) and adjust the focus and dioptre settings for your eyes before proceeding to higher magnifications.
Parts Description
The microscope features several key components for operation:
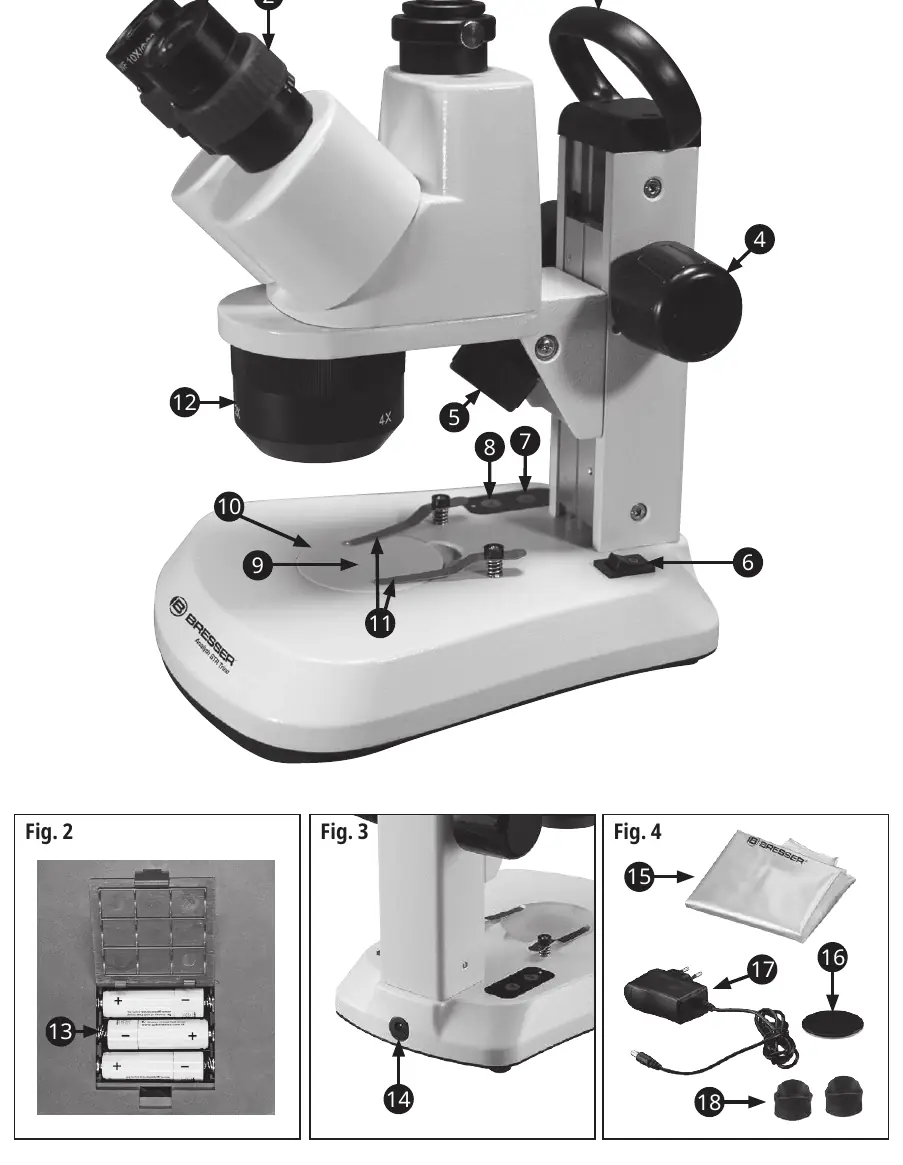
- 1: Eyepieces
- 2: Dioptre scale
- 3: Trinocular head
- 4: Focus wheel
- 5: Incident light illumination
- 6: On/Off switch
- 7 & 8: Brightness controls (incident and transmitted light)
- 9: Transmitted light illumination
- 10: Microscope stage with object plate
- 11: Object clamps
- 12: Rotatable lens holder
- 13: Battery compartment
- 14: Power supply connection
Setup and Illumination
Connect the power supply to a wall socket and then to the microscope's power connection (14). Use the main switch (6) to turn the device on. You can use incident light, transmitted light, or both simultaneously. Adjust the brightness for each light source independently using the control knobs (7 and 8). If using batteries, open the compartment (13) on the underside and ensure correct polarity. Note that rechargeable batteries are not charged by the microscope.
Observation and Adjustments
Place your object on the stage (10) and secure it with the clamps (11) if necessary. Rotate the lens holder (12) to select the desired magnification (1x, 2x, or 4x). To adjust for your vision:
- Set the dioptre scale (2) to the middle position.
- Close your left eye and use the focus wheel (4) to sharpen the image for your right eye.
- Close your right eye and use the dioptre ring to sharpen the image for your left eye.
If the microscope head slides down due to its weight, adjust the friction by turning the two focusing wheels in opposite directions.
Trinocular Head
The trinocular head allows for camera mounting. It is designed for adapters with a 23.2 mm diameter. Insert the camera and secure it with the knurled screw. If the camera is not parfocal with the eyepieces, use the focus knobs to correct the image, though this may blur the view through the eyepieces.
Cleaning and Maintenance
Keep the microscope free of dust and fingerprints. Clean the body with a slightly moistened soft cloth. Use a separate clean cloth with a small amount of alcohol to clean optical surfaces. Always cover the microscope with the dust cover when not in use.
Technical Data
- Eyepieces: 2x 10x
- Objectives: 1x, 2x, 4x (Stereo)
- Total Magnification: 10x, 20x, 40x
- Illumination: LED (approx. 20,000 hours lifespan)
Manufacturer information
Bresser GmbH
Practical help
Common problems
Microscope head slides down
Adjust the friction by turning the two focusing wheels in opposite directions.
Image is blurry
Adjust the dioptre scale and focus knobs; ensure the object is centered on the stage.
Camera image not parfocal
Use the focusing knobs to correct the image, or place very flat objects on a small pedestal.
Before use
- Place the microscope on a stable, even surface.
- Ensure the power socket is easily accessible.
- Check battery polarity if using battery power.
- Start observations with the lowest magnification (1x).
- Set dioptre scale to the middle position before focusing.
Specs in practice
- Magnification
- 10x, 20x, 40x (calculated by objective magnification multiplied by eyepiece magnification).
- Illumination
- LED light source with an approximate lifespan of 20,000 hours.
- Trinocular head
- Mounting fixture for cameras with 23.2 mm diameter adapters.
Images and diagrams
- Fig 1: Overview of microscope parts including eyepieces, focus wheel, and illumination controls.
- Fig 2: Battery compartment location on the underside of the microscope.
- Fig 4: Included accessories like dust cover, power supply, and rubber eyecups.
Model compatibility
- Compatible with Bresser MikroCam cameras using appropriate reducing lenses (0.5x, 0.75x, 1x).
- Trinocular head accepts adapters with a 23.2 mm diameter.

Manual page author
David Miller
Documentation analyst
Organizes user manual content into clear summaries, with attention to model details, product context, and everyday usability.