Lighting / Fixtures
Instruction Manual for Bresser Advance ICD 10x-160x Zoom Stereo Microscope
Comprehensive user manual for the Bresser Advance ICD 10x-160x Zoom Stereo Microscope, covering setup, operation, maintenance, and technical specifications.
Table of contents
Manual images
Jump to the sectionProduct Overview
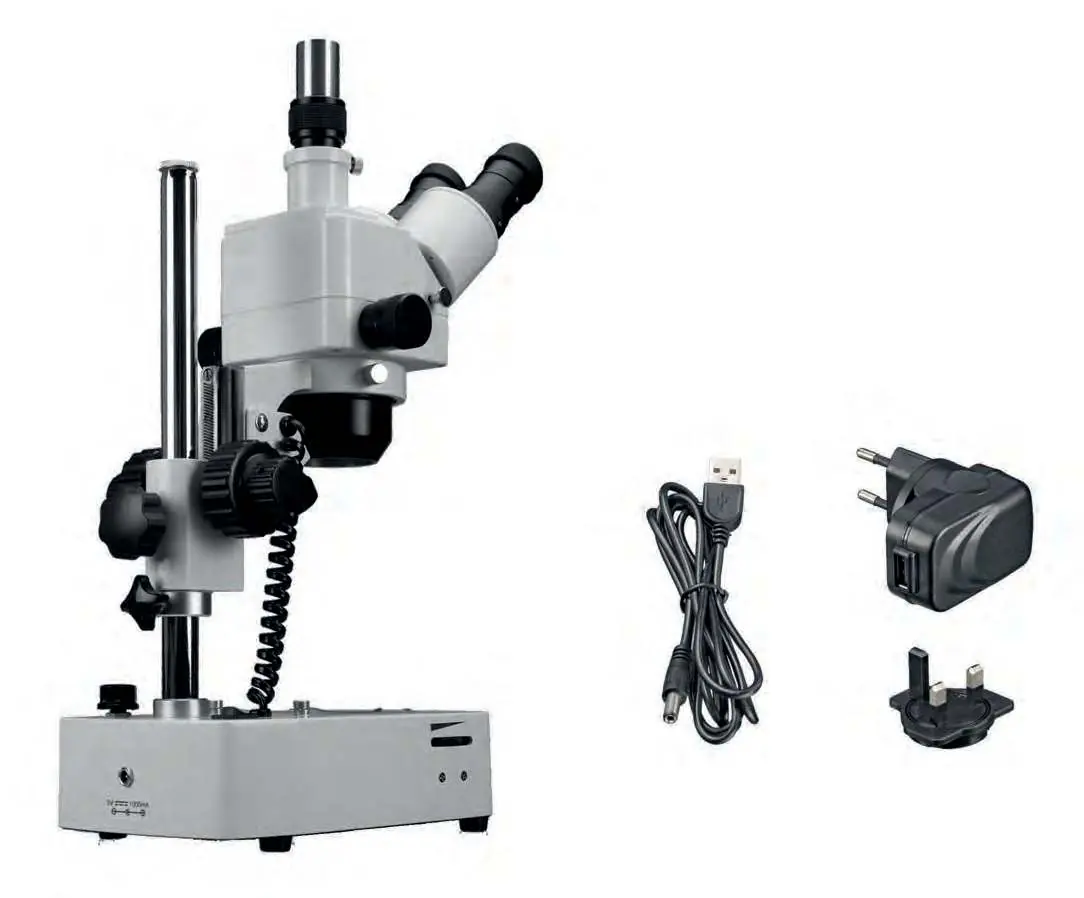
The Bresser Advance ICD 10x-160x is a high-quality zoom stereo microscope designed for both visual observation and digital imaging. It features a trinocular head, allowing for simultaneous viewing and camera attachment. The microscope is equipped with a continuously adjustable LED lighting system for both incident and transmitted light, ensuring optimal illumination for various specimens.
Setup and Operation
Before use, place the microscope on a flat, stable, and vibration-free surface. Ensure there is at least 10 cm of clearance around the device. Connect the microscope to a power source using the provided USB power cable and adapter. The microscope features a coaxial coarse and fine focusing mechanism for precise image sharpness. The interpupillary distance can be adjusted by shifting the eyepiece tubes to ensure comfortable, fatigue-free viewing.
Lighting and Magnification
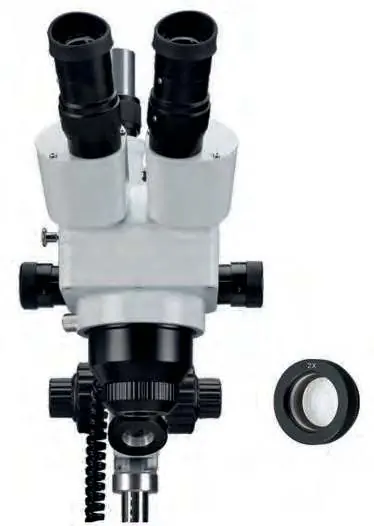
The microscope offers three lighting modes: incident light, transmitted light, or both simultaneously. The brightness can be adjusted using the integrated dimmer. Magnification is continuously adjustable between 1x and 4x using the zoom knobs. By combining the stereo zoom objective with the included 10x or 20x wide-field eyepieces and the 2x additional lens, a total magnification range of 10x to 160x is achievable.
Maintenance and Care
As a precision instrument, the microscope requires careful handling. Keep optical surfaces clean by blowing off loose dust and using a soft paper towel soaked in 30-70% pure alcohol for gentle cleaning. Do not apply cleaning solutions directly to the optical parts. When not in use, cover the microscope with the provided dust cover and store it in a dry, mold-free environment. For transport, remove all loose components and pack the device securely, preferably in its original packaging.
Manufacturer information
Bresser GmbH
Practical help
Common problems
Microscope head slides down due to its own weight.
Use the provided tool wrench to adjust the friction of the coarse drive by turning the adjustment ring on the inside of the coarse drive knob.
Image is not sharp or clear.
Ensure the diopter compensation is correctly adjusted for your eyes. Also, verify that the magnification is set correctly and the focus is adjusted using both coarse and fine drives.
Camera image sharpness differs from the eyepiece view.
Adjust the height of the trinotube using the knurled ring of the adapter until both the camera image and the eyepiece view are sharp.
Before use
- Ensure the surface is flat, stable, and non-combustible.
- Check that the power adapter is firmly attached to the plug adapter.
- Remove all packaging materials and check for completeness.
- Ensure the microscope is in a dry environment.
- Remove the dust cover from the trinotube if using a camera.
Specs in practice
- Magnification Range
- 10x to 160x, depending on the combination of eyepieces, zoom objective, and the 2x additional lens.
- Working Distance
- The distance between the objective and the specimen, typically 28-80 mm.
- Maximum Object Height
- The maximum height of a specimen that can be observed is approximately 230 mm.
Images and diagrams
- The microscope features a trinocular head with a bino/trino conversion lever to direct the light path.
- The coarse and fine focusing knobs are located on the side of the microscope arm.
- The LED lighting switch allows selection between incident, transmitted, or combined light modes.
Model compatibility
- The trinotube is compatible with various cameras; some may require specific adapters or reduction lenses.
- Only use the supplied 5V/1A power adapter to avoid damaging the LED lighting system.

Manual page author
Michael Turner
Technical manual editor
Reviews PDF manuals for structure, safety notes, and practical product details so readers can find the right information quickly.