Electronics / Video Transmission
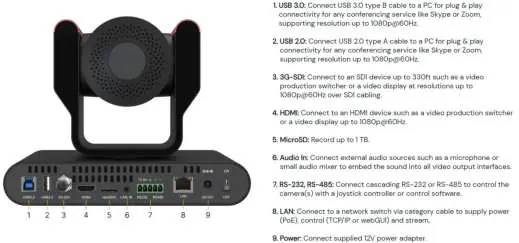
User Manual for BZBGEAR BG-ADAMO-JRND PTZ Camera
Comprehensive user guide for the BZBGEAR BG-ADAMO-JRND 1080P PTZ camera. Includes installation, auto-tracking setup, network configuration, streaming, and troubleshooting.
Table of contents
Manual images
Click an image to enlargeQuick Start Guide
The BZBGEAR BG-ADAMO-JRND is an ultra-high-definition PTZ camera. Upon power-on, the camera performs a self-check, panning and tilting to its home position. The remote control is paired by default; if re-pairing is needed, press the 'set' and '*' keys for 3 seconds. The default IP address for web access is 192.168.5.163.
Installation and Mounting
Wall Mounting: Ensure the bracket is mounted to a wooden or concrete wall. Use the provided anti-vibrate cushion, wall mounting bracket, and M6 bolts. Secure the camera to the bracket using the 1/4-20 UNC bolt.

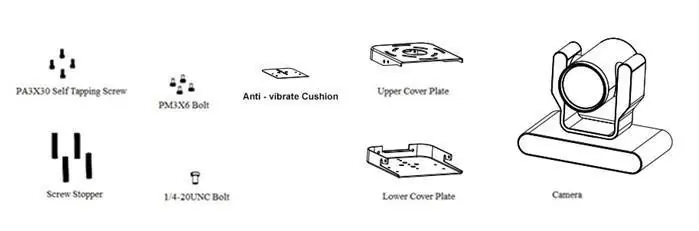
Ceiling Mounting: Follow the specific ceiling mounting instructions provided in the manual, ensuring the use of the upper and lower cover plates and appropriate screws.
Auto-Tracking Configuration
The camera features two auto-tracking modes accessible via the web interface under 'Track Configuration':
- Presenter Mode: Continuously tracks the subject. You can adjust the 'Headroom' setting (Low, Medium, High).
- Zone Mode: Holds the frame in predetermined zones. The camera moves only when the subject leaves one zone and enters another. Requires setting up at least 2 (up to 4) regions using the 'Set' button in the web interface.
Network and Web Interface
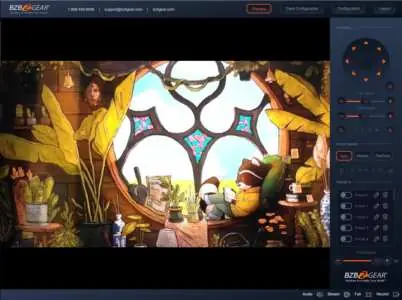
To access the web interface, ensure your computer is on the 192.168.5.x subnet. Enter 192.168.5.163 in your browser. Default administrator credentials are username 'admin' and password 'admin'. From here, you can configure network settings, video encoding, and system parameters.

Streaming and NDI
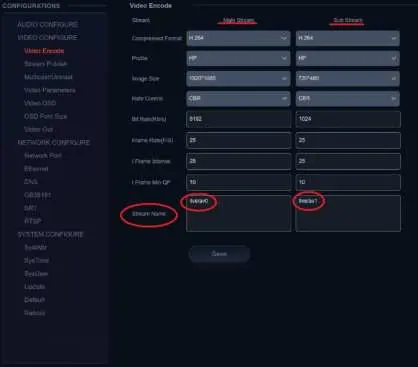
The camera supports multiple streaming protocols including RTSP and RTMP. Configure these under 'Video Encode' and 'Stream Publish' in the web interface. NDI is enabled by default; you can customize the NDI Name and Group in the NDI settings menu.
Serial Control
The camera supports RS232/RS485 control using VISCA, PELCO-D, and PELCO-P protocols. The manual provides detailed command packets for functions like Pan/Tilt, Zoom, Focus, and Preset management.
Maintenance and Troubleshooting
Maintenance: Clean the lens with a soft, dry cloth. Avoid strong or corrosive detergents. Disconnect power when not in use for extended periods.
Troubleshooting: If there is no video output, check power, PoE status, and cable connections. If the remote control fails, check batteries and ensure the camera is not in the OSD menu. For network issues, verify the subnet configuration.
Practical help
Common problems
No video output
Check power supply, ensure PoE is enabled on the switch, and verify output cables and display monitor.
Image distortion or shaky video
Ensure the camera is installed on a solid, stable surface and remove any objects transmitting vibration.
Remote control not working
Check batteries, verify remote address is set to 1, and ensure the camera is not currently in the OSD menu.
Cannot connect to web interface
Verify your computer is on the 192.168.5.x subnet and the camera is not using a conflicting IP address.
Before use
- Check power supply (12V/1.5A)
- Ensure stable mounting surface
- Verify network connection (if using IP)
- Pair remote control (if necessary)
- Format SD card to FAT32 (if recording)
Specs in practice
- Optical Zoom
- Available in 12X, 20X, or 30X optical zoom variants.
- Video Format
- Supports up to 1080P60 resolution via HDMI, SDI, and USB.
- Auto-Tracking
- Presenter mode tracks movement; Zone mode holds frame in specific regions.
Images and diagrams
- Interface layout (page 7) shows all physical ports.
- Wall mounting steps (page 9) illustrate the assembly sequence.
- Web interface configuration (page 14) provides a map of the menu structure.
Model compatibility
- SD card recording requires FAT32 formatting.
- Requires 192.168.5.x subnet for initial web access.
- Supports VISCA, PELCO-D, and PELCO-P protocols.

Manual page author
David Miller
Documentation analyst
Organizes user manual content into clear summaries, with attention to model details, product context, and everyday usability.