Furniture / Bedroom Furniture
Assembly Instructions for Charlton Home 5023 Living Room Set
Quick assembly guide for the Charlton Home 5023 2-Piece Living Room Set. Includes step-by-step installation instructions, parts list, and safety tips for proper setup.
Quick answers from the manual
Quick answer
- The Charlton Home 5023 is a 2-piece living room set that requires 2 people and approximately 20 minutes to assemble. Ensure all parts are present before starting and do not fully tighten screws until the final step. p. 1, 2
Key actions
- Assemble the frame and handrails p. 4
- Attach the feet p. 4
- Expand cushions p. 5
Where to find it in the PDF
- Assembly Instructions p. 1
- Parts List p. 3
- Installation Steps p. 4, 5, 6
Table of contents
Manual images
Click an image to enlargeQuick guide from the manual
This assembly guide provides instructions for the Charlton Home 5023 2-Piece Living Room Set. The assembly process is designed for 2 people and takes approximately 20 minutes to complete. Please ensure all parts are present and intact before beginning.
Safety and Preparation
- Check parts: Verify all components are present and undamaged before starting the installation.
- Tightening screws: During installation, exercise caution and do not fully tighten screws immediately. Secure all screws to 80% before final tightening.
- Returns: Returns are only accepted for items in their original, unopened condition.
Parts List
The package includes the following components:
- A, B, C, D: Main structural components (upholstered sections).
- E, F: Handrails.
- G: Cushion/Cover component.
- H: Feet (4 pieces).
- I: Cushion/Cover component.
- J: Washers (4 pieces).
- K: Washers (12 pieces).
- L: Screws (12 pieces).
- M: Allen key.
Installation Steps

Step 1-2: Handrails
Connect the handrails (E and F) to the main frame (A) using screws (L) and washers (K). Use the provided Allen key (M). Do not fully tighten the screws at this stage to ensure the back frame can be installed easily.
Step 3: Feet
Assemble the feet (H) to the base. Rotate and twist the feet inwards to secure them.
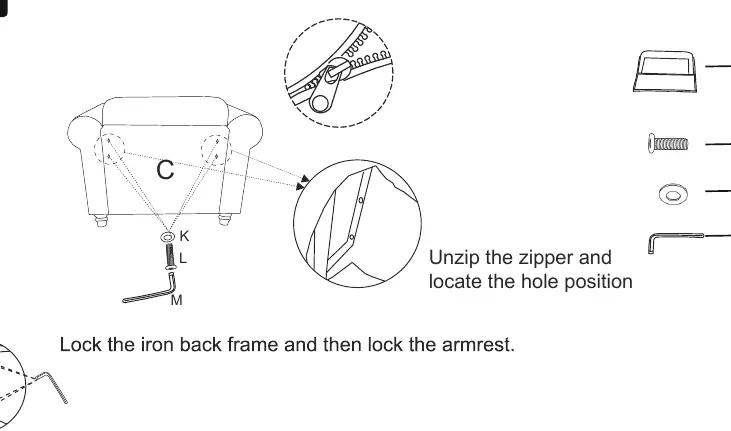
Step 4: Back Frame
Unzip the zipper to locate the hole position. Lock the iron back frame (C) and then lock the armrest. After securing the back frame, fully tighten the left and right armrests.
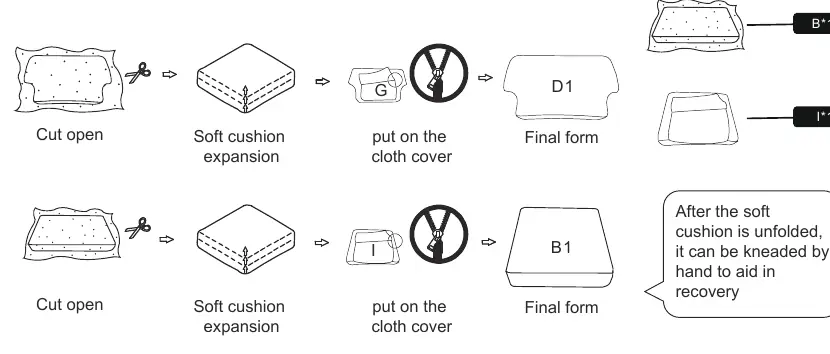
Step 5: Cushions
Cut open the soft cushion expansion packaging. Put on the cloth covers (G, B1). After the soft cushion is unfolded, it can be kneaded by hand to aid in recovery to its final form.
FAQ and Support
If you receive damaged or defective products, please retain the original box and contact support to initiate a damage claim. If you are unsatisfied with the product, contact support with your reasons for return to facilitate the process.
Practical help
Common problems
Damaged or defective parts upon delivery
Retain the original box and contact support immediately to initiate a damage claim.
Dissatisfaction with the product
Message the support team with your reasons for return to facilitate the process.
Before use
- Ensure all parts are present and intact before starting.
- Have 2 people available for assembly.
- Allow approximately 20 minutes for assembly.
- Do not fully tighten screws until the final assembly stage.
- Knead the cushions by hand after unfolding to aid in recovery.
Images and diagrams
- Steps 1-2: Attach handrails to the main frame using the provided Allen key.
- Step 3: Attach the feet to the base by rotating them inwards.
- Step 4: Secure the back frame and tighten all armrest screws.
- Step 5: Expand and cover the cushions.

Manual page author
Michael Turner
Technical manual editor
Reviews PDF manuals for structure, safety notes, and practical product details so readers can find the right information quickly.