Furniture / Living Room
Assembly Instructions for Charlton Home 10032-RS Cabinet End Table
Step-by-step assembly guide for the Charlton Home 10032-RS Cabinet End Table. Includes a complete parts list, hardware identification, and detailed instructions for frame, top, and shelf installation.
Table of contents
Quick guide from the manual
This document provides assembly instructions for the Charlton Home 10032-RS Cabinet End Table. Before beginning, ensure you have a clear, soft surface to work on to prevent scratching the furniture finish. You will need a hammer to tap the corner fasteners into place. The assembly process involves connecting the frame components, attaching the top, and installing the internal shelf and bottom panel.
Parts list
- A: Top Assembly
- B: (2) Side Frames
- C: Front Frame
- D: Back Frame
- E: Bottom Panel
- F: Middle Shelf
- G: (8) Shelf Supports
- H: (6) Bolts
- I: (6) Flat Washers
- J: (6) Lock Washers
- K: Allen Wrench
Assembly instructions
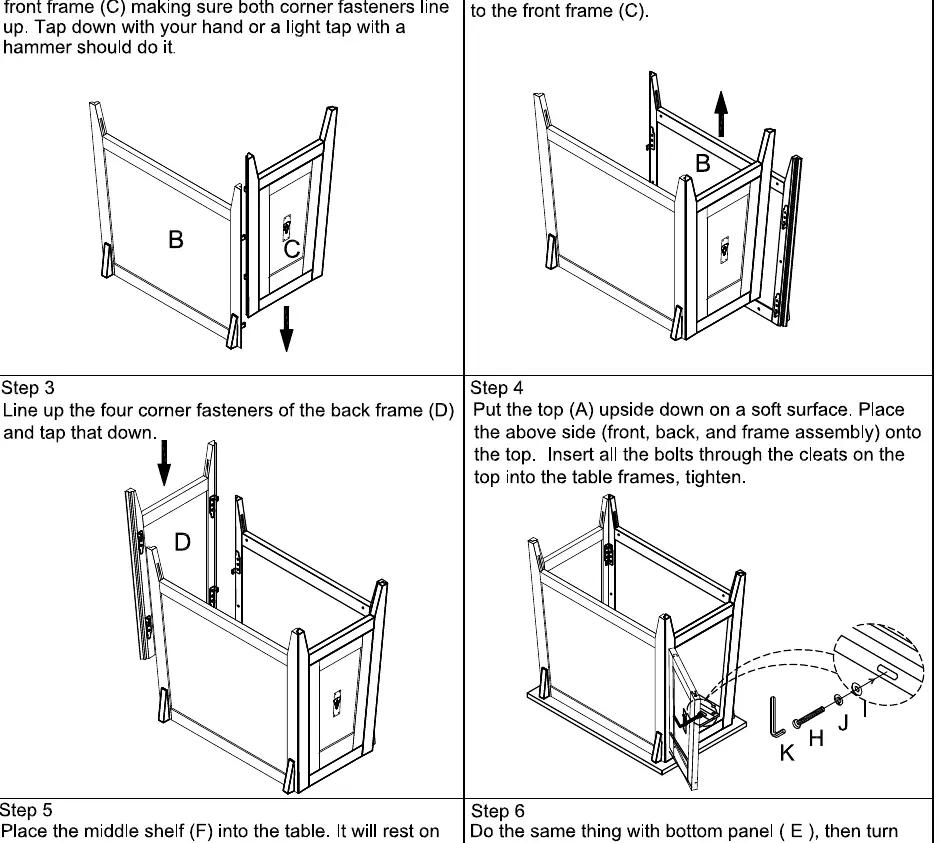
Step 1 and 2: Frame assembly
Assemble the unit upside down. Connect one side frame (B) to the front frame (C), ensuring the corner fasteners line up. Tap down with your hand or a light tap with a hammer to secure. Repeat this process for the second side frame (B) on the other side of the front frame (C).
Step 3: Back frame installation
Line up the four corner fasteners of the back frame (D) with the existing assembly and tap down to secure the back frame in place.
Step 4: Attaching the top
Place the top assembly (A) upside down on a soft surface. Position the assembled frame (front, back, and sides) onto the top. Insert all bolts (H) with flat washers (I) and lock washers (J) through the cleats on the top into the table frames. Tighten securely using the provided Allen wrench (K).
Step 5 and 6: Shelf and bottom panel
Insert the shelf supports (G) into the holes at the desired height. Place the middle shelf (F) onto the supports. Repeat the same process for the bottom panel (E). Once all components are secure, carefully turn the table right side up.
Practical help
Common problems
Frame components do not fit together
Ensure the corner fasteners are perfectly aligned before tapping them down. Use a light tap with a hammer if necessary.
Table feels wobbly after assembly
Check that all bolts (H) connecting the top assembly to the frame are tightened securely using the Allen wrench.
Before use
- Clear a soft surface for assembly to prevent scratching.
- Verify all parts (A-F) are present according to the parts list.
- Verify all hardware (G-K) is present.
- Have a hammer ready for tapping fasteners.
- Ensure you have the provided Allen wrench (K) for tightening bolts.
Images and diagrams
- The assembly requires tapping corner fasteners into place.
- The top assembly (A) is attached upside down to the frame.
- Shelf supports (G) are inserted into pre-drilled holes to hold the shelf and bottom panel.

Manual page author
David Miller
Documentation analyst
Organizes user manual content into clear summaries, with attention to model details, product context, and everyday usability.