Furniture / Living Room
Assembly Instructions for Charlton Home Hillcrest 2-drawer Night Stand
Quick guide for assembling the Charlton Home Hillcrest 2-drawer night stand. Includes parts list, hardware details, anti-tipping installation advice, and maintenance tips.
Quick answers from the manual
Quick answer
- This document provides assembly instructions for the Charlton Home Hillcrest 2-drawer night stand, including parts list, hardware, and safety installation. p. 1
Key actions
- Install anti-tipping hardware p. 1
- Install protective pads under legs p. 1
First start
- Check all parts and hardware before assembly. p. 1
Problems and fixes
Hardware missing
Check packing materials; contact dealer if still missing.
p. 1Maintenance and reset
- Periodically check and tighten all connections. p. 1
Where to find it in the PDF
- Assembly Instructions p. 1
Table of contents
Manual images
Click an image to enlargeImportant Information
Before beginning assembly, please verify that you have all parts and hardware listed. If any items appear to be missing, check the packing materials thoroughly before contacting your dealer. Do not tighten bolts until the assembly is completely finished to ensure proper alignment.
Parts and Hardware
The package includes the following items:
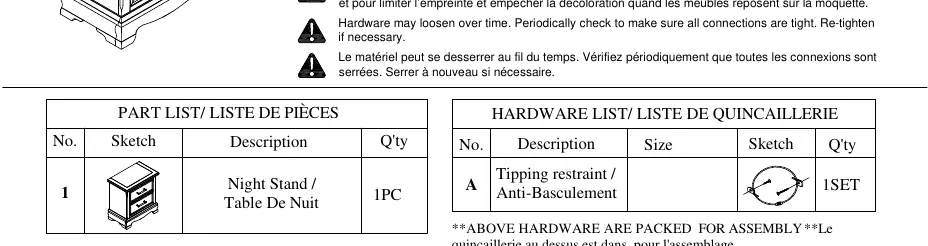
- Night Stand: 1 piece
- Tipping Restraint (Anti-Basculement): 1 set
The anti-tipping hardware pack is located at the back panel of the unit. Please refer to the specific installation instructions included within that hardware pack.
Assembly Instructions
Follow these steps to assemble your night stand:
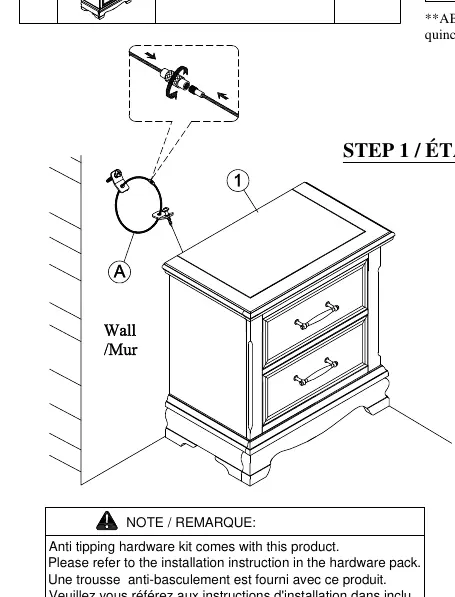
- Step 1: Attach the anti-tipping restraint to the back panel of the night stand and secure it to the wall according to the instructions provided in the hardware pack.
- Ensure all connections are properly aligned before tightening the bolts.
Safety and Maintenance
- Protective Pads: It is recommended to install protective pads under all legs and supports. This helps prevent damage or scratches on wood floors and limits indentation or discoloration on carpets.
- Periodic Maintenance: Hardware may loosen over time. Periodically check all connections to ensure they remain tight. Re-tighten bolts if necessary.
Practical help
Common problems
Hardware or parts appear missing
Check all packing materials thoroughly, as small parts are often hidden in the packaging.
Furniture is unstable or wobbly
Ensure all bolts are fully tightened after assembly is complete. Check that protective pads are installed under the legs.
Before use
- Verify all parts and hardware are present.
- Locate the anti-tipping hardware pack at the back panel.
- Prepare a clear, flat surface for assembly.
- Have necessary tools ready (not specified, but standard screwdriver usually required).
- Ensure protective pads are available for the legs.
Images and diagrams
- The assembly diagram illustrates the attachment of the anti-tipping restraint to the back panel of the night stand and the wall.
Model compatibility
- Anti-tipping hardware is included and must be installed for safety.

Manual page author
Emily Carter
User documentation editor
Prepares concise manual descriptions and highlights the most useful setup, operation, and maintenance information for readers.