Home Appliances / Commercial Kitchen Equipment
CMA Dishmachines 180UC-3 High Temp Under Counter Dishwasher Setup Guide
Quick setup and installation guide for the CMA Dishmachines 180UC-3 high-temperature under-counter dishwasher. Includes plumbing, electrical, chemical tubing, and startup procedures.
Table of contents
Manual images
Click an image to enlargeQuick Setup Overview
This guide provides essential instructions for the installation and initial startup of the CMA Dishmachines 180UC-3. Warning: All electrical and plumbing connections must be performed by a qualified service technician in compliance with all applicable Federal, State, and Local Health, Electrical, Plumbing, and Safety codes.
Installation and Plumbing
Proper installation is critical for the machine to function correctly. Follow these steps:
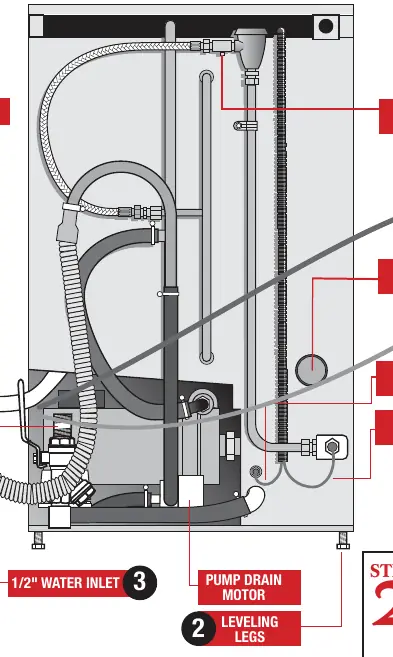

- Drain Hose: Connect the drain hose to the wall or floor drain. The hose must not be higher than 22 inches from the floor. Ensure a 1-inch air gap between the drain hose and the drain.
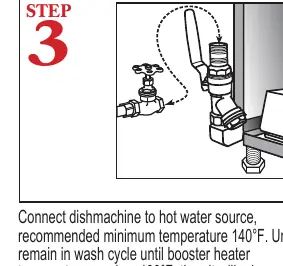
- Water Inlet: Connect the machine to a hot water source. The recommended minimum temperature is 140°F.
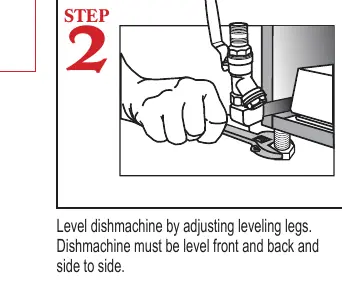
- Leveling: Adjust the leveling legs to ensure the dishmachine is level front-to-back and side-to-side.
- Electrical: Connect the hard-wire three-wire power supply according to local codes.
Chemical Setup
The machine requires chemical dispensers for detergent and rinse aid:
- Insert the tube stiffener with chemical tubing into the corresponding chemical containers.
- Ensure the red and blue tubes are connected to the correct dispensers as indicated on the rear view diagram.
Initial Startup and High-Limit Switch
Before the first use, you must connect the safety switch:
- Locate the booster high-limit switch behind the front panel.
- Ensure the power supply is turned off.
- Reconnect the factory-unplugged wire to the booster high-limit switch. This is required to prevent heating element damage.
- Press the power switch to the ON position.
- Listen for water spraying into the machine. Check the wash tank for water; if empty, repeat until the tank is full. The installer is responsible for adjusting the fill timer.
Daily Operation
Follow these steps for daily use:
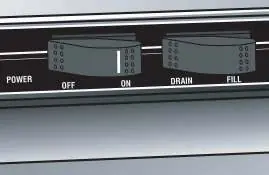
- Press the power switch to ON. The machine will automatically fill the wash tank.
- Allow approximately 10 minutes for the wash tank temperature display to reach 160°F.
- Turn the power supply back on and allow the machine to heat up for about 10 minutes.
- Push the start switch to begin the cycle.
- Observe the "Rinse Cycle" (the last 12 seconds of the cycle). The temperature must be a minimum of 180°F.
Adjustments
If the rinse temperature is insufficient, you can adjust the booster thermostat. Turn the adjustment stem on the booster thermostat clockwise to increase the temperature.
Manufacturer information
CMA Dishmachines
Practical help
Common problems
Wash tank not filling
Check for water supply and adjust the fill timer.
Dishwasher not heating up
Ensure the factory-unplugged wire is connected to the booster high-limit switch behind the front panel.
Rinse temperature too low
Turn the adjustment stem on the booster thermostat clockwise to increase the temperature.
Before use
- Ensure plumbing and electrical connections are performed by a qualified technician.
- Verify drain hose height is not more than 22 inches from the floor.
- Ensure a 1-inch air gap between the drain hose and the drain.
- Level the machine front-to-back and side-to-side.
- Connect to a hot water source (minimum 140°F).
- Reconnect the booster high-limit switch wire before powering on.
Specs in practice
- Hot Water Supply
- Minimum 140°F required for proper operation.
- Rinse Cycle Temperature
- Must reach a minimum of 180°F.
- Drain Hose Height
- Maximum 22 inches from the floor.
Images and diagrams
- Rear view diagram showing drain hose, water inlet, power supply, and chemical tubing connections.
- Front view diagram showing temperature displays, gauges, and control switches.
Model compatibility
- Requires hot water supply at 140°F.
- Requires qualified technician for installation.

Manual page author
Emily Carter
User documentation editor
Prepares concise manual descriptions and highlights the most useful setup, operation, and maintenance information for readers.