Home Appliances / Dishwashers
Parts Manual for CMA 181GW Commercial Dishwasher
This guide provides a comprehensive breakdown of parts and assemblies for the CMA 181GW commercial dishwasher. Access detailed exploded view diagrams, component lists, and maintenance assembly information to assist with repairs and part...
Table of contents
Manual images
Click an image to enlargeQuick guide from the manual
This document serves as the official parts manual for the CMA 181GW commercial dishwasher. It contains exploded view diagrams and corresponding parts lists for all major assemblies. Use this guide to identify specific part numbers for ordering replacements or performing maintenance.
Initial Parts Kit
The manual lists an initial parts kit (P/N 1100.66) containing essential components for quick repairs, including motor and heater contactors, relays, switches, and solenoid repair kits.
Mechanical Assemblies
The manual provides detailed diagrams and parts lists for the following systems:
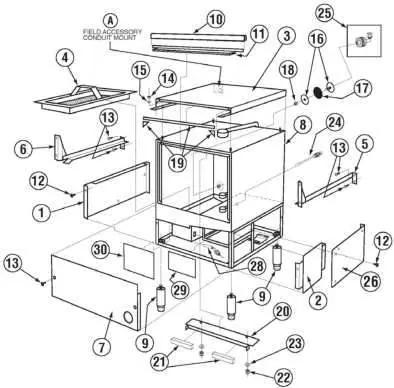

- Cabinet Assembly: Structural panels, legs, and door components.
- Door Assembly: Hinges, magnets, and support rods.
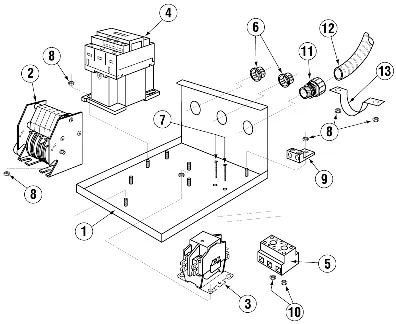
- Electrical Tray: Contactors, timers, and power blocks.
- Control Box Assembly: Switches, temperature displays, and wiring components.
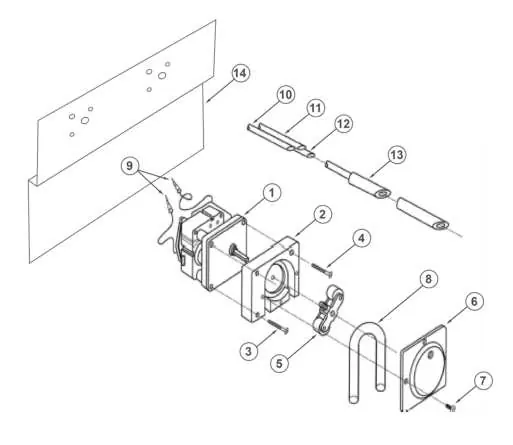
- Chemical Dispenser: Peristaltic pump components and tubing.
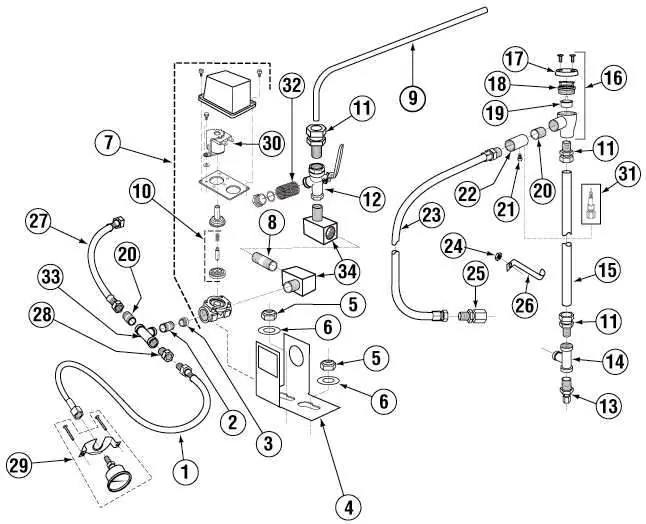
- Plumbing System: Hoses, valves, vacuum breakers, and fittings.
- Drain System: Drain valves and hoses.
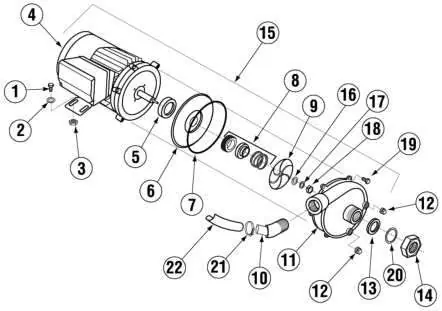
- Wash and Rinse Systems: Arms, gaskets, and end plugs.
- S/S Pump Assembly: Motor, impeller, and seal kits.
- Heater Assembly: Heating elements, thermostats, and high-limit switches.
Water Tempering Kit
An optional water tempering kit is available. The manual includes specific installation instructions and a parts breakdown for this kit.
Important Maintenance Notes
Always turn the dishwasher's wall breaker to the OFF position before performing any installation or maintenance work. Ensure all connections are secure and check for leaks after reassembly.
Manufacturer information
CMA Dishmachines
Practical help
Common problems
Water leaks
Check hose clamps, gaskets, and fittings identified in the plumbing and drain system diagrams.
Electrical failure
Inspect contactors, relays, and switches on the electrical tray and control box.
Before use
- Turn off the main power supply at the wall breaker before servicing.
- Verify part numbers against the specific assembly diagram before ordering.
- Ensure all gaskets and seals are properly seated during reassembly.
- Check for leaks after installing new plumbing or chemical dispenser components.
Images and diagrams
- Exploded view diagrams show the relative position of components and hardware.
- Item numbers in diagrams correspond to the item numbers in the adjacent parts tables.
Model compatibility
- Some parts are shared with the CMA-180UC model; verify compatibility using the provided part numbers.

Manual page author
Michael Turner
Technical manual editor
Reviews PDF manuals for structure, safety notes, and practical product details so readers can find the right information quickly.