Electronics / Microphones
User Manual for Comica LinkFlex AD5 Audio Interface
Quick guide for the Comica LinkFlex AD5 audio interface. Learn how to connect microphones, instruments, and computers, configure DAW settings, and use features like loopback, denoise, and phantom power.
Table of contents
Manual images
Click an image to enlargeQuick Guide and Important Notices
Before using the Comica LinkFlex AD5, please observe the following safety and operational guidelines to ensure optimal performance and prevent damage:
- Gain Adjustment: Always set the gain to the minimum before turning the device on or toggling the 48V Phantom Power/Inst switches. Adjust the gain step-by-step to avoid audio feedback or sound peaks.
- Phantom Power: Turn off 48V phantom power when connecting devices that do not require it.
- Handling: This is a high-precision device; avoid dropping, colliding, or exposing it to moisture, rain, or heat sources.
- Reset: If the device fails to charge or function, use a pin to press the reset button in the reset hole.
Device Components
The LinkFlex AD5 features a comprehensive control layout across three panels:
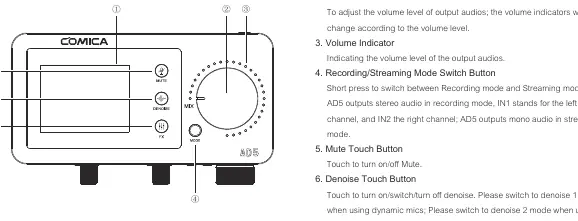
Top Panel
- LCD Screen: Displays device status.
- MIX Knob: Adjusts output volume.
- Recording/Streaming Mode Switch: Toggles between modes.
- Touch Buttons: Includes Mute, Denoise (1 for dynamic mics, 2 for condenser mics), and FX (EQ/Reverb) controls.
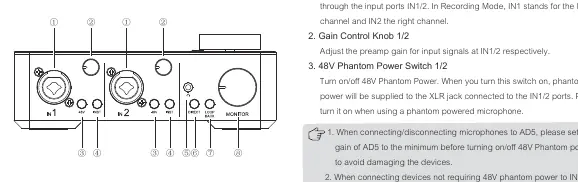
Front Panel
- Input Ports (IN1/2): XLR/6.35mm combo jacks for microphones and instruments.
- Gain Control: Individual knobs for IN1 and IN2.
- Switches: Dedicated 48V Phantom Power and Inst (impedance) switches for each input.
- Monitoring: 3.5mm headphone port, Monitoring Mode switch, Loopback switch, and Volume control.
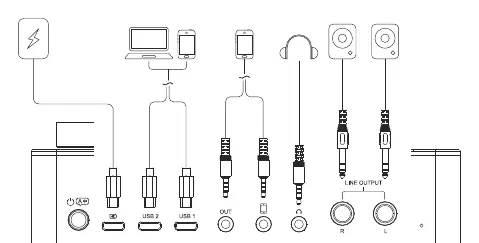
Back Panel
- Power/Language: Long press for power, short press for language.
- Connectivity: USB-C charging port, dual USB-C ports for computers/phones, 3.5mm ports, and Line Output ports for monitor speakers.
Screen Display
The LCD screen provides real-time feedback on:
- Input Status: 48V and Inst status for both channels.
- Audio Dynamics: Visual bars for input and monitoring levels.
- Mode Indicators: Current recording/streaming mode, Denoise level, and EQ/Reverb settings.
- Power Status: Battery level indicator.
Installation and Connections
Follow these steps to set up your audio interface:
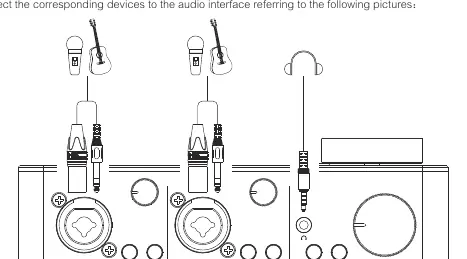
- Microphones/Instruments: Connect to IN1/2. Enable 48V for condenser mics or Inst switch for Hi-Z instruments (guitars/bass).
- Computers/Phones: Use the USB-C or 3.5mm ports for audio input/output.
- Monitoring: Connect headphones to the 3.5mm monitoring ports.
- Speakers: Connect monitor speakers to the Line Output ports.
DAW Software Configuration
To use the AD5 with DAW software like Cubase or ProTools:
- Driver: Download and install the ASIO4ALL driver.
- Setup: Select 'ASIO4ALL v2' in your DAW's audio settings.
- Activation: Open the ASIO4ALL Control Panel and activate the 'Comica_AD5-USB2' input/output port.
- Monitoring: If using direct monitoring, turn off the 'Monitor' function in your DAW to avoid echo. If using input monitoring, turn it on.
Specifications
- Input Interface: 2 x XLR/6.35mm
- Digital Interface: 2 x USB-C
- Preamp Gain: +65dB
- Sampling Rate: 48kHz / 24bit
- Battery: 3000mAh 3.7V (up to 6 hours)
- Dimensions: 170 x 85 x 61mm
Practical help
Common problems
Echo effect heard in DAW
Turn off the 'Monitor' function in your DAW software when direct monitoring mode is active.
Device not found by software
Ensure the device is connected and set as the default output device in your computer's sound settings.
Device unresponsive or not charging
Insert a reset pin into the reset hole on the back panel to perform a hard reset.
Before use
- Set gain to minimum before turning on 48V phantom power or Inst switch.
- Turn off 48V phantom power when using devices that do not require it.
- Install the ASIO4ALL driver before connecting to DAW software.
- Ensure proper cable connections for microphones and instruments.
- Check battery level on the LCD screen.
Specs in practice
- Sampling Rate
- 48kHz/24bit for high-quality audio recording.
Images and diagrams
- Top Panel: Shows touch controls for Mute, Denoise, FX, and the main MIX knob.
- Front Panel: Details the XLR/6.35mm inputs, gain knobs, and phantom power/inst switches.
- Back Panel: Illustrates USB-C, 3.5mm, and Line Output port locations.
- Connection Diagram: Shows how to connect microphones, instruments, headphones, and speakers.
Model compatibility
- Compatible with 6.35mm TRS instruments and XLR microphones.
- Supports dual USB-C connections for simultaneous use with two computers or mobile devices.

Manual page author
Michael Turner
Technical manual editor
Reviews PDF manuals for structure, safety notes, and practical product details so readers can find the right information quickly.