Electronics / Audio Interfaces
User Manual for Comica BoomX-D PRO Wireless Microphone
Quick guide for the Comica BoomX-D PRO wireless microphone. Learn how to pair, record, connect to cameras or phones, and manage settings.
Table of contents
Manual images
Click an image to enlargeQuick Guide
The Comica BoomX-D PRO is a 2.4G digital dual-channel wireless microphone system featuring on-board recording, real-time monitoring, and universal compatibility with cameras, phones, and PCs. It supports internal and external microphone inputs and offers a safety channel for post-production flexibility.
Components
Transmitter (TX): Features an internal microphone, 3.5mm external mic port, power/mute button, denoise/pair button, REC button, and USB-C port for charging/data.
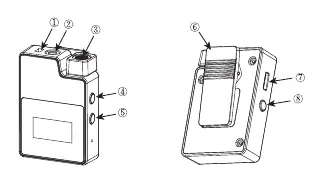
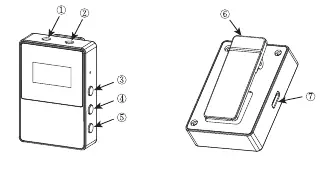
Receiver (RX): Features a 3.5mm headphone monitoring port, 3.5mm audio output port, power/mode switch button, A/B channel gain/pair buttons, and USB-C port.
Pairing
The devices are paired at the factory. If re-pairing is required: Turn on the transmitter and receiver within one meter. With the screen on, long press the pair buttons on both devices. The icon will change from the unlinked symbol to the linked symbol upon successful pairing. The first transmitter paired becomes Channel A (left), and the second becomes Channel B (right).

Operation
Recording: Long press the REC button on the transmitter to start or stop recording. Files are saved every 2 hours. The 16GB internal memory holds approximately 48 hours of audio. When full, new files overwrite old ones.
Muting and Denoise: Short press the power button on the transmitter to mute. Short press the denoise button to toggle noise reduction.
Output Modes: The receiver supports Mono, Stereo, and Safety modes. Note that Stereo is not available in single-channel or safety mode.
Connections
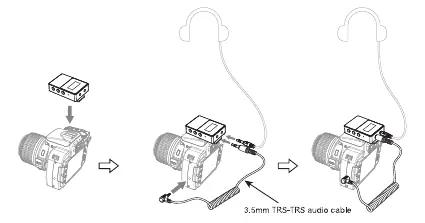
Camera: Use the 3.5mm TRS-TRS cable to connect the receiver output to the camera's mic input. Use the belt clip to mount the receiver on the camera's hot shoe.
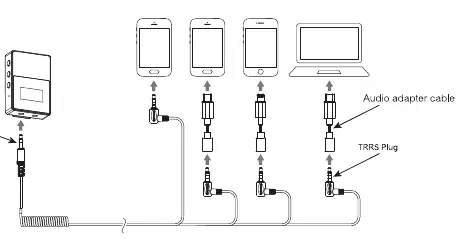
Smartphone/Computer: Use the 3.5mm TRS-TRRS cable for analog output. For digital output, use the USB-C cable to connect to devices with USB interfaces.
Troubleshooting
If the device crashes or fails to turn on, press and hold the power button for 10 seconds to reset. If the transmitter does not show the audio dynamic bar, ensure it is connected to the receiver. Keep the transmitter and receiver face-to-face to avoid signal dropouts.
Specifications
Wireless Type: 2.4GHzWorking Range: Up to 100m (open area)Latency:<20msBattery: Li-polymer 330mAh 3.7VStandby Time: 4.5 hours (on-board recording mode) / 15 hours (normal mode) for TX; 12 hours for RXDimensions: 39 x 22 x 55mmWeight: 29g (TX), 28g (RX)
Practical help
Common problems
Transmitter does not show audio dynamic bar
Ensure the transmitter and receiver are successfully paired.
Device crash or failure to turn on
Press and hold the power button for 10 seconds to perform a hard reset.
Poor signal or connection drops
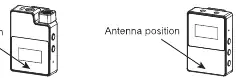
Keep the transmitter and receiver face-to-face and ensure the antenna position is not blocked.
Stereo function not working
Stereo mode is not available when using single-channel or safety mode.
Before use
- Charge both transmitter and receiver via USB-C.
- Ensure you have the correct audio cable (TRS for cameras, TRRS for phones/PCs).
- Check if pairing is required (icon should show linked status).
- Select the desired output mode (Mono/Stereo/Safety) on the receiver.
- If using an external microphone, plug it into the 3.5mm port.
Specs in practice
- 16GB Internal Memory
- Allows for on-board recording directly on the transmitter for up to 48 hours.
- Safety Channel
- Outputs a second audio track at -6dB to prevent audio clipping in post-production.
- Latency < 20ms
- Ensures minimal delay for real-time audio monitoring.
Images and diagrams
- Antenna Position: Keep this area clear to maintain signal strength.
- USB-C Port: Used for charging the device and transferring recorded files to a computer.
- 3.5mm TRS/TRRS: Use the correct plug type for your recording device to ensure compatibility.
Model compatibility
- Compatible with cameras, smartphones, and computers.
- Some smartphones may require an additional audio adapter cable (not included).

Manual page author
David Miller
Documentation analyst
Organizes user manual content into clear summaries, with attention to model details, product context, and everyday usability.