Home Appliances / Air Fryers
User Manual for Create Stylance Blender
Quick guide for the Create Stylance blender. Includes assembly instructions, operating modes (ice crush, smoothie, interval), safety precautions, cleaning tips, and troubleshooting for overheat and overcurrent protection.
Table of contents
Manual images
Click an image to enlargeQuick Guide
The Create Stylance blender is designed for household use. Before first use, clean all parts and ensure the switch is in the OFF position. Always operate with the lid securely in place and do not exceed the maximum capacity indicated on the jar. The blender features three programs: Ice Crush, Smoothie, and Interval. If the blender stops during operation, check for safety switch engagement, overheating, or overcurrent protection.
Product Description
The blender consists of the following main components:
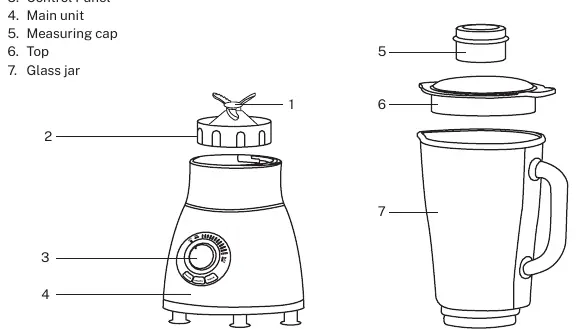
- Blade holder
- Pitcher
- Control Panel
- Main unit
- Measuring cap
- Top lid
- Glass jar
Assembly & Setup
Follow these steps to prepare your blender for use:
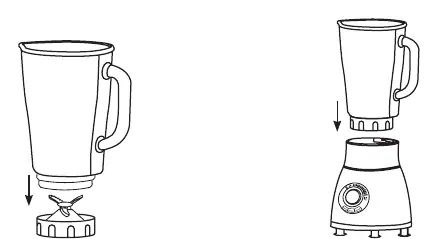
- Place the blade assembly into the bottom of the jar.
- Secure the carafe firmly onto the retaining ring.
- Ensure the switch is in the OFF position.
- Place the carafe onto the main unit and push down until it locks into place.
- Uncoil the power cable from the base and plug it into a power outlet.
Operation
Use the rotary knob to turn the unit on/off and control speed. The blender offers three specific programs:
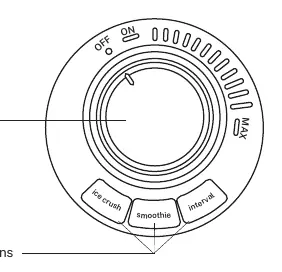
- Ice Crush: For crushing ice.
- Smoothie: For making smoothies.
- Interval: For intermittent cutting (turn, stop, turn, stop).
Speeds:
- Low: For light mixes with liquid ingredients.
- Half: For thicker consistency with liquid and solid ingredients.
- High: For an instant energy burst.
Practical Tips
For best results, follow these guidelines:
- Smoothies: Add solid ingredients in small portions gradually.
- Food Prep: Cut food into small pieces (2-3 cm).
- Mixing: Start with solid ingredients and a small amount of liquid, then add more liquid through the lid opening.
- Mayonnaise: Add oil through the plug hole in the lid.
- Viscous Ingredients: Use the Interval mode to prevent the blade from sticking.
Cleaning & Maintenance
- Ensure the switch and speed regulator are in the 0 position and unplug the unit.
- Do not immerse the motor housing in water; clean with a damp cloth only.
- To clean the jar, fill it with water, attach it to the main unit, and run the Interval setting several times.
- Empty and rinse the jar.
- Ensure the jar is empty before unscrewing the fixing ring. Handle the blade with care.
Safety & Troubleshooting
Safety Features:
- Safety Switch: The blender will not operate if the jar is not correctly positioned.
- Overheat Protection: If the motor overheats, the thermal limiter will stop the unit. Reduce the load and wait 30 minutes for the motor to cool.
- Overcurrent Protection: If the blade gets stuck due to hard or large food, the current limiter will stop the unit. Turn off, remove the obstruction, and restart.
Manufacturer information
Create
Practical help
Common problems
Blender does not start
Ensure the jar is properly locked into position and the switch is in the OFF position before starting.
Motor stops during operation (Overheat)
Reduce the load in the jar and wait approximately 30 minutes for the motor to cool down.
Blade is stuck (Overcurrent)
Turn off the unit, remove the hard or large food causing the blockage, and restart.
Before use
- Clean all parts before first use.
- Uncoil the power cable from the base.
- Ensure the switch is in the OFF position.
- Assemble the blade holder into the bottom of the jar.
- Secure the carafe onto the main unit until it locks.
Images and diagrams
- The parts list diagram identifies the blade holder, pitcher, control panel, and main unit.
- The control panel diagram shows the rotary knob and program buttons.
Model compatibility
- Do not use with hot ingredients over 60°C.
- Do not operate the blender when empty.

Manual page author
Emily Carter
User documentation editor
Prepares concise manual descriptions and highlights the most useful setup, operation, and maintenance information for readers.