Home / Pet Supplies
User Manual for Dogtra 1900S Series Remote Training Collar
Access the official Dogtra 1900S Series owner's manual. This guide provides essential instructions on collar fitting, stimulation settings, battery charging, maintenance, and troubleshooting for your remote dog training system.
Table of contents
Manual images
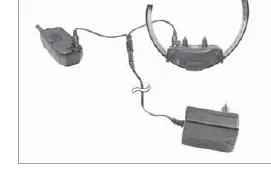
Click an image to enlargeQuick Start Guide
To begin using your Dogtra 1900S Series, ensure the unit is fully charged for 2 hours before the first use. The system consists of a handheld transmitter and a receiver collar. Turn the transmitter on by holding the side button until the LCD illuminates. Turn the receiver on by holding the on/off button until the LED indicator turns green. Always start with the lowest stimulation level and adjust based on your dog's reaction.
Product Overview
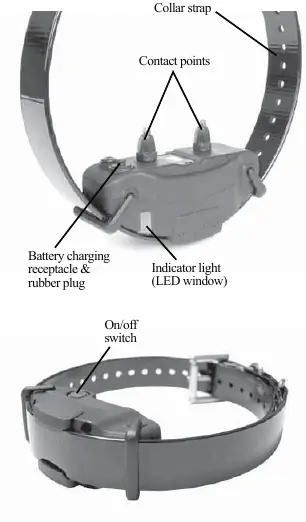
The 1900S system features a handheld transmitter with a rheostat intensity dial (levels 0-127), Nick and Constant stimulation buttons, and a Pager (vibration) button. The receiver collar is waterproof and features contact points that must be in firm contact with the dog's skin.

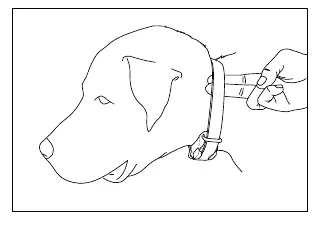
Collar Fitting
Proper fit is critical for effective training. The contact points must press firmly against the dog's skin. You should be able to fit one or two fingers snugly between the contact points and the dog's neck. If the collar is too loose, it may cause skin irritation due to rubbing; if too tight, it may cause breathing difficulties.
Operation and Stimulation
Nick Button: Emits a single pulse of electrical stimulation.
Constant Button: Provides continuous stimulation as long as the button is pressed, up to 12 seconds. The unit automatically shuts off after 12 seconds as a safety feature.
Pager Button: Provides non-stimulating vibration.
Stimulation Levels: Use the rheostat dial to adjust intensity from 0 to 127. Always start at the lowest level and increase only as needed based on the dog's temperament and distractions.
Charging the Battery
The unit uses Lithium-Polymer batteries. Charge the unit if the LED indicator on the collar is red, the transmitter LCD shows only 1 bar, or the unit fails to turn on. Plug the charger into a wall outlet; the indicator lights will glow red during charging and turn green when fully charged. Always cover the charging receptacles with the rubber plugs after charging.
Maintenance
After each training session, inspect the unit for damage. Rinse the receiver/collar to remove dirt or debris. Ensure the rubber charging cap is securely in place during use. If storing for extended periods, fully charge the unit once a month.
Troubleshooting
If the unit is not working as expected, check the following:
- No reaction: Ensure the collar is on, the strap is tight enough, and the intensity level is sufficient.
- No stimulation felt: Check battery levels and ensure contact points are touching the skin.
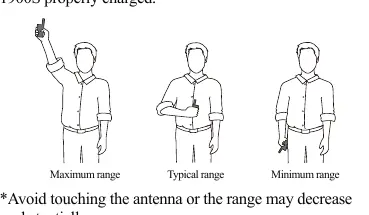
- Range issues: Avoid touching the antenna, as this significantly reduces range. Operate away from electrical conductors like metal buildings or radio towers.
- Not holding charge: Clean the charging port and ensure the charging pin is not damaged.
Manufacturer information
Dogtra
Practical help
Common problems
Dog is not reacting to the collar
Ensure the receiver is turned on, the collar is tight enough for contact points to touch the skin, and the stimulation level is high enough.
LED light is on, but no stimulation is felt
Check battery levels, ensure both contact points are touching the skin, or try the unit on your fingertips to verify function.
Transmitter has no range or weak stimulation
Avoid touching the antenna while using the transmitter. Ensure you are in a clear area away from electrical conductors like metal buildings.
Unit is not holding a charge
Clean the charging port with a cotton swab and rubbing alcohol. Check if the charging pin is straight and firm.
Before use
- Charge the unit for 2 hours before the first use.
- Ensure the receiver collar is turned on.
- Fit the collar snugly so contact points touch the skin.
- Test the stimulation using the provided test light.
- Check the dog's neck for skin irritation before and after use.
Images and diagrams
- Transmitter buttons: Nick, Constant, Pager, and On/Off switch.
- Receiver components: Contact points, charging port, and LED indicator.
- Test light usage: Place over contact points to verify stimulation.
Model compatibility
- 1900S is a single-dog unit.
- 1902S is a two-dog unit with additional buttons and a toggle switch.

Manual page author
David Miller
Documentation analyst
Organizes user manual content into clear summaries, with attention to model details, product context, and everyday usability.