Furniture / Home Furnishing
Dual 1006/A Record Changer Operating Instructions
Comprehensive operating instructions for the Dual 1006/A record changer, covering setup, operation, cartridge installation, and maintenance.
Table of contents
Manual images
Jump to the sectionProduct Overview
The Dual 1006/A is a versatile, high-quality record changer designed for both stereophonic and monaural playback. It offers fully automatic operation for record changing and single-play, as well as manual playback options. The unit supports four speeds (16 2/3, 33 1/3, 45, and 78 rpm) and can handle record sizes from 7 to 12 inches. It features a self-stabilizing changer spindle, an adjustable tracking pressure mechanism with a built-in scale, and a removable cartridge holder compatible with various international Hi-Fi cartridges.

Setup and Installation
Before operating the unit, it is essential to remove the two transit screws to allow the spring suspension to function correctly. The device must be configured for the local power line voltage (110/125V or 220/240V) using the voltage selector located under the unit. Ensure the motor pulley is set for the correct power line frequency (50 or 60 cycles) by interchanging the bushing on the motor shaft if necessary. The unit connects to an amplifier via a standard cable with specific color-coded plugs: red for the left channel and yellow for the right channel.
Operation
The Dual 1006/A is controlled via a set of push-buttons. The Start key initiates automatic operation. The Stop key allows for an instant stop, where the tone arm returns to its rest position and the equipment shuts off. For repeat playback, the Repet key is used. The unit can be operated as a record changer by inserting the changer spindle, or as an automatic/manual record player by using the short spindle. For manual operation, the tone arm is placed on the record by hand, and playback is started by pressing the Manual key.
Cartridge and Stylus Maintenance
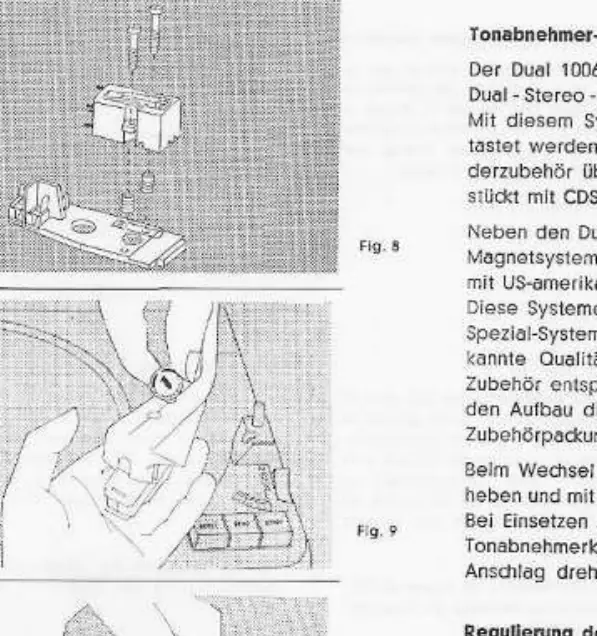
The unit comes equipped with the Dual CDS 420 crystal cartridge. Tracking pressure can be adjusted using the regulation screw and verified using the built-in scale. It is crucial to maintain the stylus to ensure high-fidelity reproduction and protect your records. Replace the stylus periodically; always use original Dual replacement parts to avoid potential damage to the equipment or records. When installing different cartridges, ensure the correct spacers and mounting screws are used to maintain the proper distance and tracking geometry.
Safety and Care
When connecting the unit to receivers with autotransformers or for commercial use, ensure proper chassis grounding as required by safety standards. Keep the unit clean and handle the tone arm with care to avoid damaging the delicate internal mechanisms. If the unit is not functioning correctly, check the power supply settings and the cartridge connections before seeking professional service.
Manufacturer information
Dual
Practical help
Common problems
Incorrect playback speed
Check the motor pulley frequency setting (50 or 60 cycles) and adjust the speed selector.
Distorted sound or poor tracking
Verify the tracking pressure using the built-in scale and adjust the regulation screw if necessary.
Unit does not start or stops prematurely
Ensure the transit screws are removed and the power voltage selector is correctly set.
Before use
- Remove the two transit screws from the chassis.
- Verify the voltage selector matches your local power supply.
- Check that the motor pulley matches your local power frequency.
- Ensure the correct spindle (changer or short) is installed.
- Connect the audio cables to the correct amplifier inputs.
- Check that the stylus is clean and in good condition.
- Set the tracking pressure according to the cartridge specifications.
Specs in practice
- Tracking Pressure
- The force applied by the stylus to the record groove, adjustable between 2 and 10 grams.
- Voltage Selector
- A switch to adapt the unit to 110/125V or 220/240V power lines.
Images and diagrams
- Fig 2: Overview of controls including speed selector, start/stop/repeat keys, and tone arm scale.
- Fig 3: Voltage selector location under the unit.
- Fig 5: Detailed view of the push-button control panel.
- Fig 8: Exploded view of the cartridge mounting system.
Model compatibility
- Compatible with 7 to 12-inch records.
- Supports standard international Hi-Fi cartridges.
- Requires specific spindles for changer vs. single-play operation.

Manual page author
Michael Turner
Technical manual editor
Reviews PDF manuals for structure, safety notes, and practical product details so readers can find the right information quickly.