Home Appliances / Space Heaters
User Manual for Duux North Smart Mobile Air Conditioner (DXMA10/11/12/13)
Quick guide and user manual for the Duux North smart mobile air conditioner. Includes installation steps, operation modes, maintenance, WiFi setup, and troubleshooting for models DXMA10, DXMA11, DXMA12, and DXMA13.
Table of contents
Manual images
Click an image to enlargeQuick guide from the manual
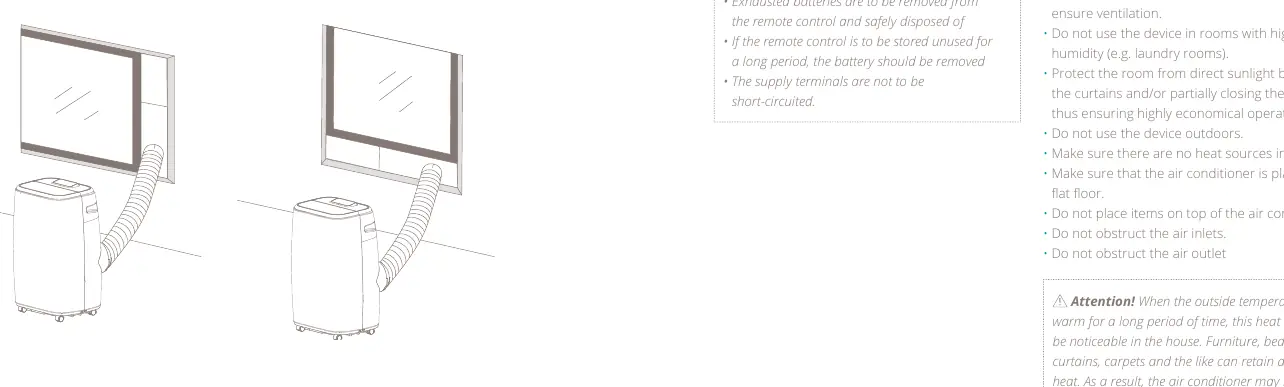
The Duux North is a smart mobile air conditioner designed for indoor cooling. Before first use, ensure the device has been standing upright for at least 12 hours after transport. The device must be placed on a flat, level surface with at least 50cm of clearance from any objects. Ensure the exhaust hose is correctly installed and not kinked to prevent overheating. The device requires a window kit for proper ventilation.
Product overview
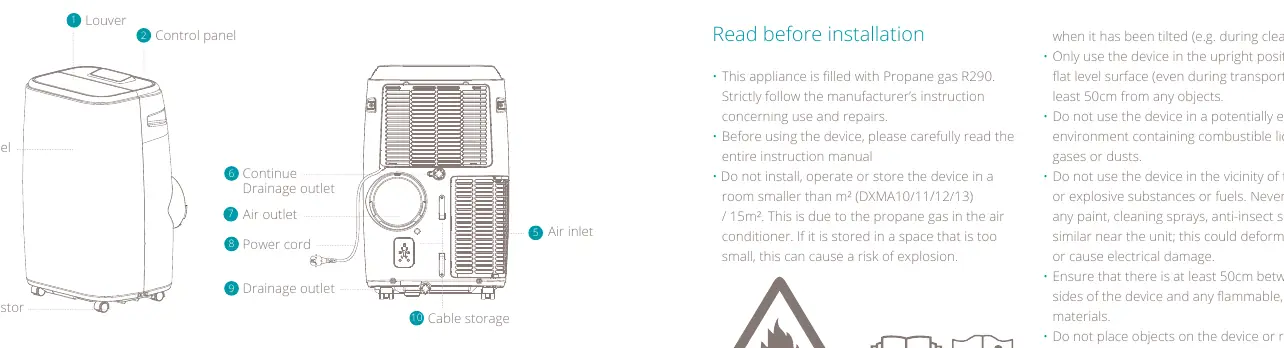
The unit features a louver, control panel, and front panel. The rear contains the air inlet, air outlet, power cord, and drainage outlets. Accessories include a housing adaptor, window connector, drainage hose, exhaust hose, window kit, and remote controller.
Installation and use
Important: Do not use the device in rooms smaller than 15m² due to the R290 propane gas. Ensure the exhaust hose is installed using the provided kit. The hose can be extended from 300mm to 1500mm, but shorter lengths are more efficient. Keep doors and windows closed for optimal cooling performance.
Operation modes
- Cooling mode: Cools the room. Set temperature between 16°C and 31°C.
- Dehumidifying mode: Removes moisture from the air. Operates at low fan speed.
- Ventilation mode: Circulates air without cooling. Fan speed can be set to 1, 2, or 3.
- Night mode: Adjusts temperature and fan speed for quiet operation.
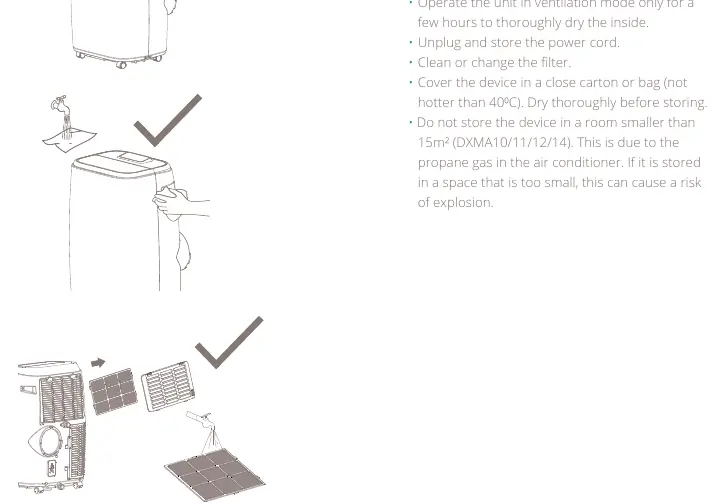
Maintenance
Always unplug the device before cleaning. Clean the body with a soft, damp cloth. Clean the air filter every two weeks by opening the air inlet grill, removing the filter, and washing it in lukewarm water (max 40°C). Never operate the unit without the filter.
Troubleshooting
If the unit does not turn on, check the power connection or if the 'Water Full' indicator is blinking. If the device has little effect, check for direct sunlight, open windows/doors, or blocked air vents. If an error code appears (E0, E2, E3), contact your point of sale or local service point.
Practical help
Common problems
Air conditioner does not turn on
Check if the unit is plugged in, if there is a power failure, or if the 'Water Full' indicator is blinking (empty the water tank).
Device has little cooling effect
Close curtains to block direct sunlight, close doors and windows, remove heat sources, and ensure air intake/outlet are not blocked.
Compressor does not work
Overheat protection may be active. Wait a few minutes for the temperature to drop.
Error codes E0, E2, E3
E0/E3: Sensor failure (contact service). E2: Water tank full (empty the tank).
Before use
- Ensure the device is on a flat, level surface.
- Leave the device to stand for 12 hours after transport before connecting to power.
- Ensure at least 50cm clearance from objects.
- Install the exhaust hose correctly (300mm-1500mm).
- Check that the window kit is installed.
Specs in practice
- Cooling capacity
- 14000/18000 BTU/h
- Power consumption
- 1538/2000 Watt
- Effective area
- 38/46 m²
Images and diagrams
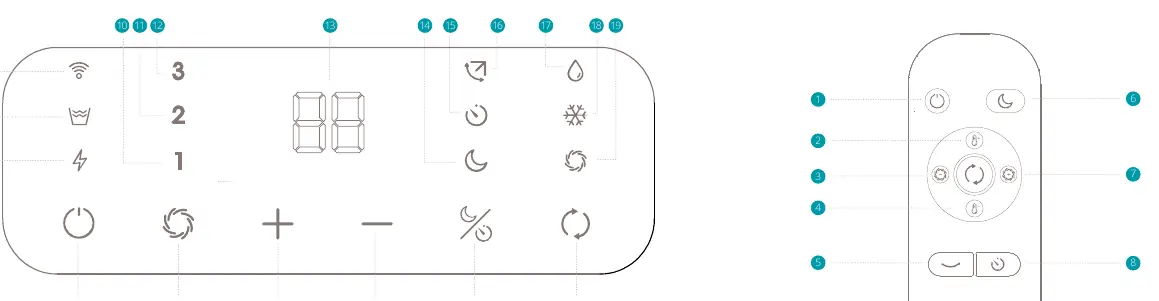
- Control panel layout showing modes, fan speed, and timer settings.
- Drainage procedure showing how to remove the plug and connect the drain tube.
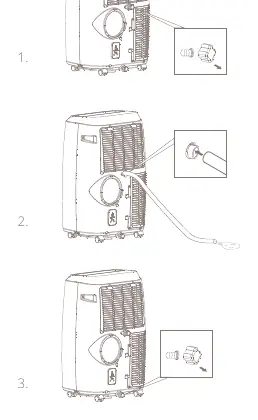
- Exhaust hose installation showing correct positioning to avoid kinks.
Model compatibility
- Requires 1x CR2025 3V battery for remote control.
- Do not use in rooms smaller than 15m² due to R290 propane gas.

Manual page author
Michael Turner
Technical manual editor
Reviews PDF manuals for structure, safety notes, and practical product details so readers can find the right information quickly.