HVAC / Air Conditioners
User Manual for Duux Edge Heater
Quick guide for the Duux Edge Heater. Includes installation, operation, Wi-Fi setup, maintenance, and troubleshooting.
Quick answers from the manual
Quick answer
- The Duux Edge is an electric heater that can be controlled via the control panel, remote, or the Duux app. It features thermostat, timer, schedule, and night modes. p. 5, 6, 7, 18
Key actions
- Mounting the heater on the wall p. 15, 16
- Setting the time and day p. 17
- Connecting to Wi-Fi p. 18
First start
- Plug in, toggle the power switch to I, and press the power button. p. 19
Problems and fixes
E0
NTC disconnected. Contact service.
p. 26
E1
NTC short circuited. Contact service.
p. 26
E2
Tip-over switch triggered. Place upright.
p. 26Error codes
| Code | Meaning | Action | Pages |
|---|---|---|---|
| E0 | NTC disconnected | Contact service | p. 26 |
| E1 | NTC short circuited | Contact service | p. 26 |
| E2 | Tip-over switch triggered | Place upright | p. 26 |
Maintenance and reset
- Clean the outside with a soft, slightly damp cloth weekly. p. 25
Technical specifications
| Parameter | Value | Meaning | Pages |
|---|---|---|---|
| Power | 500-2000 W | Heating power | p. 28 |
Where to find it in the PDF
- Installation p. 14, 15, 16
- Operation p. 19, 20, 21, 22
Table of contents
Manual images
Click an image to enlargeQuick guide from the manual
The Duux Edge is an electric heater designed for indoor use. It can be controlled via the integrated control panel, the included remote control, or the Duux app. This guide covers the essential steps for installation, operation, and maintenance.
Product overview
The Edge heater is designed for household environments. It is not intended as a main heating source. The unit can be placed on the floor using the provided stands or mounted on the wall using the included brackets.
Installation
Required tools: Screwdriver, power drill, 6 mm drill bit, hammer, pencil, and measuring tape.
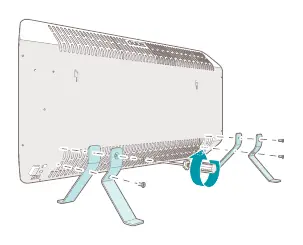
Assembling the product
- Place the heater on a soft, stable surface.
- Remove the rubber protection plugs from the floor stand mounting holes.
- Attach the floor stands to the heater using the provided M5 x 10 mm bolts.
- Ensure the unit is in an upright position before use.
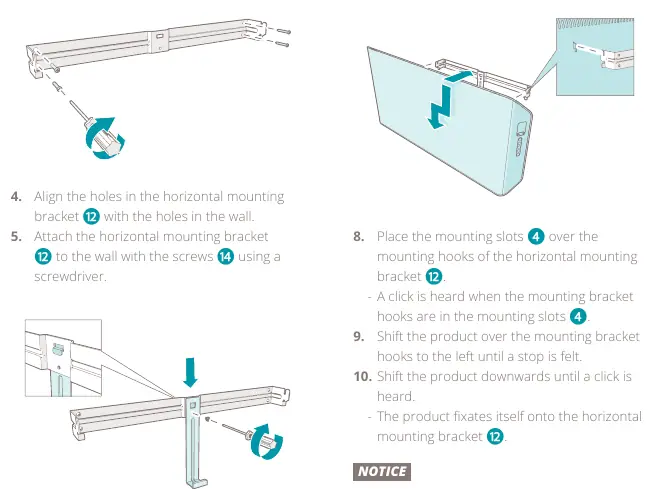
Wall mounting
- Determine the desired position and mark the 4 holes for the mounting bracket.
- Drill 6 mm holes and insert the provided plugs.
- Attach the horizontal mounting bracket to the wall.
- Attach the vertical mounting bracket to the horizontal one.
- Hang the heater onto the mounting hooks and shift it until it clicks into place.
Operation
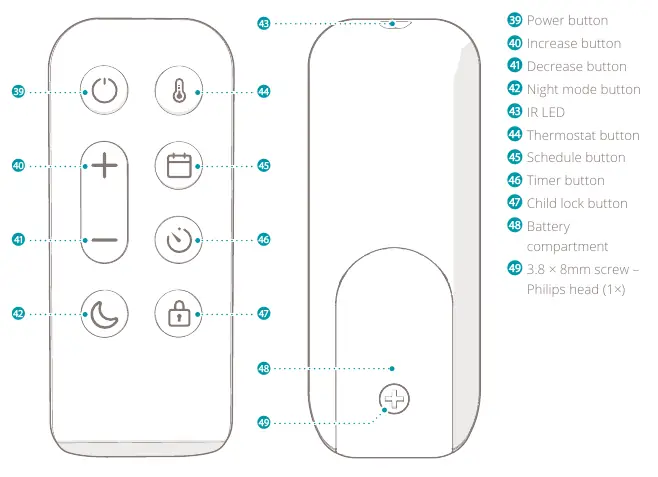
Turning on: Plug in the power cord, toggle the power rocker switch to 'I', and press the power button on the unit or remote.
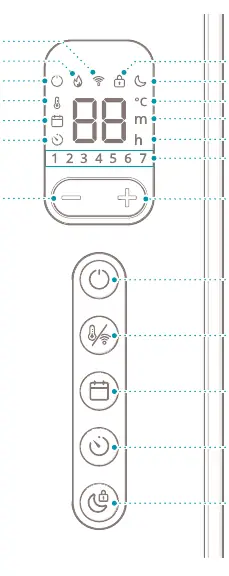
Modes
- Standby: Connected to power but not turned on.
- Sleep: Heater is on, night mode icon is dimmed, no sound signals.
- Awake: Heater is on, all functions active.
Key functions
- Thermostat: Set the desired room temperature. The heater maintains this temperature automatically.
- Timer: Set the heater to turn on or off automatically after a set number of hours (1-24).
- Schedule: Choose from preset schedules (Home, Office, Cabin) or create custom ones via the Duux app.
- Night mode: Dims the display and disables sound signals.
- Child lock: Prevents unwanted changes to settings.
Maintenance
Cleaning: Clean the outside of the product weekly with a soft, slightly damp cloth. Dry with a soft, dry cloth. Never use solvents or abrasives.
Storing: If not used for several months, clean the components and store in the original packaging in a clean, dry place.
Troubleshooting
If the heater displays an error code, follow these steps:
- E0: NTC disconnected. Contact a certified Duux service provider.
- E1: NTC short circuited. Contact a certified Duux service provider.
- E2: Tip-over switch triggered. Disconnect the unit, place it upright on a flat surface, and reconnect.
Practical help
Common problems
E0 error code
NTC is disconnected. Contact a certified Duux service provider.
E1 error code
NTC has short circuited. Contact a certified Duux service provider.
E2 error code
Tip-over switch triggered. Disconnect the unit, place it upright on a flat surface, and reconnect.
Before use
- Remove all packaging material.
- Check if all parts are present.
- Ensure the product is placed on a flat, stable surface (or mounted correctly).
- Check voltage on the rating plate.
- Do not use an extension cord.
Specs in practice
- Ambient temperature
- Operating range of 5°C - 36°C.
Images and diagrams
- Page 5 shows the main parts of the heater.
- Page 6 shows the control panel icons.
- Page 7 shows the remote control buttons.
- Page 15 shows the assembly steps.
- Page 16 shows the wall mounting steps.
Model compatibility
- Requires Wi-Fi for app operation.
- Not intended as a main heating source.
- Indoor use only.

Manual page author
David Miller
Documentation analyst
Organizes user manual content into clear summaries, with attention to model details, product context, and everyday usability.