Furniture / Home Furnishing
Installation and Ownership Manual for Elkay Liv EZ Built-in Filtered Water Dispenser
Quick guide for the Elkay Liv EZ built-in filtered water dispenser. Includes installation steps, filter replacement, battery maintenance, and troubleshooting for low or no water flow.
Table of contents
Quick guide from the manual
The Elkay Liv EZ is a non-refrigerated, built-in filtered water dispenser designed for indoor use. This manual provides essential instructions for installation, maintenance, and operation. Key requirements include a cold water line connection and a wall cavity with a minimum depth of 3-1/2 inches (89 mm).
Installation
Before starting, ensure you have the necessary tools: safety glasses, protective gloves, Phillips head screwdriver, tape measure, wall cutting tool, and a level. A shutoff valve at the water supply source is highly recommended.
- Cut an opening in the wall: 19-1/2 inches high by 14-1/2 inches wide. The recommended height from the floor is 59-2/5 inches.
- Route the 3/8-inch water line through the base opening of the dispenser.
- Place the dispenser into the wall cavity, ensuring it sits flush against the top drywall.
- Use a bubble level to straighten the unit and secure it to wall studs using four screws (not included).
- Install 3 AA batteries into the battery compartment.
- Connect the 3/8-inch water line to the filter inlet shutoff valve.
Startup and First Use
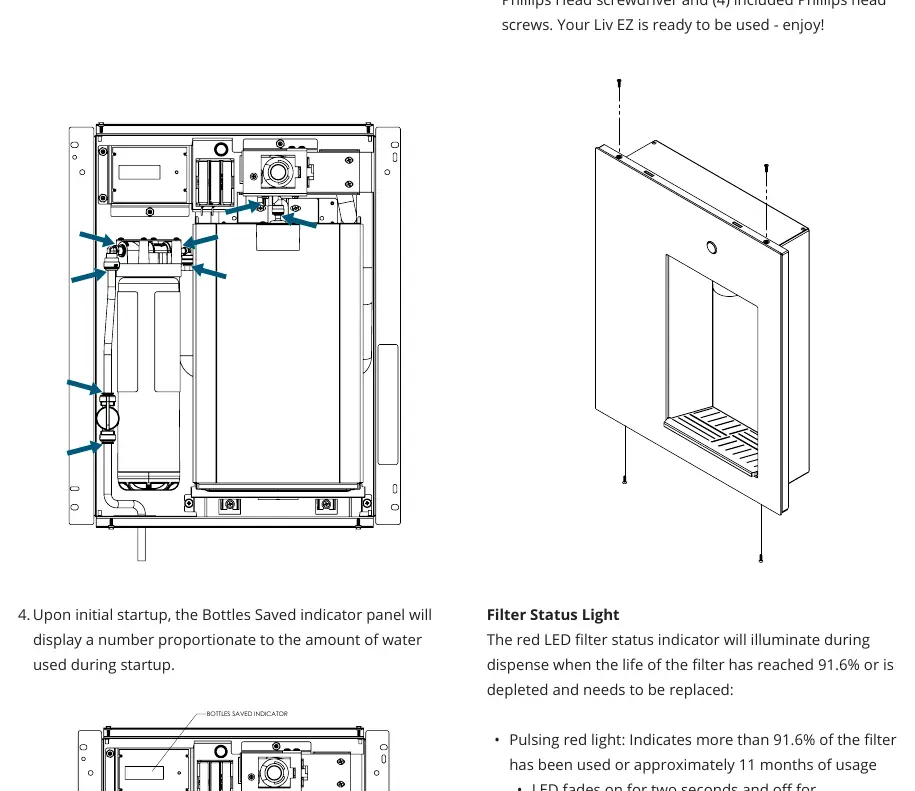
After installation, open all shutoff valves and check for leaks. Place a container under the spout and dispense at least one gallon of water to flush trapped air and carbon particles from the filter. Attach the glass front panel using the provided screws.
Filter and Battery Maintenance
The unit features a red LED filter status indicator. A pulsing light indicates over 91.6% filter usage, while a solid light indicates 100% usage (approximately 12 months). To replace the filter and batteries:
- Remove the front panel screws and the panel itself.
- Turn off the water supply.
- Rotate the old filter counterclockwise to release it.
- Install the new filter by turning it clockwise.
- Replace the 3 AA batteries.
- Turn the water supply back on.
- Press and hold the reset button until HLD 3SEC appears, followed by FLTR RST to confirm the reset.
Safety
Always wear protective gear when using power tools. Ensure the unit is connected to a GFCI-protected circuit if applicable. Do not use with microbiologically unsafe water. The system requires a water pressure between 40 and 105 psi.
Manufacturer information
Elkay Manufacturing Company
Practical help
Common problems
Low water flow
Check that water supply pressure is between 40 and 105 psi; ensure the filter is properly installed.
No water flow
Ensure all shutoff valves (at the source and inside the filter box) are open and check for blocked or damaged water lines.
Before use
- Verify wall cavity depth is at least 3-1/2 inches.
- Ensure cold water line is available.
- Install 3 AA batteries.
- Flush at least one gallon of water through the system to remove air and carbon particles.
- Check all connections for leaks.
Specs in practice
- Water Pressure
- Must be between 40 and 105 psi for proper operation.
Images and diagrams
- The manual includes detailed diagrams for wall cutout dimensions (19-1/2" H x 14-1/2" W).
- Component diagrams identify the filter, battery compartment, and reset button locations.
- Exploded views show the assembly of the alcove and main enclosure.
Model compatibility
- Designed for indoor use only.
- Not suitable for installations where water jets are used.
- Requires 3 AA batteries for operation.

Manual page author
David Miller
Documentation analyst
Organizes user manual content into clear summaries, with attention to model details, product context, and everyday usability.