Home / Door Hardware
User Manual for Everbilt 24 in. x 16 in. Drawer Kit
Quick guide for the Everbilt 24 in. x 16 in. Drawer Kit. Includes installation steps, safety warnings, parts list, and care instructions for your closet organization system.
Table of contents
Manual images
Click an image to enlargeQuick Guide
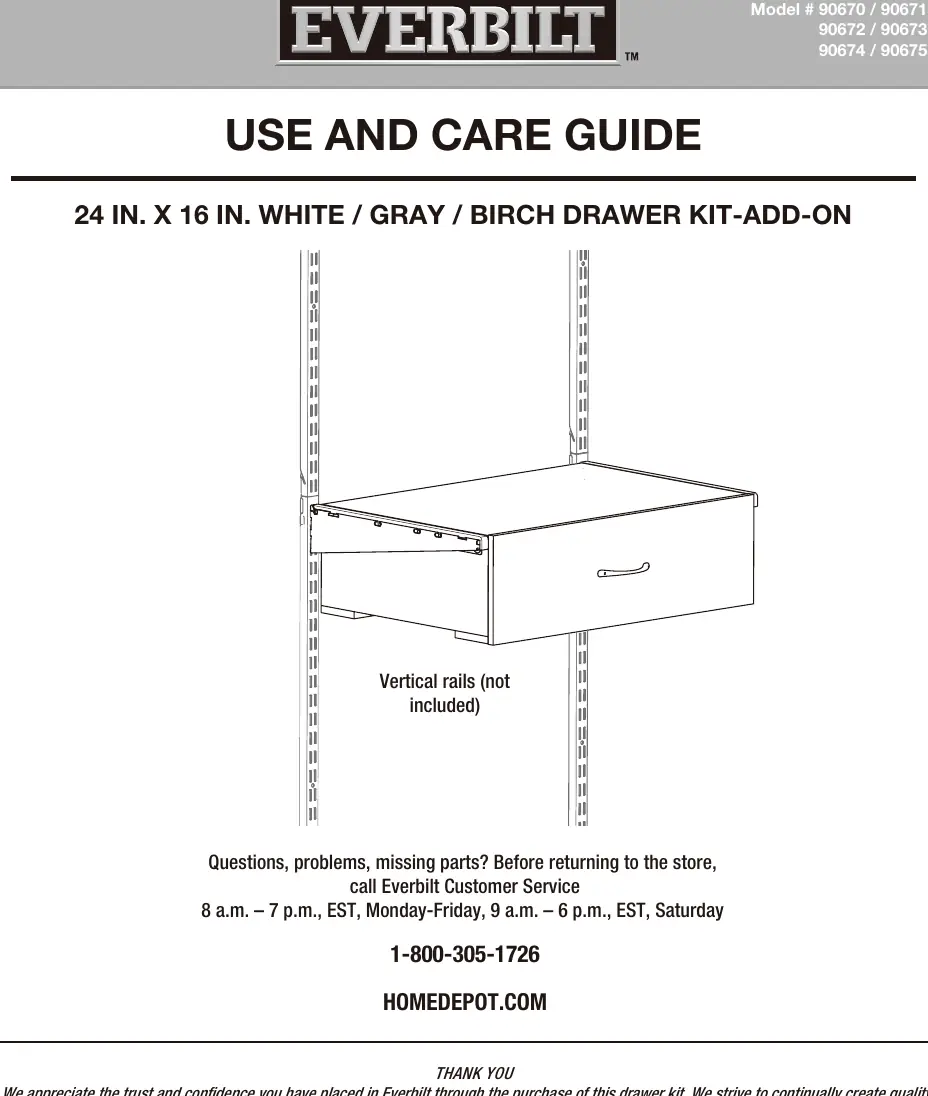
This drawer kit is designed as an add-on for existing closet organization systems. Before beginning, ensure you have two people for the installation, as the drawer kit is heavy. Remove all packaging paperboards from inside the drawer kit before starting. The system requires vertical rails (not included) for mounting.
Safety Information
- Sharp Edges: The metal components may have sharp edges or corners. It is strongly recommended to wear protective gloves during assembly.
- Weight Limits: Do not overload the units, as this may cause the system to collapse, resulting in personal injury or property damage. Distribute weight evenly.
- Usage: Do not climb, stand, or step on the product.
- Children: This product contains small parts that pose a choking hazard. Keep away from small children and provide close supervision.
- Tools: Wear appropriate safety equipment when using power tools and hand tools.
Product Specifications
- Mounting: Drywall installation requires mounting into at least 1 stud.
- Drywall Requirement: ASTM C1396 Compliant, minimum thickness 1/2 in.
- Spacing: Requires 24 in. center-to-center spacing between two vertical rails.
Pre-installation
Before installing, plan your layout. If you are installing two or more drawer kits, install the bottom drawer kit first. Ensure you have all components listed in the package:
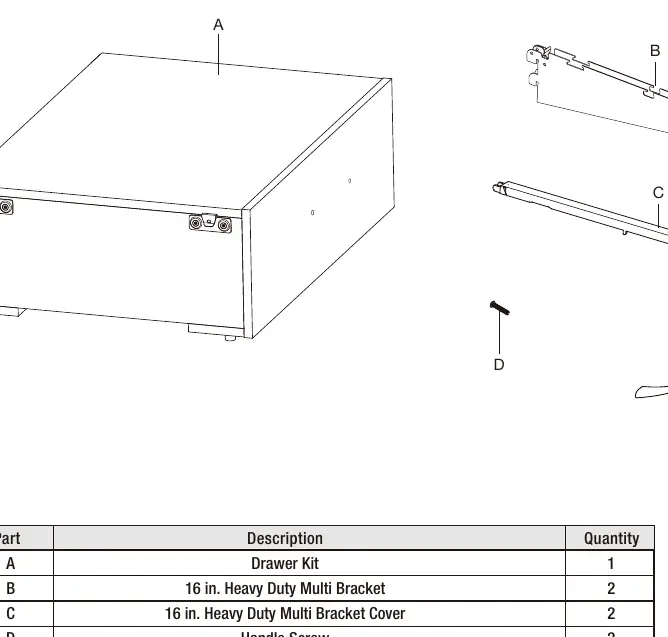
- Drawer Kit (A)
- 16 in. Heavy Duty Multi Bracket (B) - Qty 2
- 16 in. Heavy Duty Multi Bracket Cover (C) - Qty 2
- Handle Screw (D) - Qty 2
- Handle (E) - Qty 1
Installation
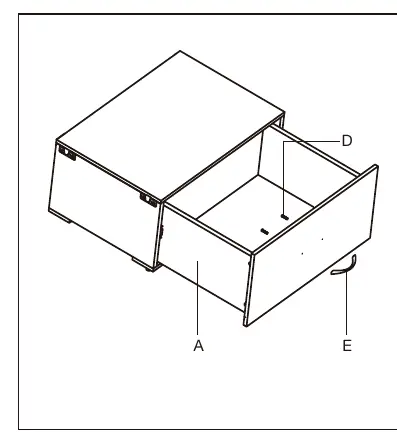
Install Handles
Attach the handle (E) to the drawer front using the handle screws (D).
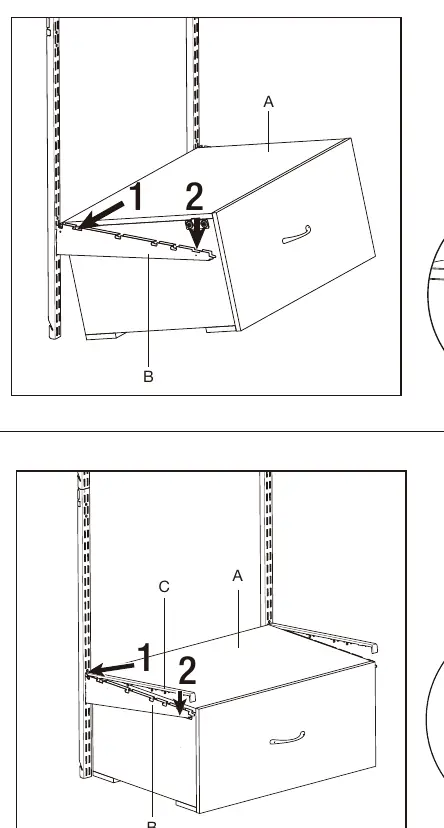
Install Brackets
Mount the brackets (B) onto your existing vertical rails. Ensure they are securely locked into the rail slots.
Install Drawer Kits on the Bracket
With two people, lift the drawer kit (A) and place it onto the brackets (B). Ensure the drawer kit is inserted into the end of the groove on the brackets.
Install Bracket Covers
Snap the bracket covers (C) over the brackets (B) to secure the installation.
Care and Cleaning
The closet organizer is powder-coated and the drawer kit is made of particle board. Follow these steps for maintenance:
- Use a soft cloth or soft brush with a diluted solution of warm water and mild detergent (e.g., liquid dishwashing detergent).
- Do not use solvents.
- Rinse the surface thoroughly with clean fresh water to remove all residue.
- Dry the surface completely before reuse.
Practical help
Common problems
System collapse or failure
Do not overload the units. Ensure weight is distributed evenly and the system is mounted into at least one stud.
Sharp edges during assembly
Wear protective gloves when handling metal components.
Choking hazard
Keep small parts away from children; close supervision is necessary.
Before use
- Ensure you have two people for installation.
- Remove all packaging paperboards from inside the drawer kit.
- Verify you have all parts: Drawer Kit, 2 Brackets, 2 Covers, 2 Screws, 1 Handle.
- Ensure vertical rails are already installed (not included).
- Check that your wall is drywall with at least 1 stud available for mounting.
Specs in practice
- Drywall Mounting
- Requires mounting into at least 1 stud for stability.
- Rail Spacing
- Vertical rails must be spaced 24 inches apart (center-to-center).
- Drywall Thickness
- Must be at least 1/2 inch thick and ASTM C1396 compliant.
Images and diagrams
- The parts diagram identifies the drawer kit, brackets, covers, screws, and handle.
- Installation diagrams show the correct orientation for mounting brackets to vertical rails and inserting the drawer kit into the bracket grooves.
Model compatibility
- Requires existing vertical rails (not included).
- Designed for 24-inch wide closet organization systems.

Manual page author
David Miller
Documentation analyst
Organizes user manual content into clear summaries, with attention to model details, product context, and everyday usability.