Home / Door Hardware
User Guide for Everbilt 48 in. Shoe Rack Add-On
Quick installation guide for the Everbilt 48 in. Shoe Rack Add-On. Includes parts list, step-by-step assembly instructions, and important setup notes for bracket angles and shelf covers.
Table of contents
Manual images
Click an image to enlargeQuick guide from the manual
This guide provides instructions for installing the Everbilt 48 in. Shoe Rack Add-On. Before beginning, ensure you have all necessary parts and that your existing vertical rails are spaced correctly at 24 inches (60.9 cm) center-to-center.
Parts List
- A: 48 in. x 16 in. Wire Shelf (1)
- B: 16 in. Shoe Shelf Bracket (3)
- C: 48 in. Décor Shoe Shelf Cover (1)
- D: Décor Shoe Shelf Cover End cap Set (1)
- E: Shoe Shelf Bracket Clip (6)
Installation
Note: Please remove the protective film from the decor shoe shelf cover before installation.

- Install Brackets: Attach the shoe shelf brackets (B) to your existing vertical rails. Pay attention to the placement of left, right, and middle rails. The brackets have two angle options: 69° and 80.5°. Choose one angle and ensure all brackets are set to the same angle.
- Place Shelf: Place the wire shelf (A) onto the installed brackets (B). Ensure the rear horizontal rod sits securely under the back hooks of the brackets.
- Secure with Clips: Install the clips (E) over the wire shelf (A) and onto the brackets (B).
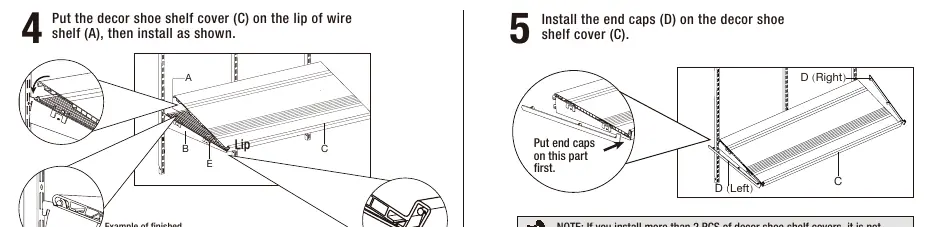
- Attach Cover: Place the decor shoe shelf cover (C) onto the lip of the wire shelf (A).
- Install End Caps: Install the end caps (D) on the decor shoe shelf cover (C). If installing more than 2 decor shoe shelf covers, end caps are not required between them.
Warranty
This product is guaranteed to be free of defects in materials and workmanship for 2 years from the date of purchase. If the product is defective, call 1-800-305-1726 or return it to the store for a replacement. The guarantee does not cover normal wear and tear.
Practical help
Common problems
Protective film left on cover
Remove the protective film from the decor shoe shelf cover before installation.
Shelf feels unstable
Ensure the rear horizontal rod of the wire shelf sits firmly under the back hooks of the brackets.
Bracket angle mismatch
Ensure all brackets are set to the same angle (either 69° or 80.5°) for proper shelf alignment.
Before use
- Verify all parts (A, B, C, D, E) are present.
- Remove protective film from the decor shoe shelf cover.
- Ensure vertical rails are installed at 24 in. (60.9 cm) center-to-center spacing.
- Decide on the desired bracket angle (69° or 80.5°) and set all brackets identically.
Specs in practice
- Bracket Angles
- 69° or 80.5° options available; all brackets must match.
- Rail Spacing
- 24 in. (60.9 cm) center-to-center spacing required for vertical rails.
Images and diagrams
- Step 1 illustrates bracket installation on vertical rails with angle adjustment.
- Step 2 shows the correct placement of the wire shelf on the brackets.
- Step 3 demonstrates the installation of clips to secure the shelf.
- Step 4 shows the placement of the decor cover on the shelf lip.
- Step 5 details the installation of end caps on the decor cover.
Model compatibility
- Designed for use with existing vertical rails.
- End caps are not required between decor covers if installing more than 2 units.

Manual page author
Michael Turner
Technical manual editor
Reviews PDF manuals for structure, safety notes, and practical product details so readers can find the right information quickly.