Furniture / Home Furnishing
Installation Guide for FAKRO LWS-P Attic Ladder
Comprehensive installation guide for FAKRO LWS-P series attic ladders, covering site preparation, ceiling opening framing, ladder positioning, and precise leg trimming for safe operation.
Table of contents
Quick guide from the manual
This document provides professional installation instructions for the FAKRO LWS-P series attic ladder. Installation requires two people, basic carpentry skills, and specific tools. Safety Warning: Do not attempt to install this ladder if your ceiling contains air ducts, metal constructions, cement, or drop ceilings. Never cut structural roof elements like trusses or braced joists without consulting an architect. The maximum load capacity is 325 lbs.
Required tools and materials
- Tools: Flashlight, claw hammer, pencil, hand saw, tape measure, framing square, power drill with 1/8 inch bit, and ceiling cutting tools.
- Materials: Joist-sized lumber, 1x4x36 inch boards for temporary support, wood shims, 20d sinker nails, and 4 inch wood screws.
- Safety: Gloves, safety goggles, and dust mask.
Installation process
The installation involves several critical phases:
- Site Preparation: Choose a location free of obstacles. Verify ceiling height against the product label and Table 1.
- Cutting the Opening: Create an initial hole, then enlarge it to the dimensions specified in Table 2. Ensure one edge is parallel to a ceiling joist.
- Framing: If joists are cut, you must install double headers to support the structure. Ensure the frame is square by measuring diagonals (tolerance within 1/8 inch).
- Temporary Support: Install temporary support boards to create a 1/4 inch ledge for the ladder to rest on during installation.
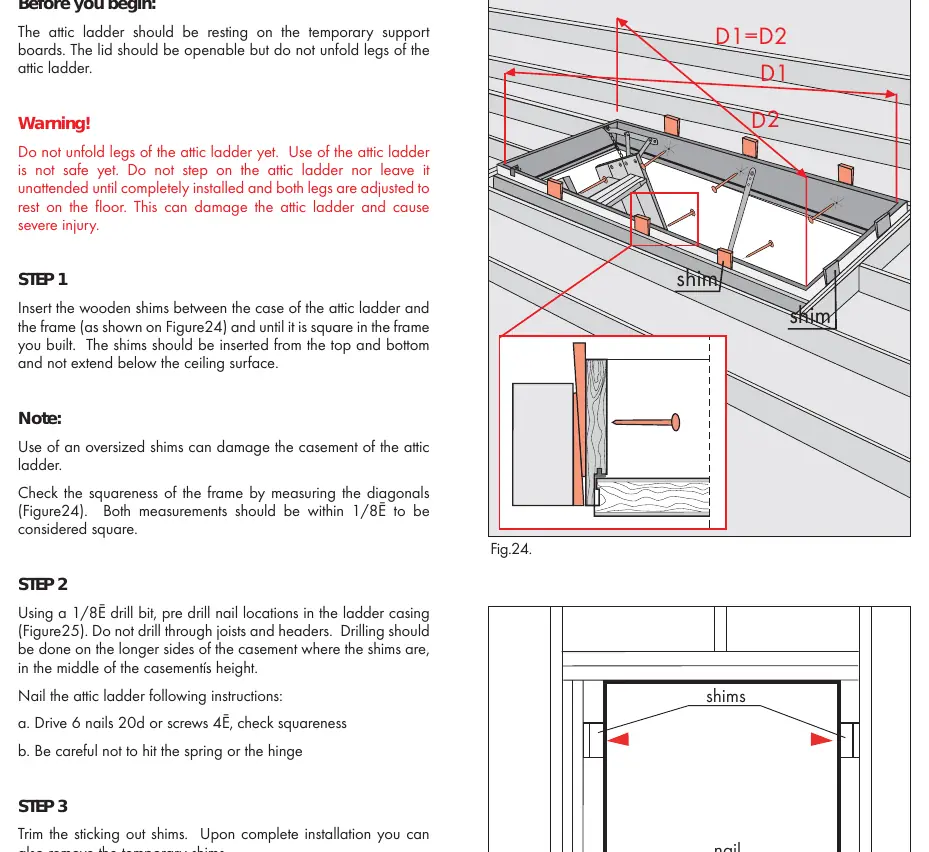
- Positioning: Place the ladder on the temporary supports. Use shims between the ladder case and the frame to ensure it is square before nailing.
- Leg Trimming: This is the final and most critical step. Measure distances A and B on both sides of the ladder while it is unfolded. Trim the legs precisely so that the ladder sits flush on the floor with no gaps at the metal hinges.
Safety and maintenance
Do not unfold the ladder legs or step on the ladder until it is fully installed and the legs are trimmed. If you observe gaps between the metal hinges and the ladder frame, the legs are not trimmed correctly; do not use the ladder in this condition. For technical support, contact FAKRO AMERICA, L.L.C. at 311 W. Laura Dr, Addison, IL 60101, USA, or via phone at (630) 543-1010.
Manufacturer information
FAKRO
Practical help
Common problems
Gaps between metal hinges after installation
The legs are not trimmed correctly. Do not use the ladder; re-trim the feet until the ladder sits flush on the floor.
Lid is blocked by temporary support boards
Remove the ladder and re-install the temporary support boards to ensure they do not interfere with the opening mechanism.
Trimming line falls on a rung
Reposition the full run of steps where it attaches to the lid so the cut line does not intersect with a rung.
Before use
- Verify ceiling construction is suitable (no air ducts, metal, or cement).
- Ensure two people are available for installation.
- Check that the ladder length matches your ceiling height.
- Confirm the frame is square (diagonals within 1/8 inch).
- Ensure legs are trimmed so the ladder sits flush on the floor.
- Verify no gaps exist at the metal hinges.
Specs in practice
- Maximum Load
- 325 lbs; do not exceed this weight limit.
- Swing Clearance (SC)
- The space required for the ladder to open fully without hitting obstacles.
- Landing Space (LS)
- The floor area required for the ladder to rest securely.
Images and diagrams
- Fig. 1-3: Illustrates safe vs. unsafe roof constructions (do not cut trusses).
- Fig. 14: Shows how to frame the opening and verify squareness using diagonals D1=D2.
- Fig. 20: Details the installation of temporary support boards with a 1/4 inch ledge.
- Fig. 29-30: Demonstrates the correct method for measuring and marking leg trimming lines.
- Fig. 31-33: Shows the difference between a properly installed ladder and one with incorrectly trimmed legs.
Model compatibility
- Designed for home use only.
- Not suitable for commercial buildings without checking local building codes.
- Requires wood-framed ceiling construction.

Manual page author
David Miller
Documentation analyst
Organizes user manual content into clear summaries, with attention to model details, product context, and everyday usability.