Tools / Power Tools
User Manual for FLEX PP 40 12 and PP 110 18-EC Cordless Tube Press
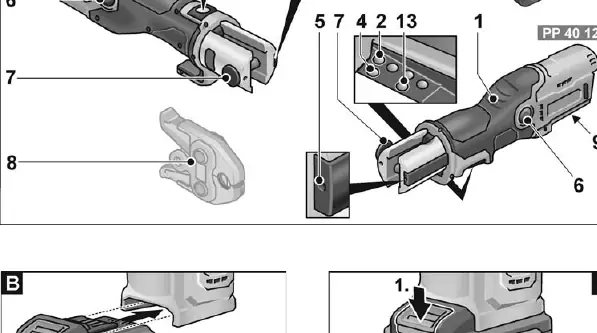
Quick guide for the FLEX PP 40 12 and PP 110 18-EC cordless tube press. Includes setup, operation, LED indicator meanings, maintenance, and safety instructions.
Table of contents
Manual images
Click an image to enlargeQuick guide from the manual
This guide provides essential information for operating the FLEX PP 40 12 and PP 110 18-EC cordless tube press. Always read the full manual before use.
Important safety information
- Flying fragments: Incorrect use or use of worn/damaged tools can cause injury from flying fragments. Inspect tools for cracks before every use.
- Battery safety: Do not open batteries. Protect from heat, fire, water, and moisture.
- Specialist use: Only trained specialists should operate this tool.
Operation
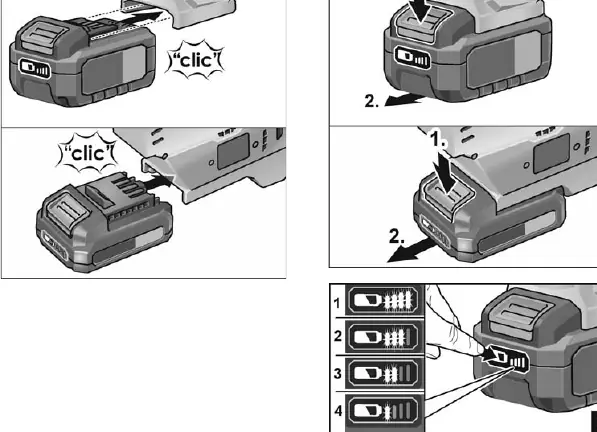
Inserting/changing the battery: Push the charged battery into the slot until it engages. Press the release buttons to remove it.
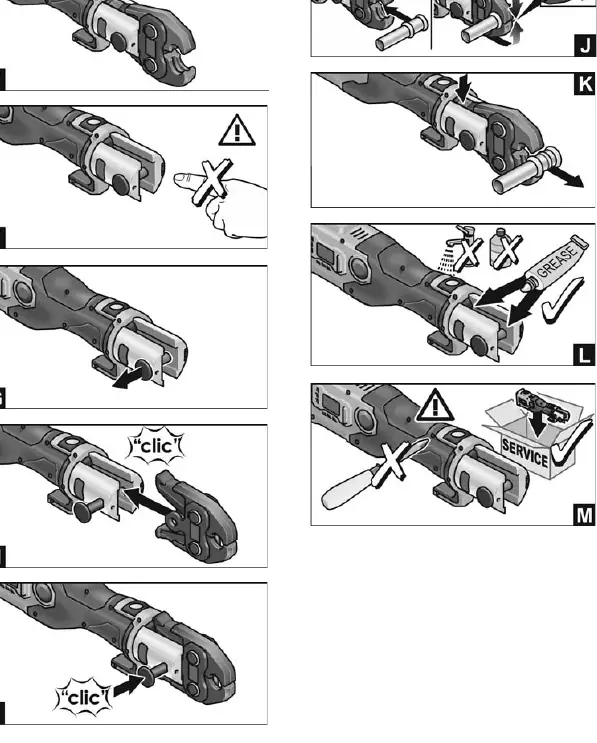
Inserting the pressing jaw: Loosen the retaining bolt, insert the jaw, and push the retaining bolt back in firmly. The tool will not start if the bolt is not correctly inserted.
Pressing: Ensure the nominal diameter of the fitting matches the jaw/collar. Press the start button to begin. The automatic pressing system ensures a complete press. The process can be interrupted by holding the release button.
LED Indicators
- Green LED: Ready for operation.
- Blue LED: Wireless interface status (flashing = ready for connection, lit = connected).
- Red LED: Fault or temperature error.
- Red/Green flashing: Maintenance interval reached.
Maintenance and care
Do not use water or liquid cleaning agents. Repairs must be performed by an authorized customer service center. The next service date is indicated on the device; this must be performed at least every 2 years.
Manufacturer information
FLEX
Practical help
Common problems
Tool does not start
Check if the battery is charged and if the retaining bolt is correctly inserted.
Red LED flashes
Tool is outside the operating temperature range (-10 to +50°C). Move to a warmer/cooler environment.
Green LED flashes
Retaining bolt is not closed correctly. Insert/check the bolt and cylinder.
Before use
- Unpack and check for missing or damaged parts
- Charge batteries fully before first use
- Inspect pressing tools for cracks or wear
- Ensure the correct jaw/fitting size is used
Specs in practice
- Nominal force
- Pressing force (19 kN for PP 40 12, 32 kN for PP 110 18-EC)
- Pressing area
- Capacity for plastic and metal pipes
Images and diagrams
- Fig A: Overview of tool components
- Fig B/C: Battery insertion and removal
- Fig D: Checking battery charge level
- Fig G-I: Inserting the pressing jaw
- Fig J-K: Pressing process
Model compatibility
- Use only original FLEX batteries and chargers
- Compatible with specific pressing jaws/collars as per manufacturer instructions

Manual page author
David Miller
Documentation analyst
Organizes user manual content into clear summaries, with attention to model details, product context, and everyday usability.