Home / Aquarium Supplies
Fluval Aquasky 3.0 LED Instruction Manual
Official instruction manual for the Fluval Aquasky 3.0 LED aquarium light system. Includes installation guides, safety warnings, maintenance procedures, and technical specifications for models 16650 through 16656.
Quick answers from the manual
Quick answer
- The Fluval Aquasky 3.0 LED is an app-controlled aquarium light. It is not submersible and requires a drip loop for safety. It can be mounted on aquariums with glass thickness between 3mm and 15mm. p. 2, 3
Key actions
- Install mounting brackets p. 3
- Clean fixture weekly p. 3
First start
- Connect transformer to fixture, then connect to power source. p. 2, 3
Problems and fixes
Fixture not working
Check all plug and wire connections.
p. 3Maintenance and reset
- Clean fixture and LED lens weekly with a damp cloth; do not use detergents. p. 3
Technical specifications
| Parameter | Value | Meaning | Pages |
|---|---|---|---|
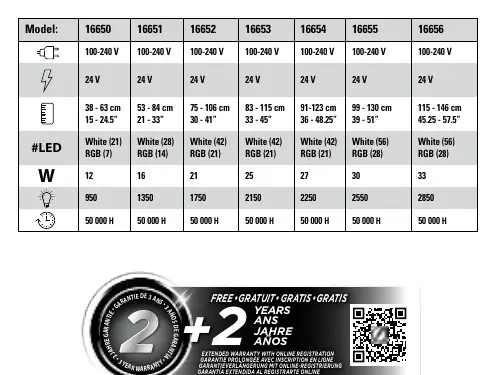
| Model 16650 | 12W | 38-63 cm length | p. 1 |
| Model 16656 | 33W | 115-146 cm length | p. 1 |
Where to find it in the PDF
- Technical Specifications p. 1
- Safety Instructions p. 2
- Installation p. 3
Table of contents
Manual images
Click an image to enlargeQuick guide from the manual
The Fluval Aquasky 3.0 LED is an aquarium lighting system controlled via the FluvalConnect app. Before installation, ensure all components are undamaged. Important: This light is not submersible, although the LEDs are IPX7 rated for temporary submersion. Always disconnect the power supply before performing any maintenance or handling the fixture.
Safety Instructions
- Indoor Use Only: Do not install or store the appliance where it will be exposed to weather or temperatures below freezing.
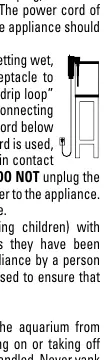
- Drip Loop: Always arrange a drip loop for the power cord to prevent water from traveling along the cord and reaching the receptacle.
- Water Safety: If the appliance or any part of it falls into the water, do not reach for it. Unplug the unit first.
- Handling: Do not touch moving or hot parts. Always unplug the device before placing hands in the aquarium water.
- Power Supply: Use only the AC adapter supplied with this product. The socket-outlet should be easily accessible.
- Light Source: The light source is not replaceable. When it reaches the end of its life, the entire luminaire must be replaced. Do not stare directly at the light.
Installation and Usage
Mounting Brackets
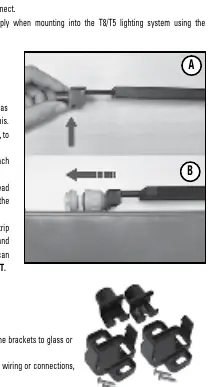
The fixture can be mounted on aquariums with a glass thickness between 3mm and 15mm.
- Ensure all components are present.
- Adjust the extendable brackets to match the aquarium width. The edges should rest securely on the aquarium frame.
- For T5 lighting systems: Fit the end caps over the end of the mounting brackets to face inwards.
- For T8 lighting systems: Click the T8 ring adapter onto the end of each mounting bracket, then follow the T5 instructions.
- Tighten the end caps back onto the threads, ensuring they are not cross-threaded or over-tightened.
Ceiling Bracket
Clip the ceiling brackets over the back (finned side) of the LED strip. Use suitable fixings for the mounting surface. If bonding to glass or plastic, use aquarium silicone. Do not screw the bracket into housings containing electrical wiring.
Maintenance
For maximum performance, clean the fixture and LED lens weekly. Unplug the transformer before cleaning. Wipe exposed surfaces with a damp cloth to remove dust or mineral deposits. Do not use detergents or harsh cleaners, as these can damage the fixture. Ensure all surfaces are dry before reconnecting to the power source.
Troubleshooting
If the fixture does not work, verify that all plugs and wires are firmly connected, specifically the connection from the fixture to the transformer and from the transformer to the electrical outlet.
Practical help
Common problems
Fixture does not turn on
Ensure all plugs and wires are firmly connected between the fixture, transformer, and electrical outlet.
Water leakage or wet plug
Disconnect the fuse or circuit breaker supplying power to the appliance before unplugging or examining the receptacle.
Before use
- Verify all components are undamaged.
- Ensure the aquarium glass thickness is between 3mm and 15mm.
- Arrange a drip loop for the power cord.
- Ensure the light is securely fastened to the aquarium frame.
- Disconnect power before any maintenance.
Specs in practice
- Bluetooth Frequency
- 2.402 GHz - 2.480 GHz (2.4G ISM band).
- Bluetooth Power
- -20 dBm to +4 dBm.
Images and diagrams
- Drip loop: Cord must hang below the level of the receptacle to prevent water from dripping into the outlet.
- Mounting brackets: Extendable arms adjust to fit aquarium width; T8/T5 adapters are used for specific lighting system retrofits.
Model compatibility
- Compatible with T8 and T5 lighting systems using included adapters.
- Suitable for aquariums with glass thickness between 3mm and 15mm.

Manual page author
David Miller
Documentation analyst
Organizes user manual content into clear summaries, with attention to model details, product context, and everyday usability.