Lighting / Aquarium Lighting
Assembly Instructions for Fluval Shaker Collection 168L Cabinet
A complete assembly guide for the Fluval Shaker Collection 168L aquarium cabinet. Includes step-by-step instructions for panel assembly, hinge installation, 3D hinge adjustment, and essential waterproofing procedures to protect your...
Quick answers from the manual
Quick answer
- The Fluval Shaker Collection 168L cabinet should be assembled on a flat, level surface using a mallet. Key steps include gluing dowels, installing soft-close hinges at the top and standard hinges at the bottom, and sealing internal joints with silicone to prevent water damage. p. 1, 2
Key actions
- Apply a small drop of glue to dowel holes before inserting dowels. p. 1, 2
- Seal inside joints of the top panel trim with silicone. p. 2
- Use a mallet for assembly, not a metal hammer. p. 2
Problems and fixes
Door misalignment
Perform 3D Hinge Adjustment.
p. 2Where to find it in the PDF
- Assembly Instructions p. 1, 2
Table of contents
Manual images
Click an image to enlargeQuick Guide for Assembly
The Fluval Shaker Collection 168L cabinet requires assembly on a flat, solid, and level surface. It is recommended to build the cabinet in its final location. Use a mallet for assembly; do not use a metal hammer to avoid damaging the panels. Ensure you have all parts and fittings listed in the manual before starting.
Preparation and Tools
Before beginning, clear a workspace and ensure the floor is level. The assembly process requires a mallet. Apply a very small drop of glue into the dowel holes on panels (i), (ii), (iii), (iv), and (11) before inserting the dowels (G). Ensure panel (i) is positioned correctly with fitting (H) at the same height as those on the side panels.
Assembly Steps
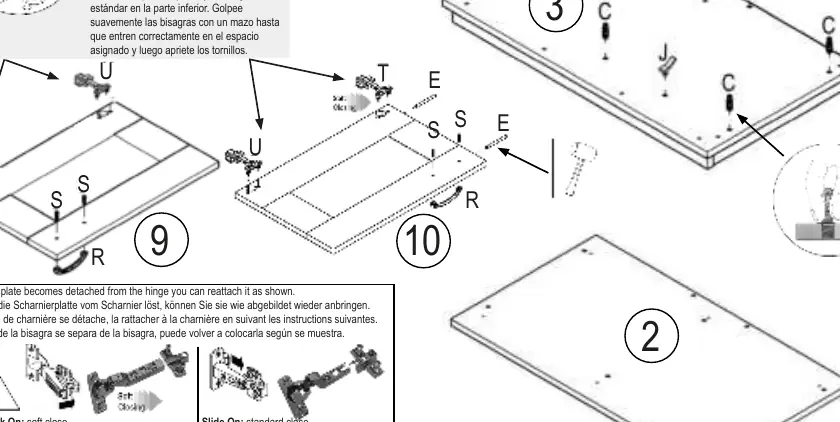
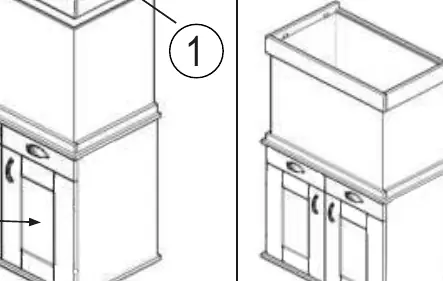
Follow the numbered diagrams in the manual to connect the panels. Ensure all fittings are secure. When attaching the top panel, ensure fittings (H) are correctly fitted so the deep side of the hood rests on the tank. Use washers (F) to ensure even spacing between the false drawer and the door.
Hinge Installation and Adjustment
The cabinet uses two types of hinges. Install the soft-close hinge at the top and the standard hinge at the bottom of the door. Knock the hinges into place with a mallet before tightening the screws. If the hinge plate detaches, it can be reattached as shown in the diagram. Use the 3D Hinge Adjustment feature to align the doors properly if they are uneven.
Waterproofing and Maintenance
After assembly, it is strongly recommended to seal all inside joints of the top panel trim to protect against water spills. Apply a very fine bead of transparent silicone along the joints and smooth it out with a wet finger to create a clean, water-resistant finish.
Practical help
Common problems
Doors are misaligned
Use the 3D Hinge Adjustment feature to align the doors correctly.
Hinge plate detached
Reattach the hinge plate to the hinge as shown in the diagram on page 1.
Risk of water damage
Seal all inside joints of the top panel trim with a fine bead of transparent silicone.
Before use
- Ensure the floor is flat, solid, and level.
- Use a mallet for assembly; do not use a metal hammer.
- Apply a small drop of glue to dowel holes before insertion.
- Install soft-close hinges at the top and standard hinges at the bottom.
- Use washers (F) for even spacing between the false drawer and door.
- Seal internal joints with silicone after assembly.
Specs in practice
- Soft Close Hinge
- Installed at the top position for smooth door closing.
- Standard Hinge
- Installed at the bottom position.
Images and diagrams
- Diagrams show the correct orientation of panels (i) through (iv) and (11).
- Hinge installation diagrams distinguish between soft-close and standard hinges.
- 3D adjustment diagrams illustrate how to align doors.
Model compatibility
- Designed specifically for the Fluval Shaker Collection 168L aquarium.
- Ensure the cabinet is placed in its final location before assembly.

Manual page author
Emily Carter
User documentation editor
Prepares concise manual descriptions and highlights the most useful setup, operation, and maintenance information for readers.