Home Appliances / Parts & Accessories
Installation Guide for Frigidaire 11NBSTGSSS Gas Range Trim Kit
Step-by-step installation instructions for the Frigidaire 11NBSTGSSS gas range trim kit. Learn how to properly prepare surfaces, attach the vented rear piece, and install the side trim strips for a secure fit.
Table of contents
Manual images
Click an image to enlargeQuick Guide for Installation
This trim kit is designed for Frigidaire front control freestanding gas ranges. The kit includes four pieces: one vented rear piece, one rear trim strip, and two side trim pieces. Proper installation requires cleaning the mounting surfaces with rubbing alcohol and ensuring the range is level and in its final position before applying adhesive components. Adhesive pieces require holding for 10 seconds to ensure a secure bond.
Safety Precautions
Warning: Before beginning installation, disconnect the electrical power to the range. Ensure the appliance is turned off and all surfaces are cool to the touch. Attempting to service the appliance while hot may cause burns or other injuries.
Kit Contents
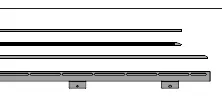
- One vented rear piece (attaches with screws)
- One rear trim piece (adhesive)
- Two side trim pieces (adhesive)
Preparation
Before installing the trim kit, perform the following steps:
- Ensure the range is level and in its final position.
- Clean the countertops and the back of the range thoroughly using rubbing alcohol to remove any dust or residue that might prevent the adhesive from sticking.
- Verify the fit and placement of all pieces before peeling away the adhesive tape.
Installation Steps
Follow these steps in order to ensure proper ventilation and fit:
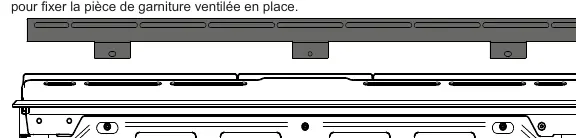
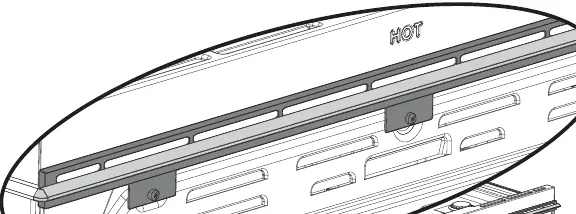
- Installing the Vented Rear Trim: Remove the three screws from the back of the range that align with the tabs on the bottom of the vented trim piece. Position the vented trim so the vents face away from the range back. Secure the piece by replacing the three screws.
- Installing the Rear Trim Strip: Once the vented trim is secured, peel the tape from the rear trim piece. Center the piece to the width of the range, press the adhesive side against the back of the range, and hold firmly for 10 seconds.
- Installing the Side Trim Strips: Ensure the range is in its final position. Remove the tape from the side trim piece. Align the front of the trim piece with the notch on the front of the range. Press the trim against the countertop surface for 10 seconds. Repeat this process for the remaining side trim piece.
Manufacturer information
Frigidaire
Practical help
Common problems
Adhesive not sticking
Clean countertops and the back of the range thoroughly with rubbing alcohol to remove dust and residue before application.
Trim pieces do not fit correctly
Ensure the range is level and in its final position before applying adhesive pieces. Verify placement before peeling the tape.
Before use
- Disconnect electrical power to the range.
- Ensure the range is level and in its final position.
- Clean countertops and the back of the range with rubbing alcohol.
- Verify the fit and placement of all pieces before peeling the adhesive tape.
Specs in practice
- Vented Rear Piece
- Attaches to the back of the range using existing screws; provides necessary ventilation.
- Rear Trim Strip
- Adhesive-backed strip that attaches to the back of the vented piece.
- Side Trim Pieces
- Adhesive-backed strips that attach to the countertop to close gaps.
Images and diagrams
- The vented rear trim aligns with three screws on the back of the range.
- Side trim pieces feature a notch that must be aligned with the front of the range.
Model compatibility
- Designed for specific Frigidaire front control freestanding gas ranges.

Manual page author
Michael Turner
Technical manual editor
Reviews PDF manuals for structure, safety notes, and practical product details so readers can find the right information quickly.