Electronics / Televisions
Quick Start Guide for Fronius iWave 190i and 230i Welding System
A concise quick start guide for the Fronius iWave 190i and 230i gas-cooled welding systems, covering assembly, gas cylinder installation, and initial setup steps.
Table of contents
Manual images
Jump to the sectionQuick guide from the manual
This document serves as a quick start guide for the Fronius iWave 190i and 230i gas-cooled welding systems. It outlines the essential physical assembly and connection steps required before operation. Users must read and understand all provided and online documentation before working with the device.
Assembly and Installation
The assembly process requires a TX25 screwdriver. Follow these steps to prepare the unit:
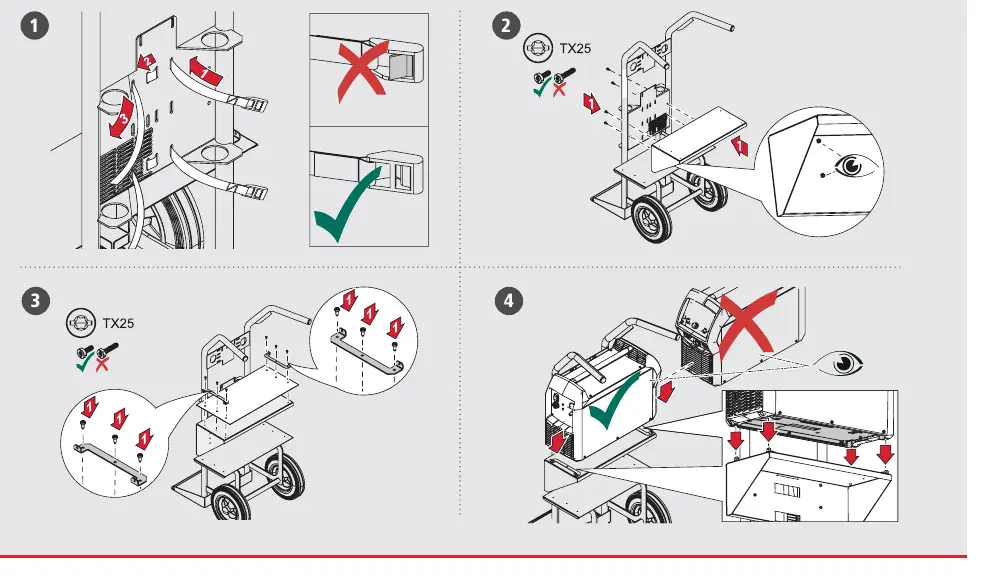
- Ensure the welding power source is correctly positioned on the transport cart.
- Secure the power source to the cart using the provided screws and brackets.
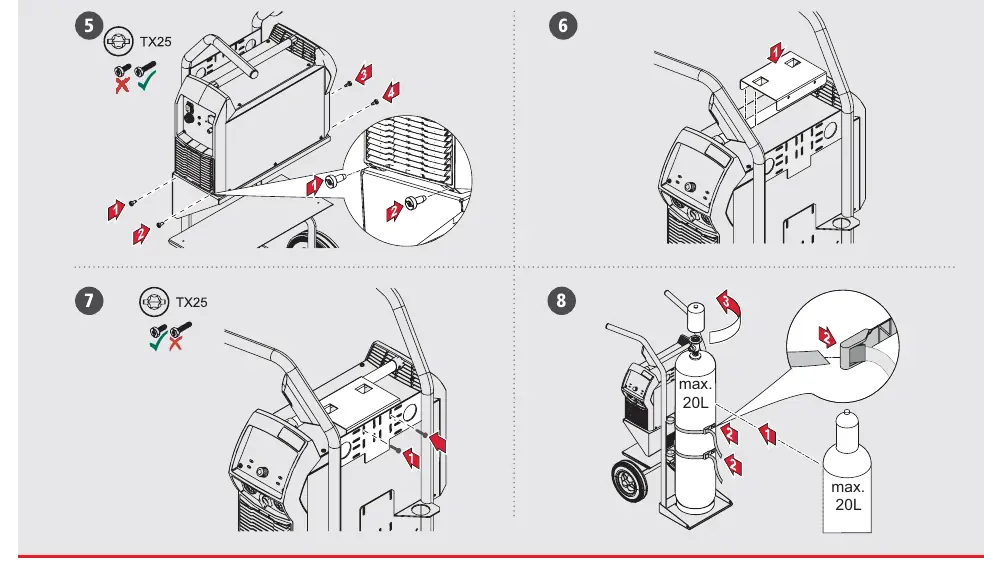
- Install the gas cylinder onto the cart, ensuring it is securely fastened. The maximum cylinder size supported is 20L.
- Connect the gas regulator to the cylinder and attach the gas hose to the power source.
- Connect the welding torch and ground cable to the appropriate ports on the front panel.
- Ensure all connections are tight and secure before proceeding.
Initial Setup and Operation

- Open the gas cylinder valve slowly. Ensure the pressure does not exceed 5 bar (72 psi).
- For MultiVoltage models, ensure the power cable is correctly connected to the appropriate power source.
- Switch on the device using the main power switch.
- Verify that all connections are secure and that the torch is ready for use.
- Always wear appropriate protective gear when operating the welding system.
Contact Information
For further support, visit the official website at www.fronius.com. You can also contact Fronius International GmbH at Froniusplatz 1, A-4600 Wels, Austria, or via email at [email protected]. A full list of sales and service partners is available at http://www.fronius.com/adresses.
Official resources from the manual
Manufacturer information
Fronius International GmbH
Practical help
Common problems
Gas pressure too high
Ensure the gas regulator is set to a maximum of 5 bar (72 psi).
Insecure assembly
Verify all screws are tightened using a TX25 screwdriver and that the power source is correctly seated on the cart.
Before use
- Read and understand all provided and online documentation.
- Ensure the welding power source is securely mounted on the cart.
- Check that the gas cylinder is properly fastened (max 20L).
- Verify gas regulator pressure is set to max 5 bar.
- Confirm all cable connections (torch, ground, power) are secure.
- Wear appropriate personal protective equipment.
Specs in practice
- Max gas pressure
- 5 bar (72 psi) - do not exceed this to prevent damage or safety hazards.
- Max cylinder size
- 20L - the transport cart is designed for cylinders up to this capacity.
Images and diagrams
- Steps 1-7: Assembly of the power source onto the transport cart using TX25 screws.
- Step 8: Mounting the gas cylinder.
- Steps 9-10: Connecting the gas regulator and hose.
- Steps 11-12: Connecting the welding torch and ground cable.
- Step 16: Power connection for Standard vs MultiVoltage models.
Model compatibility
- This guide applies to iWave 190i and 230i gas-cooled models.
- MultiVoltage models require specific power connection procedures.

Manual page author
Michael Turner
Technical manual editor
Reviews PDF manuals for structure, safety notes, and practical product details so readers can find the right information quickly.