Documents / Warranty Safety
Gamdias AEOLUS P2 1203U Case & Radiator Fan Installation Guide
Quick installation and connection guide for the Gamdias AEOLUS P2 1203U fan system, including daisy-chaining, radiator mounting, and controller wiring instructions.
Table of contents
Manual images
Jump to the sectionQuick guide from the manual
This guide provides instructions for the installation and connection of the Gamdias AEOLUS P2 1203U fan system. Before starting, ensure the power is turned off. The system supports daisy-chaining fans for simplified cable management and includes a dedicated controller hub.
Package Contents
The package includes 3 fans, 3 fan blades, a controller hub, 12 short screws (D), 12 long screws (E), and various connection cables (USB, PWM, ARGB, and fan extension cables) along with a tube of lubricant.
Installation
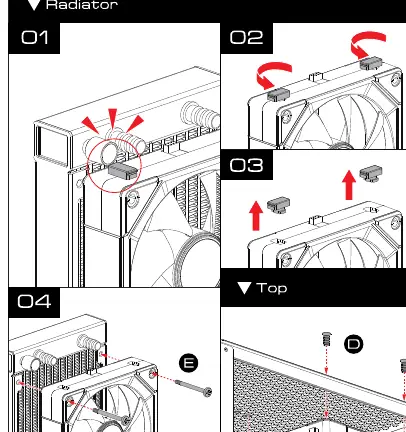
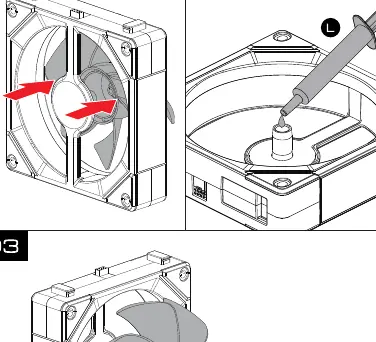
Fans can be mounted to the front or back of the PC case using the provided screws. For radiator mounting, align the fans with the radiator, secure them using the long screws (E), and ensure the daisy-chain connectors are properly seated. The fan blades are replaceable; use the provided lubricant (L) on the fan motor shaft if necessary.
Connection
Connect the fans to the controller hub using the provided extension cables (K). The hub supports up to 6 fans per port, with a maximum of 16 fans in total. Connect the hub to the motherboard using the PWM cable (G) and the USB cable (F). For ARGB lighting control, use the provided ARGB cable (H) to connect to the motherboard's 5V 3-pin header.
Safety
Always disconnect the power supply from the wall outlet before performing any installation or maintenance on the cooling system.
Manufacturer information
GAMDIAS
Practical help
Common problems
Fans not spinning or lighting up
Verify that the SATA power cable is connected to the PSU and the USB/PWM cables are correctly seated in the controller hub and motherboard.
Daisy-chained fans not detected
Ensure the physical connectors between the fans are fully clicked into place and the extension cable (K) is securely attached to the hub.
Before use
- Turn off the PC and disconnect the power cable from the wall outlet.
- Verify all components listed in the package contents are present.
- Ensure you have a 5V 3-pin ARGB header on your motherboard for lighting control.
- Check that your PSU has available SATA power connectors.
Specs in practice
- Daisy-chaining
- Allows connecting multiple fans together to reduce cable clutter.
- Hub Capacity
- The controller supports up to 6 fans per port and 16 fans total.
Images and diagrams
- The controller hub features ports for PWM, LED, USB, and SATA power.
- The daisy-chain mechanism uses physical interlocking connectors on the fan frames.
Model compatibility
- ARGB lighting requires a 5V 3-pin header (D_LED, ADD GEN2, JARGB_V2, or ADD2_LED).

Manual page author
Michael Turner
Technical manual editor
Reviews PDF manuals for structure, safety notes, and practical product details so readers can find the right information quickly.