Industrial / Gas Detection
Gastec No. 21LA Carbonyl Sulphide Detector Tube Instruction Manual
Quick guide for the Gastec No. 21LA Carbonyl Sulphide Detector Tube. Includes measurement procedures, safety precautions, interference data, and correction factors for accurate gas detection.
Quick answers from the manual
Quick answer
- The Gastec No. 21LA tube is used for detecting carbonyl sulphide in air or industrial areas. It requires a Gastec Gas Sampling Pump and specific stroke counts based on the expected concentration. p. 1
Key actions
- Break tube tips, insert into pump, align marks, pull handle to 100mL, and wait 3 minutes. p. 1
Problems and fixes
Interference from coexisting gases
Refer to the interference table; some gases like hydrogen sulphide may cause white discoloration.
p. 1Show 2 more answers Show less
Technical specifications
| Parameter | Value | Meaning | Pages |
|---|---|---|---|
| Measuring Range | 2-5 ppm (2 strokes), 5-50 ppm (1 stroke), 50-125 ppm (1/2 stroke) | Range depends on the number of pump strokes performed. | p. 1 |
| Sampling Time | 3 minutes per pump stroke | Time required for air sample to be drawn through the tube. | p. 1 |
Where to find it in the PDF
- Instruction Sheet p. 1
Table of contents
Important Information
The Gastec No. 21LA Carbonyl Sulphide Detector Tube is designed for detecting carbonyl sulphide in air or industrial areas. To ensure accurate results, use only Gastec detector tubes with a Gastec Gas Sampling Pump. The tube must be used within the temperature range of 0-40°C (32-104°F) and relative humidity of 0-90%.
Safety Precautions
- Handling: Do not touch broken glass tubes, broken pieces, or reagents with bare hands.
- Eye Safety: Keep away from eyes when breaking tube ends.
- Compatibility: Do not use non-Gastec parts or components, as this may damage the system, cause injury, or void warranties.
Measurement Procedure
- Check the pump for leaks by inserting a freshly sealed detector tube and following the pump operation manual.
- Break the tips off the fresh primary and secondary tubes using the pump's tube tip breaker.
- Connect the marked ends with rubber tubing.
- Insert the analyzer tube securely into the pump inlet with the arrow pointing toward the pump.
- Ensure the pump handle is fully in and align the guide marks on the pump body with the handle.
- Pull the handle out until it locks at one pump stroke (100 mL). Wait three minutes.
- For measurements less than 5 ppm, repeat the sampling procedure until the stain reaches the first calibration mark. For measurements higher than 50 ppm, use a fresh tube and perform a half pump stroke.
- Read the concentration level at the interface where the stained reagent meets the unstained reagent.
Corrections
Temperature: Correct for temperature using the provided correction table.
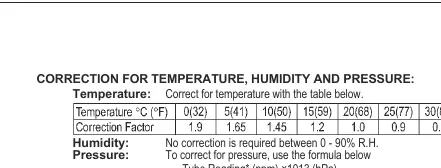
Humidity: No correction is required between 0-90% R.H.
Pressure: Use the formula: Tube Reading (ppm) × 1013 (hPa) / Atmospheric Pressure (hPa).
Interferences
Test results may be affected by coexisting gases. Carbon monoxide, sulphur dioxide, carbon disulphide, carbon dioxide, nitrogen dioxide, hydrogen sulphide, and butane/propane may cause interference. Refer to the interference table in the manual for specific effects and concentration limits.
Storage and Disposal
Store tubes at 10°C (50°F) or below in a refrigerator. Check the validity date printed on the tube box. Dispose of tubes according to local government regulations; the reagent does not contain toxic substances.
Manufacturer information
Gastec Corporation
Practical help
Common problems
Primary tube is totally discolored
The analyzer tube will be discolored white due to hydrogen sulphide interference.
Measurement less than 5 ppm
Repeat the sampling procedure until the stain reaches the first calibration mark.
Measurement higher than 50 ppm
Prepare a fresh tube and perform a half pump stroke.
Before use
- Check pump for leaks using a freshly sealed detector tube.
- Ensure the tube is within the temperature range of 0-40°C (32-104°F).
- Verify the tube is within the relative humidity range of 0-90%.
- Store tubes at 10°C (50°F) or below.
- Ensure the arrow on the tube points toward the pump.
Show more Show less
Specs in practice
- Measuring Range
- 2-5 ppm (2 strokes), 5-50 ppm (1 stroke), 50-125 ppm (1/2 stroke).
- Sampling Time
- 3 minutes per pump stroke.
- Reaction Principle
- Bluish Purple to White.
Images and diagrams
- The tube consists of a Scrubber Layer and an Oxidising agent layer.
- The arrow on the tube indicates the direction of airflow toward the pump.
Model compatibility
- Use only Gastec detector tubes in a Gastec pump.
- Do not interchange or use non-Gastec parts.

Manual page author
David Miller
Documentation analyst