Garden / Seasonal Decorations
Installation Guide for GE Lighting Glenwillow Pendant PND1LDMWBGW
Installation guide for the GE Lighting Glenwillow Pendant (PND1LDMWBGW). Includes step-by-step mounting instructions, wiring diagrams, and safety requirements for proper setup.
Table of contents
Quick guide from the manual
This installation guide provides instructions for the GE Lighting Glenwillow Pendant (Model PND1LDMWBGW). Ensure the power is turned off at the circuit breaker before starting. The fixture is designed for 120VAC 60Hz electrical systems and requires an E26 socket bulb (max 60W, ST19 recommended). Do not install in damp or wet locations.
Package Contents
Before beginning, ensure all parts are present:
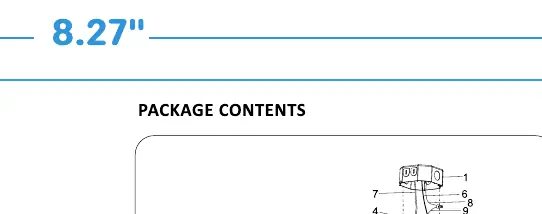
- Mounting bracket and screws
- Wire nuts
- Fixture canopy and swivel
- Rods (12 inch x 2)
- Fixture metal body
- Glass shade and socket ring
Installation
Preparation: Turn off the main power at the circuit breaker. Remove the existing fixture and disconnect all electrical wiring.
Mounting:
- Remove the mounting bracket from the canopy by removing the canopy nuts.
- Attach the mounting bracket to the outlet box.
- Adjust the desired pendant length by threading the wire through the rods. Connect the rods together using the threaded segments.
- Pass the fixture wire through the swivel and into the canopy.
Wiring:
- Connect the fixture wires to the power supply wires using the provided wire nuts.
- Connect black supply wire to black fixture wire.
- Connect white supply wire to white fixture wire.
- Connect the power supply ground wire to the fixture ground wire.
- Carefully tuck the wires into the outlet box, ensuring they are not pinched between the canopy and the ceiling.
Final Assembly:
- Attach the canopy to the mounting bracket using the mounting screws and canopy nuts.
- Adjust the angle of the swivel to the right position.
- Place the glass shade over the socket and secure it with the socket ring.
- Install the recommended bulb.
Safety and Maintenance
Consult a qualified electrician to ensure correct connection to branch circuits. The fixture must be installed in accordance with the applicable installation code by a person familiar with the construction and operation of the product. Ensure the ambient temperature does not exceed 40°C (104°F).
Practical help
Common problems
Fixture not hanging straight
Adjust the angle of the swivel at the canopy to the correct position.
Wires pinched during installation
Carefully tuck wires into the outlet box; ensure they are not pinched between the canopy and the ceiling.
Before use
- Turn off main power at the circuit breaker.
- Ensure the outlet box is properly installed and can support the fixture weight.
- Verify the supply wires are compatible with 120VAC 60Hz.
- Check that the ambient temperature will not exceed 40°C (104°F).
Images and diagrams
- The package contents diagram identifies parts 1-19, including the mounting bracket, canopy, and glass shade.
- Wiring diagram shows connecting black to black, white to white, and ground to ground using wire nuts.
Model compatibility
- Use only ST19 bulbs (not included).
- Not for use in damp or wet locations.

Manual page author
Emily Carter
User documentation editor
Prepares concise manual descriptions and highlights the most useful setup, operation, and maintenance information for readers.