Furniture / Storage Cabinets
User Manual for Generic X5 1080P Car Radio and DVR System
Quick installation and wiring guide for the Generic X5 1080P car radio and DVR system. Includes detailed pin maps, camera connection steps, accessory setup, and factory reset instructions.
Table of contents
Manual images
Click an image to enlargeQuick Guide for Installation
This guide provides essential wiring and installation instructions for the Generic X5 1080P car radio and DVR system. Before beginning, identify whether your vehicle installation requires a canbus box, as this changes the wiring configuration. Ensure all connections are secure and follow the specific pin map provided for the power cable.
Wiring Connections
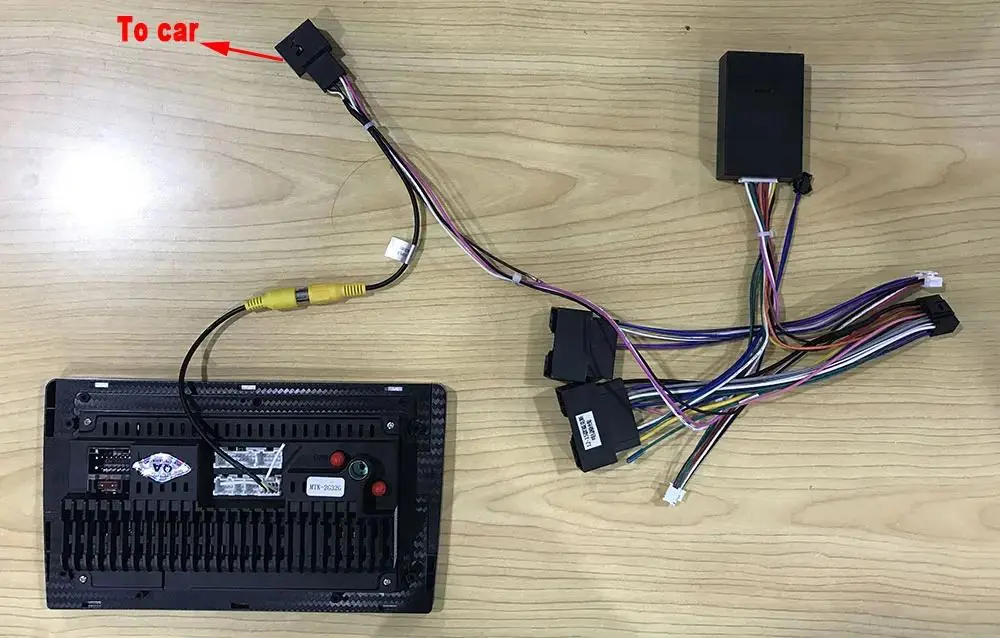
The system supports two main wiring configurations depending on your vehicle's requirements:
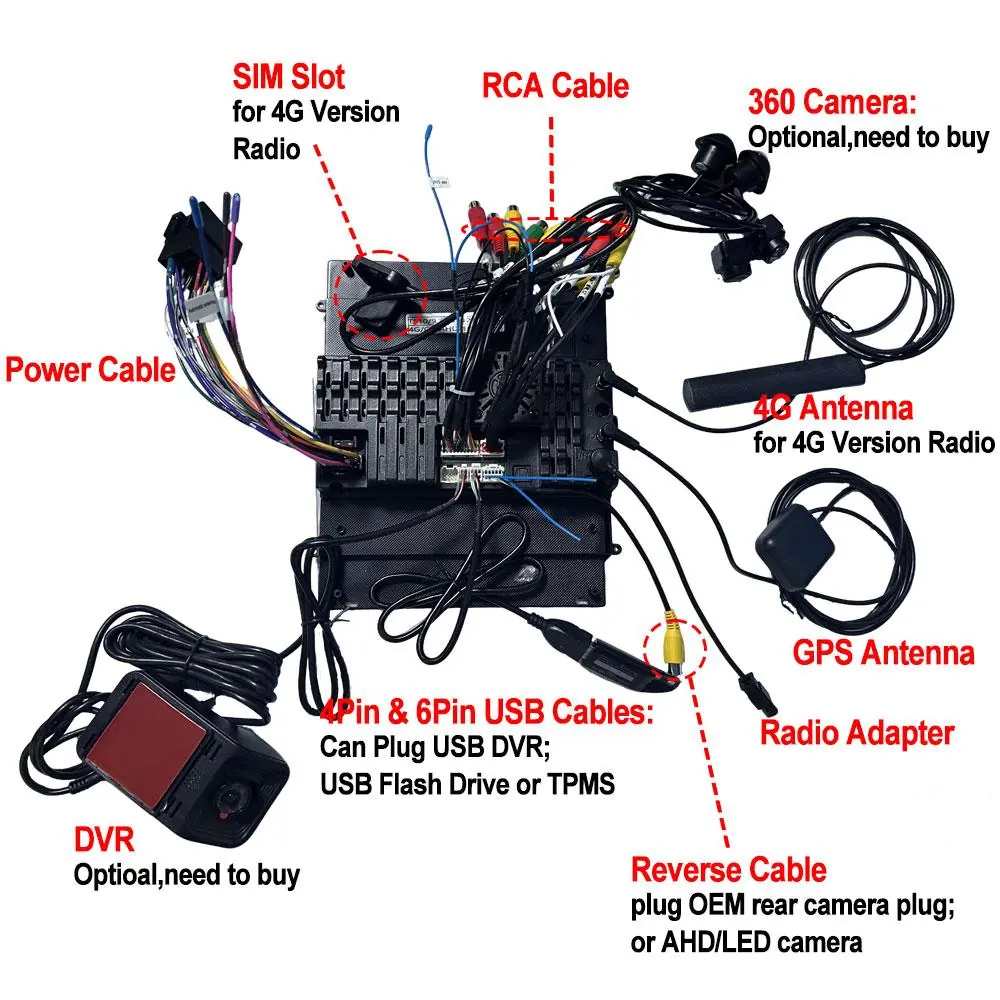
- Cable without canbus box: Connect the power cable directly to the radio unit. Ensure the RCA cables, 4G antenna, GPS antenna, and radio adapter are connected to their respective ports.
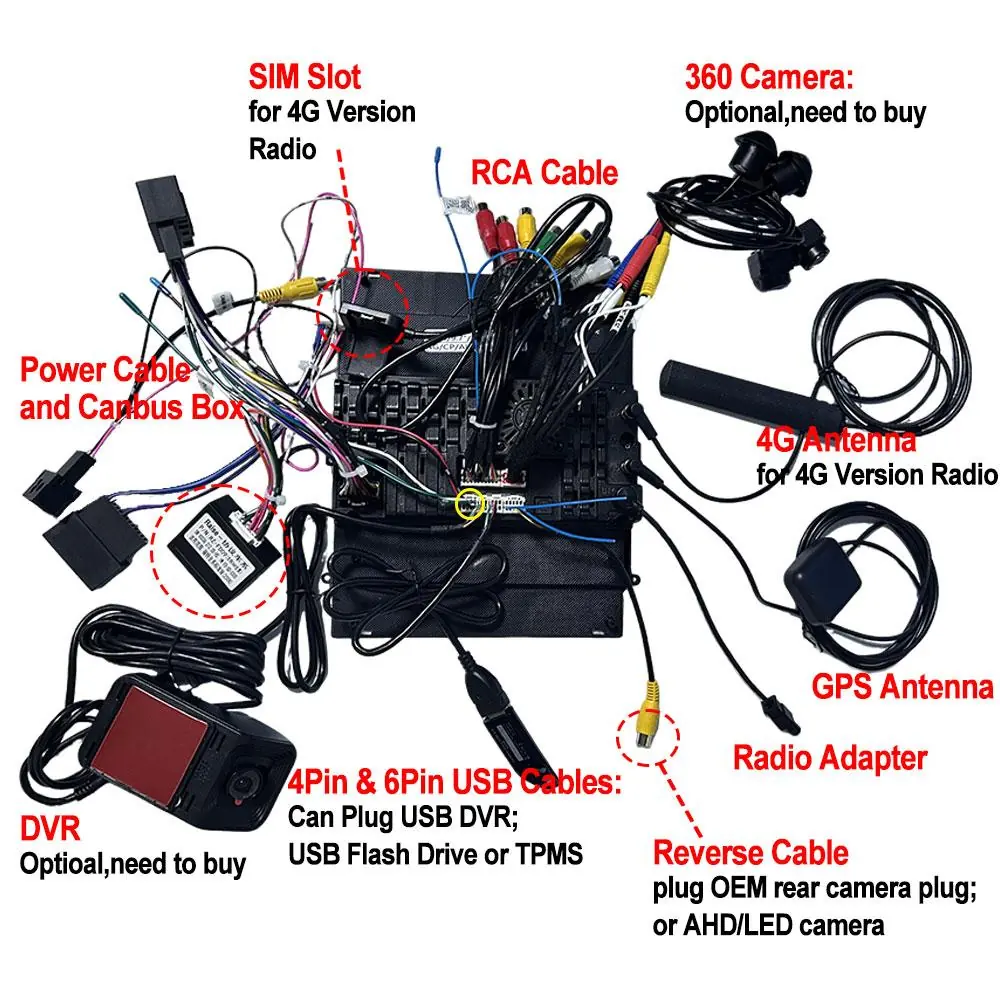
- Cable with canbus box: Connect the power cable including the canbus box to the radio unit. This configuration is necessary for vehicles that require canbus communication.
Pin Map Definition
The main power cable uses a specific pin map (check in G direction). Ensure the wires are matched correctly to the vehicle's harness:
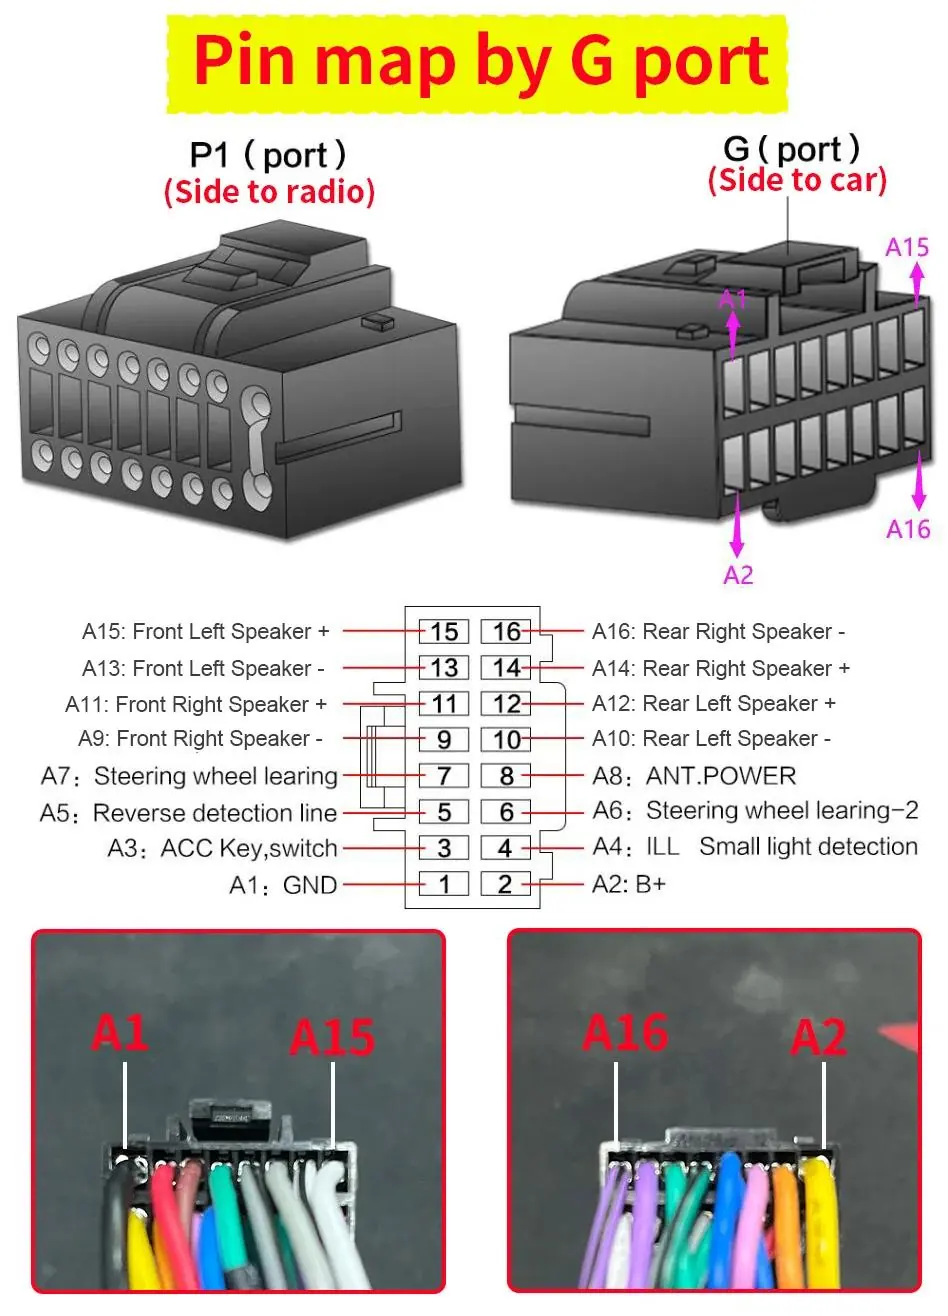
- A1: GND
- A2: B+
- A3: ACC Key, switch
- A4: ILL Small light detection
- A5: Reverse detection line
- A6: Steering wheel learning-2
- A7: Steering wheel learning
- A8: ANT.POWER
- A9: Front Right Speaker -
- A10: Rear Left Speaker -
- A11: Front Right Speaker +
- A12: Rear Left Speaker +
- A13: Front Left Speaker -
- A14: Rear Right Speaker +
- A15: Front Left Speaker +
- A16: Rear Right Speaker -
Connecting AHD Rear Camera
Follow these steps to connect your rear camera:
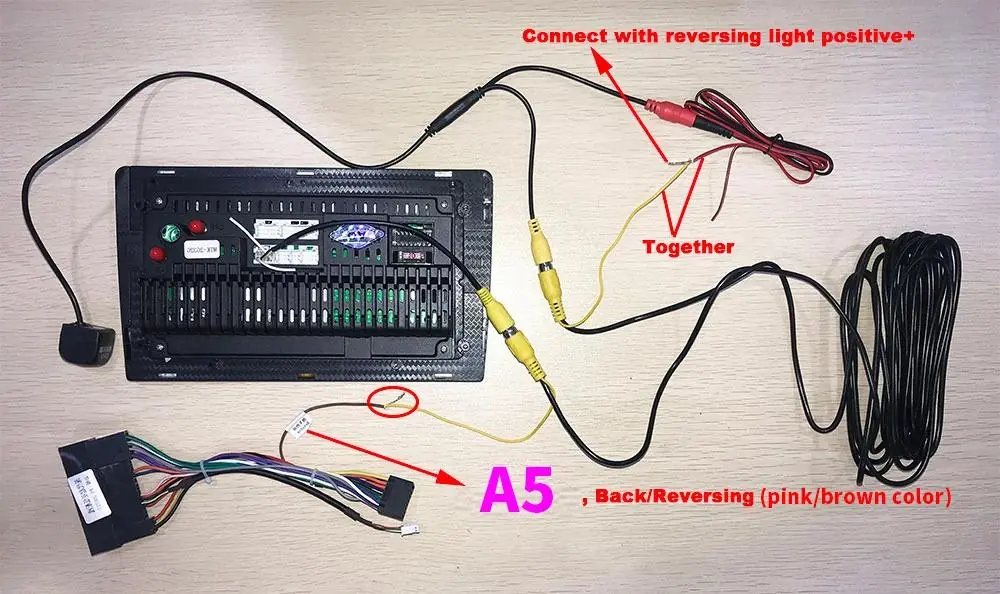
- Original car rear camera: The power cable supports the original car rear camera connection.
- AHD rear camera (with canbus): Connect the camera and ensure the A5 (Back/Reversing) wire is connected to the reversing light positive.
- AHD rear camera (without canbus): Connect the camera and ensure the A5 (Back/Reversing) wire is connected to the reversing light positive.
Connecting Accessories
The radio unit supports several external accessories via the RCA cable harness:
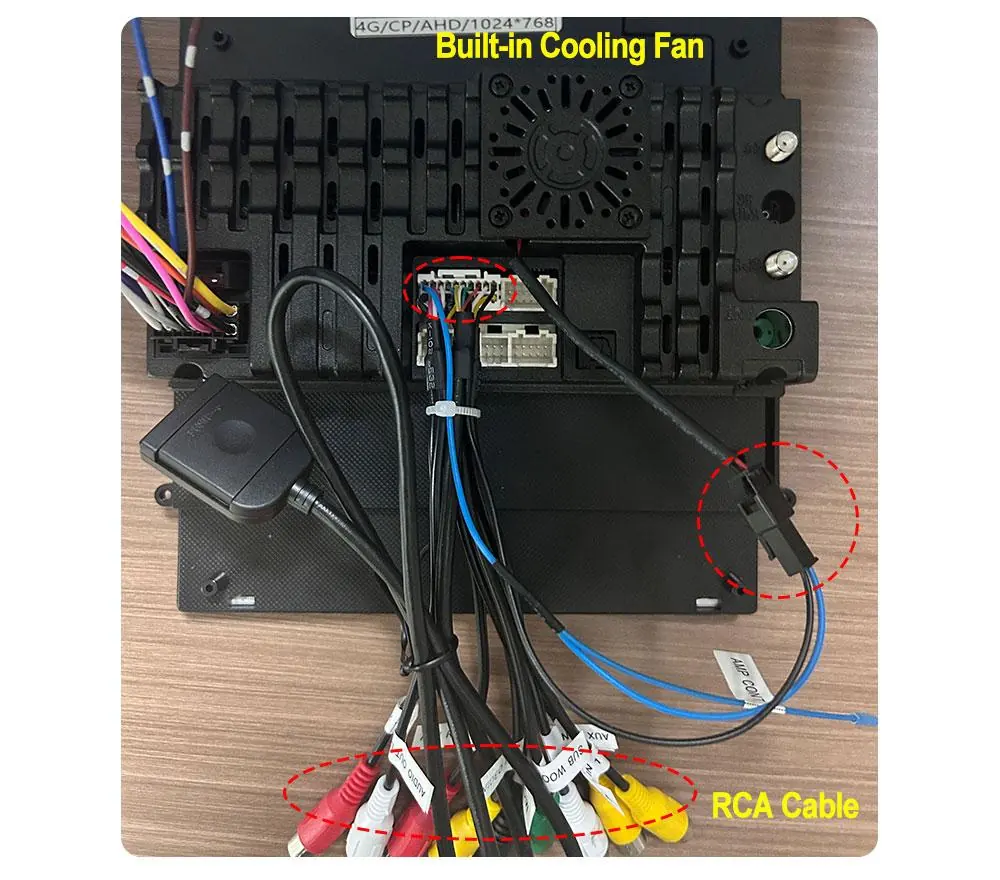
- Built-in Cooling Fan: Plug the cooling fan connector into the designated RCA cable connector.
- Extra Microphone: Plug the microphone into the "MIC" connector on the RCA cable harness.
- Subwoofer: Plug the subwoofer into the "SUB WOOFER" connector on the RCA cable harness.
DVR Installation
To install the X5 1080P USB DVR:
- Plug the DVR into the 6Pin USB cable.
- Access the "File manager" app on the radio.
- Install the "Fvdvr" APK file.
- Once installed, the Ucam app can be used to view the DVR feed.
Factory Reset
If you need to restore the system to factory settings:
- Navigate to Setting.
- Select System.
- Select Reset factory.
- Enter the password: 7890.
Official resources from the manual
Practical help
Common problems
Cannot access factory settings
Navigate to Setting > System > Reset factory and enter the password '7890'.
DVR not recording or recognized
Ensure the DVR is plugged into the 6Pin USB cable and that the 'Fvdvr' app has been installed via the File Manager.
Rear camera not activating when reversing
Verify that the A5 (Back/Reversing) wire is correctly connected to the reversing light positive.
Before use
- Determine if your vehicle requires a canbus box for installation.
- Verify the pin map (G direction) before connecting the main power cable.
- Ensure all RCA connectors (Subwoofer, MIC, Cooling Fan) are plugged into the correct ports.
- Check that the AHD camera is connected to the correct reversing signal wire.
Specs in practice
- 6Pin USB Cable
- Dedicated port for connecting the USB DVR.
Images and diagrams
- Wiring diagrams distinguish between installations with and without a canbus box.
- The pin map diagram illustrates the G-port side connection for the main power harness.
- Accessory connection diagrams show specific RCA cable ports for the cooling fan, microphone, and subwoofer.
Model compatibility
- The power cable supports original car rear cameras.
- The system supports AHD/LED cameras for reversing.
- The 6Pin USB cable is specifically for the USB DVR, USB Flash Drive, or TPMS.

Manual page author
Michael Turner
Technical manual editor
Reviews PDF manuals for structure, safety notes, and practical product details so readers can find the right information quickly.