Electronics / Projectors
1080P Projector User Guide
User guide for the 1080P Projector. Includes setup instructions, HDMI and wireless connection steps, media playback, and OTA update procedures.
Table of contents
Manual images
Click an image to enlargeQuick Guide
This projector is designed for multimedia playback and screen mirroring. Before use, ensure you have the necessary cables (HDMI, adapters) as they are often sold separately. The projector supports direct media playback via USB or Micro SD and wireless connectivity for Android and Apple devices.
Parts and Controls
The projector features the following physical controls and ports:
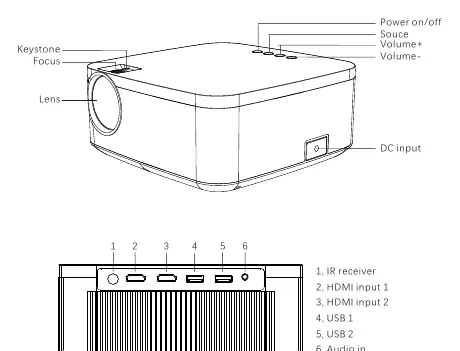
- Top Panel: Keystone adjustment, Focus adjustment, Lens, Power on/off, Source, Volume +/-.
- Rear/Side Ports: DC input, IR receiver, HDMI 1, HDMI 2, USB 1, USB 2, Audio in.
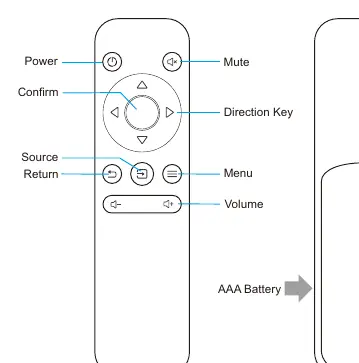
Remote Control
The remote allows full navigation of the projector's interface. Key buttons include Power, Mute, Confirm, Direction Keys, Source, Return, Menu, and Volume controls. Ensure AAA batteries are installed correctly.
HDMI Connections
To connect external devices via HDMI, you will need an HDMI cable and, depending on your device, a specific adapter:
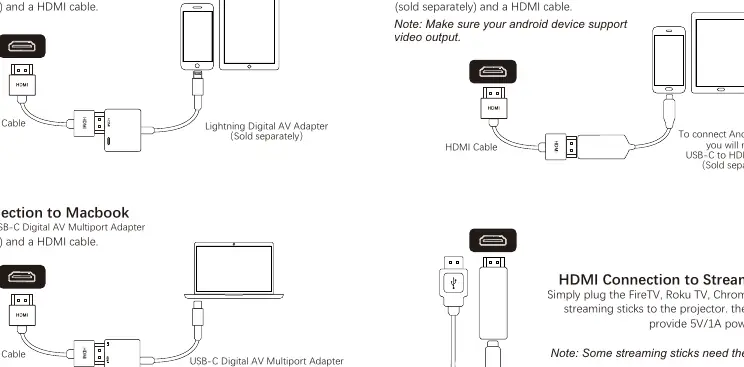
- iPhone/iPad: Requires an Apple Digital AV Adapter.
- Android Devices: Requires a USB-C to HDMI Adapter. Ensure your device supports video output.
- Macbook: Requires a USB-C Digital AV Multiport Adapter.
- Streaming Sticks: Plug directly into the HDMI port. The projector can provide 5V/1A power, though some sticks may require their own power source.
Wireless Connections
The projector supports screen mirroring for mobile devices:
- Android (Smart View/Miracast): Turn on the projector, enter the wireless page, and activate Smart View or Miracast on your Android device. Select the projector (PRO-xxxxxx) to connect.
- Apple (Airplay/Screen Mirroring): Turn on the projector, enter the wireless page to see the device name and password. Connect your Apple device to the projector's Wi-Fi, then use the quick menu to activate screen mirroring.
Network and OTA Upgrading
To perform system updates:
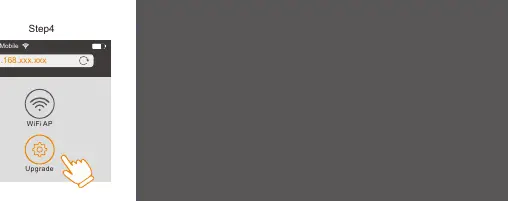
- Connect the projector to your local Wi-Fi network via the settings menu.
- Once connected, check the URL displayed on the projected screen (e.g., 192.168.xxx.xxx).
- Log on to this URL using your mobile device browser.
- Select the 'Upgrade' button to initiate the OTA update.
Multi-media Playback
The projector can read videos and images directly from USB drives or Micro SD cards. Simply insert the storage device into the appropriate port and select the media source.
Supported Formats
The projector supports the following file types:
- Video: mp4, avi, mov, wmv, mkv, rm, rmvb, mpg, mpeg (1080P@30fps, 720P@60fps).
- Image: JPG (up to 15360x8640), PNG (up to 9600x6400).
Official resources from the manual
Practical help
Common problems
Streaming stick not working
Some streaming sticks require their own external power supply; ensure it is connected if the projector's 5V/1A output is insufficient.
Android screen mirroring fails
Verify that your Android device supports video output (e.g., Smart View/Miracast). Check with your device manufacturer.
No network connection for OTA
You must connect the projector to your local Wi-Fi network via the settings page before the OTA upgrade option becomes available.
Before use
- Check if your device supports video output via USB-C or HDMI.
- Purchase necessary adapters (Apple Digital AV, USB-C to HDMI) as they are sold separately.
- Insert AAA batteries into the remote control.
- Ensure the projector is placed on a stable surface with access to power.
Specs in practice
- Keystone/Focus
- Manual dials to correct image distortion and adjust sharpness.
Images and diagrams
- Remote Control: Illustrates button layout for power, volume, menu, and navigation.
- Connection Diagrams: Shows the required adapter chains for iPhone, Android, and Macbook connections.
Model compatibility
- Streaming sticks: Projector provides 5V/1A power; some sticks require external power.
- Netflix: Some streaming apps may block video output via screen mirroring.

Manual page author
Michael Turner
Technical manual editor
Reviews PDF manuals for structure, safety notes, and practical product details so readers can find the right information quickly.