Lighting / Fixtures
Installation Guide for Globe Electric Flush Mount Light Fixture 61181
Quick installation and maintenance guide for the Globe Electric 61181 flush mount light fixture. Includes step-by-step assembly instructions, safety precautions, and bulb requirements.
Table of contents
Manual images
Click an image to enlargeQuick Guide from the Manual
This document provides essential instructions for the safe installation and maintenance of the Globe Electric 61181 flush mount light fixture. Before beginning, ensure you have all components listed in the parts section and that the power is disconnected at the source.
Parts List
Ensure your package contains the following components:
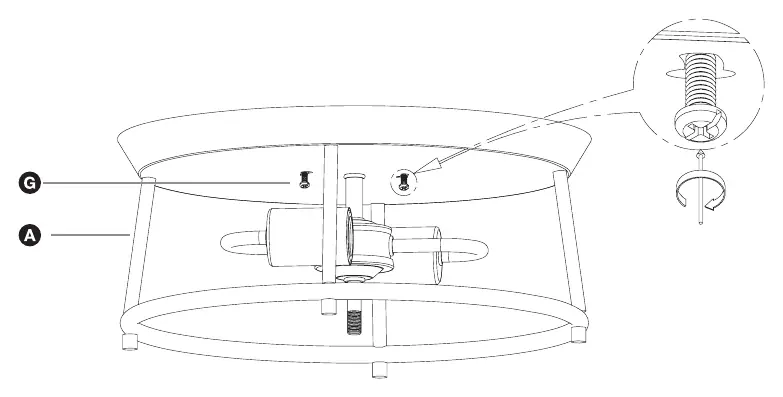
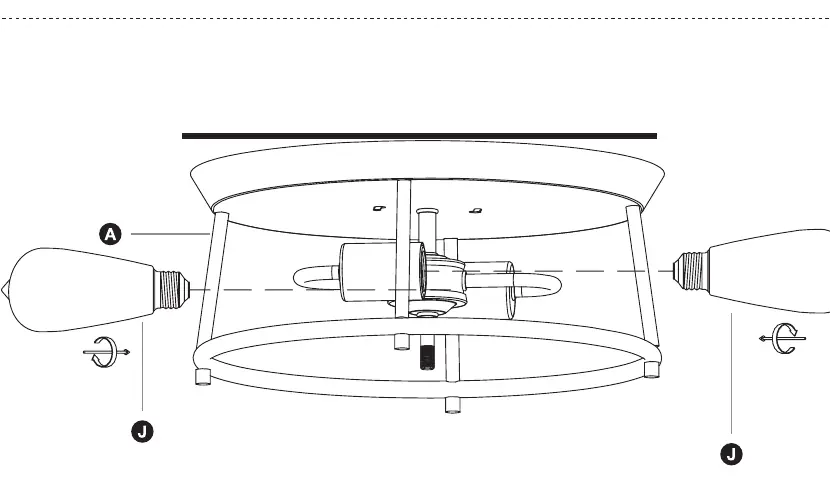
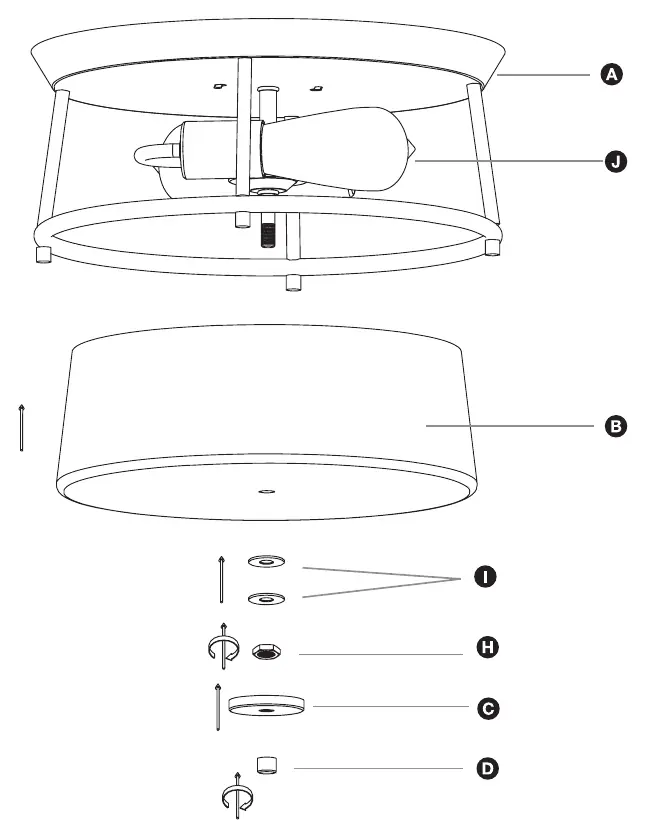
- A: Fixture body
- B: Shade
- C: Canopy
- D: Finial
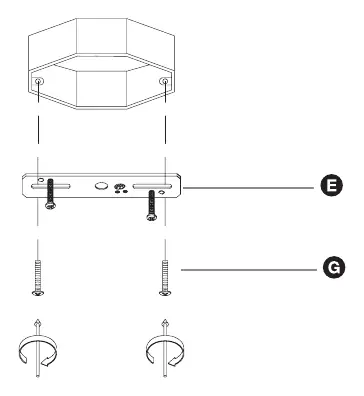
- E: Mounting bracket
- F: Wire nuts
- G: Mounting screws
- H: Nut
- I: Washers
- J: E26 medium bulbs (x2)
Electrical Installation
Warning: Risk of electric shock. Disconnect power before assembly or cleaning.
- Place the wall switch to the OFF position.
- Turn off power at the main breaker panel or unscrew the fuse that provides power to the fixture location.
- Consult a qualified electrician if you are unsure about the branch circuit conductor.
Assembly Steps
Step 1: Mounting Bracket
Attach the mounting bracket (E) to the junction box using the mounting screws (G).
Step 2: Wiring
Connect the fixture wires to the house supply wires using the provided wire nuts (F). Ensure all connections are secure.
Step 3: Fixture Attachment
Secure the fixture body (A) to the mounting bracket (E) using the provided screws.
Step 4: Bulb Installation
Install the E26 medium base bulbs (J) into the sockets. Do not exceed the maximum wattage of 60W per bulb.
Step 5: Final Assembly
Attach the shade (B) to the fixture body (A). Secure it in place using the washers (I), nut (H), canopy (C), and finial (D).
Cleaning & Maintenance
- Keep the product away from direct heat and sunlight to prevent fading or melting.
- Regularly vacuum or lightly brush the fabric shade to remove dirt.
- Periodically (every 90 days) ensure that all screws are fully tightened.
- Always switch off and unplug the fixture, allowing the bulb to cool before cleaning or replacing the bulb.
- Use a soft, clean, dry cloth for cleaning to avoid scratching the surface.
Practical help
Common problems
Fixture is loose or wobbling
Check and tighten all screws every 90 days.
Light does not turn on
Ensure the bulb is screwed in correctly and the circuit breaker or fuse is active.
Before use
- Turn off power at the wall switch.
- Turn off power at the main breaker panel or fuse box.
- Verify all parts (A-J) are present.
- Choose a clean, level, and spacious area for assembly.
- Ensure you have a soft cloth for cleaning.
Specs in practice
- Maximum Wattage
- 60W maximum per bulb; exceeding this may cause fire.
Images and diagrams
- Fig 1-3: Illustrates how to safely cut power at the wall switch, breaker panel, or fuse box.
- Assembly steps 1-5: Show the physical sequence of mounting the bracket, wiring, attaching the fixture, installing bulbs, and securing the shade.
Model compatibility
- Requires E26 medium base bulbs.
- Do not exceed 60W maximum wattage.

Manual page author
Emily Carter
User documentation editor
Prepares concise manual descriptions and highlights the most useful setup, operation, and maintenance information for readers.