Health / Weighing Scales
User Manual for Health O Meter 1522KL and 1524KL Pediatric Beam Scales
Comprehensive assembly and operating guide for Health O Meter 1522KL and 1524KL pediatric beam scales. Includes setup, zero balance adjustment, weighing instructions, and troubleshooting.
Table of contents
Manual images
Click an image to enlargeQuick Guide
This manual provides instructions for the Health O Meter 1522KL and 1524KL pediatric beam scales. The scale is a precision instrument; handle parts carefully to avoid scratching the enamel finish. Ensure the scale is placed on a hard, level surface before use. Periodic checks are recommended, especially after moving the scale.
Assembly Instructions
General Assembly:

- Insert the studs at the lower end of the pillar into the four holes in the base (Figure 1).
- Tip the scale at an angle, resting the top of the pillar on a support. Secure the pillar to the base using the provided wrench and four pillar nuts (Figure 2).
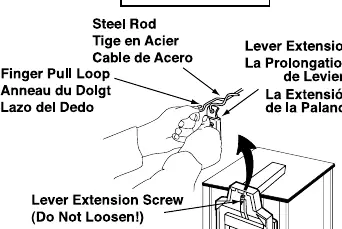
- Pull the steel rod toward the base using the finger pull loop.
- Hook the steel rod into the lever extension by pushing the lever extension toward the beam. Ensure the assembly is free-floating in the pillar head (Figure 3).
- Stand the scale upright.
Model Specific Attachments:
- 1522KL (Tray): Set the tray on the base and fasten with two screws. Cover screws with screw plugs (Figure 4a).
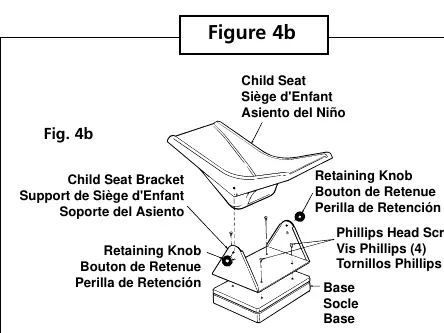
- 1524KL (Child Seat): Place the child seat bracket on the base and secure with four Phillips head screws. Lower the child seat onto the bracket, align the holes, and lock in place using the two black retaining knobs (Figure 4b).
Operating Instructions
Zero Balance Adjustment:
- Ensure the scale is on a hard, level surface. Step on and off a few times to align internal parts.
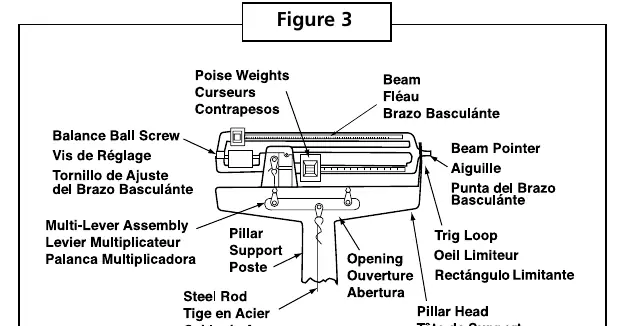
- Place both poise weights on zero. The beam pointer should float gently up and down without touching the top or bottom of the trig-loop.
- If the pointer is not centered, turn the balance ball screw (Figure 3) to correct.
Weighing Procedure:
- Set the large and small poises to the approximate weight of the baby.
- Place the baby on the tray (or in the child seat for 1524KL).
- Adjust the small poise until the pointer is centered in the trig-loop.
- Add the reading of the small poise to the reading of the large poise to determine the total weight.
Conversion (lb to kg):
- Rotate both upper and lower poise bars with a gentle twist of the wrist to the desired unit of measure (Figure 5).
- Ensure both bars match in color (chrome graduations on black background for pounds; black graduations on chrome background for kilograms).
Troubleshooting
- Incorrect Weight: Ensure the scale is on a hard, level surface. Check that the large poise is firmly seated in the notch and the small poise is against the shoulder of the beam.
- Beam Does Not Move Freely: Check if the pointer touches the side of the trig-loop. Contact technical support if necessary.
- Platform Rocks: If the platform rocks when pressed at any corner, contact technical support for leveling instructions.
- Beam Does Not Move: Ensure the poises are not set higher than the actual weight. Check that the steelyard rod inside the pillar is properly connected.
Warranty
Pelstar LLC scales are warranted against defects in materials or workmanship for one (1) year from the date of purchase. For warranty service, contact 1-800-638-3722 or 1-708-598-9100 to receive a return authorization number. Proof of purchase is required.
Practical help
Common problems
Beam pointer not centered in trig-loop
Turn the balance ball screw at the left end of the beam until the pointer floats freely in the center.
Beam does not move freely
Check if the pointer is touching the side of the trig-loop. Contact technical support at 1-800-638-3722.
Platform rocks or touches base
Contact technical support at 1-800-638-3722 for instructions on leveling the platform.
Beam does not move during weighing
Check if poises are set too high or if the internal steelyard rod is disconnected.
Before use
- Ensure the scale is placed on a hard, level surface.
- Verify all parts are present (pillar, base, screws, nuts, wrench).
- Perform zero balance adjustment before first use.
- Check that the steel rod is properly hooked into the lever extension.
- Handle parts carefully to avoid scratching the enamel finish.
Specs in practice
- Calibration Adjustment
- Can be adjusted by loosening the lock screw at the end of the long lever in the bottom of the base using a 5/16" hexagon socket wrench.
Images and diagrams
- Figure 1 & 2: Pillar and base assembly steps.
- Figure 3: Components of the beam, trig-loop, and balance ball screw.
- Figure 4a: Tray attachment for model 1522KL.
- Figure 4b: Child seat attachment for model 1524KL.
- Figure 5: How to read and convert poise bars.
Model compatibility
- 1522KL includes a tray.
- 1524KL includes a child seat.

Manual page author
Michael Turner
Technical manual editor
Reviews PDF manuals for structure, safety notes, and practical product details so readers can find the right information quickly.