Automotive / Suspension Kits
User Manual for ICON DT-5A air, DT-6A air, and DT-8A air Active Studio Monitor System
Quick guide for the ICON DT-5A air, DT-6A air, and DT-8A air active studio monitors. Learn about setup, rear panel controls, LCD display settings, cabling, and technical specifications.
Table of contents
Manual images
Click an image to enlargeQuick Guide from the Manual
The ICON DT-air series (DT-5A, DT-6A, DT-8A) are active studio monitors featuring an integrated AirCon wireless control module. Before powering on, ensure the voltage selector on the rear panel is set correctly (110V or 220V). Always follow the 'last on, first off' rule for power amplifiers: turn on your mixer and outboard gear first, then the monitors. When powering down, turn off the monitors first.
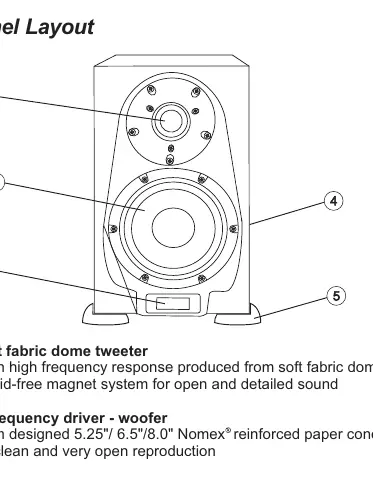
Front Panel Layout
The front panel includes the tweeter, woofer, and an LCD display. The LCD acts as a 'Communication Central' showing volume, Hi/Mid/Low settings, HP filter, and LF clipping status. The 'Definitor' logo on the LCD will flash if the bass signal is clipping.
Rear Panel Layout
The rear panel contains the primary controls and connections:
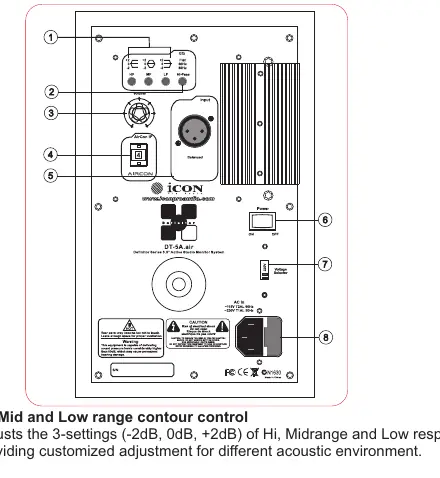
- Hi, Mid and Low range contour control: Adjusts the response (-2dB, 0dB, +2dB) for different acoustic environments.
- Hi-Pass filter control: Selectable between Flat, 60Hz, and 80Hz.
- Volume control: Adjusts the output level.
- AirCon IP setting: Used for assigning IP addresses if using the optional AirCon wireless controller.
- XLR balanced input: Connects balanced line-level signals.
- Power Switch & AC Inlet: For power control and connection.
- Voltage Selector: Switchable between 110V and 220V.
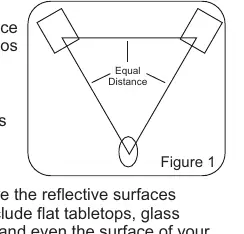
Setup and Positioning
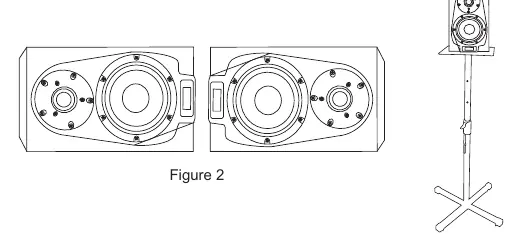
For optimal performance, use the 'mixing triangle' configuration: the distance between the left and right monitors should equal the distance from the listener to each monitor, forming an equilateral triangle. When placing monitors horizontally, ensure the tweeters are on the outermost sides to improve stereo imaging and bass coupling. Avoid placing monitors near reflective surfaces like glass or large walls; use acoustic foam if necessary.
Connections and Cabling
The monitors feature a balanced XLR input. To avoid AC hum, do not run power cables parallel to input cables. If they must cross, do so at a 90-degree angle. The balanced input circuit provides common-mode rejection to help cancel induced hum.
Operating Instructions
The AirCon wireless controller (optional) allows for remote volume, mute, and position identification. Without the controller, you can ignore the position identification settings on the LCD. The monitors are designed for near-field monitoring and can be tuned to emulate the sound of other popular monitors using the rear panel EQ controls.
Specifications
The series includes three models with varying woofer sizes (5.25", 6.5", 8.0"). All models feature a 1" soft dome tweeter, bass reflex design, and balanced XLR inputs. Power consumption and amplifier wattage vary by model (e.g., DT-5A: 40W/80W, DT-6A: 60W/120W, DT-8A: 80W/150W).
Service and Support
If the unit requires service, visit the ICON ProAudio support website to create a support ticket. Ensure the problem is not related to external devices before requesting service. Retain original packaging for shipping.
Practical help
Common problems
AC Hum
Avoid running power cables parallel to input cables. Use balanced XLR cables to utilize common-mode rejection.
Bass Clipping
Watch for the flashing 'Definitor' logo on the LCD display, which indicates bass signal clipping.
Mute function not working
The mute function requires the optional 'AirCon' wireless controller to activate.
Before use
- Check the voltage selector (110V/220V) on the rear panel before plugging in.
- Ensure the power switch is in the OFF position before connecting cables.
- Attach the included 'Vasorb' rubber feet to the bottom of the monitors.
- Set the input volume control to the 2 o'clock position initially.
- Lower mixer master outputs before turning on the monitors.
Specs in practice
- Frequency Response
- The range of sound frequencies the monitor can reproduce (e.g., 45Hz-25kHz for DT-5A).
- Bass Principle
- Bass reflex design, which uses a port to extend low-frequency response.
- Cross over frequency
- The frequency at which the signal is split between the woofer and the tweeter.
Images and diagrams
- Mixing Triangle: Place monitors so the distance between them is equal to the distance from the listener to each monitor.
- Speaker Orientation: When horizontal, place tweeters on the outside edges.
Model compatibility
- AirCon Wireless Controller: Required for remote volume, mute, and position ID settings.
- Input: Accepts balanced or unbalanced +4dBu/+4dBm line level signals via XLR.

Manual page author
Michael Turner
Technical manual editor
Reviews PDF manuals for structure, safety notes, and practical product details so readers can find the right information quickly.