Lighting / Fixtures
Installation Guide for Juno Saturn LED Semi Flush Mount
Comprehensive installation guide for the Juno Saturn LED Semi Flush Mount. Includes step-by-step mounting instructions, wiring diagrams, color temperature selection, and troubleshooting tips.
Quick answers from the manual
Quick answer
- The Juno Saturn LED Semi Flush Mount is installed by securing the mounting bracket to a UL-listed junction box, connecting the fixture wires (and 0-10V dimmer wires if applicable), and securing the canopy. p. 4, 5, 6, 7
Key actions
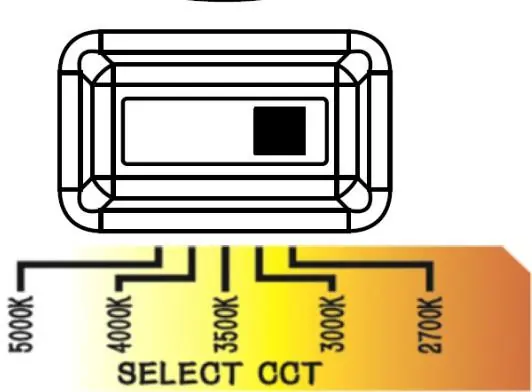
- Set the color temperature switch on the back of the fixture before installation. p. 6
- Secure the mounting bracket to the junction box and attach the tether cable. p. 6
- Connect fixture wires to supply wires using wire nuts. p. 8
First start
- Select the desired color temperature using the switch on the back of the fixture. p. 6
Problems and fixes
Fixture fails to operate
Verify proper wiring, correct grounding, and correct line voltage.
p. 8Technical specifications
| Parameter | Value | Meaning | Pages |
|---|---|---|---|
| Voltage | 120V or 120-277V | Must match the nominal power source. | p. 9 |
Where to find it in the PDF
- Safety Instructions p. 1, 3, 4
- Installation Steps p. 5, 6, 7, 8
- Troubleshooting p. 8
Table of contents
Manual images
Click an image to enlargeQuick guide from the manual
This document provides installation instructions for the Juno Saturn LED Semi Flush Mount. Before beginning, ensure the electrical power is turned off at the circuit breaker or fuse box. The fixture is designed for installation in damp locations and requires a UL-listed junction box.
Product description
The Juno Saturn LED Semi Flush Mount features a selectable color temperature switch located on the back of the fixture. It is compatible with 3-inch and 4-inch octagonal junction boxes and supports standard 120V or universal 120-277V power sources depending on the model.
Installation steps
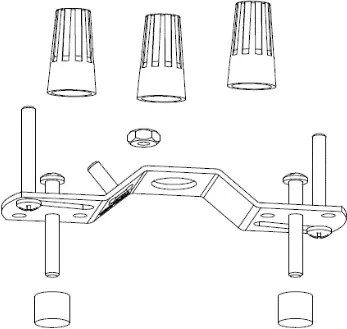
- Preparation: Read all instructions and ensure power is off at the circuit breaker. Verify all parts are included (mounting bracket, wire nuts, screws).
- Color Temperature Selection: On the back of the fixture, set the switch to your desired color temperature: 2700K, 3000K, 3500K, 4000K, or 5000K.
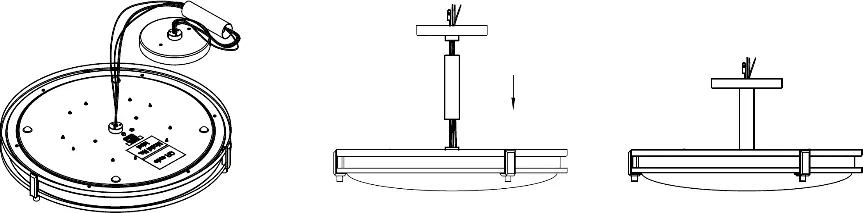
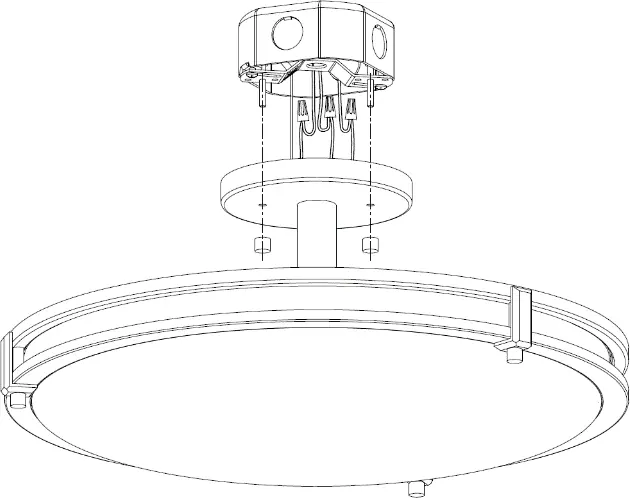
- Assembly: Rotate the semi-flush mounting rod clockwise into the fixture back until tight, then attach the canopy cover to the rod.
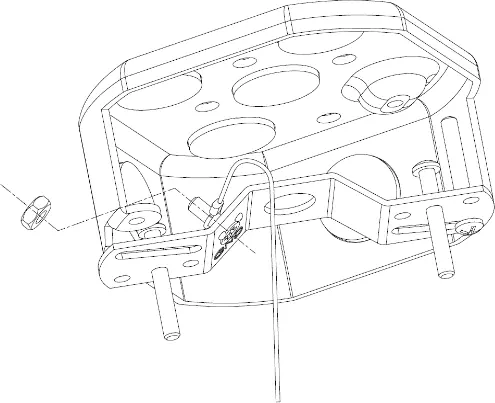
- Mounting Bracket: Secure the mounting bracket to the junction box using the provided #8 screws. Ensure the adjustable screws face the room side.
- Tether Cable: Attach the eyelet end of the tether cable through the 12mm screw location and secure it with the provided nut.
- Wiring: Connect the black fixture wire to the black supply wire, white to white, and bare copper to the junction box ground wire using wire nuts.
- Dimming (MVOLT only): For 0-10V dimming, connect the purple (+) and pink (-) wires to the dimmer. If no dimmer is used, cap these wires with wire nuts.
- Final Assembly: Tuck wires into the junction box, align the canopy with the mounting screws, and secure the fixture using the decorative nuts.
- Power On: Turn on the electricity and verify the installation.
Troubleshooting
If the fixture fails to operate properly, verify the following:
- Ensure the fixture is wired correctly according to the instructions.
- Confirm the fixture is properly grounded.
- Check that the line voltage at the fixture is correct.
Technical specifications
- Voltage: 120V (60Hz) or 120-277V (60Hz) depending on the model.
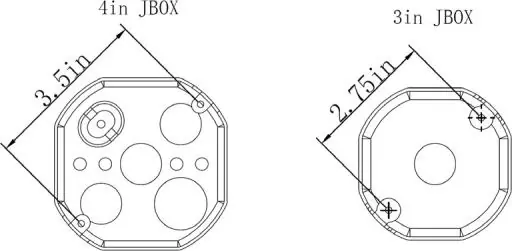
- Junction Box: 3" or 4" octagonal (metal or plastic); 1 3/4" minimum depth required.
- Clearance: 3" minimum diameter of clearance space in the junction box.
Practical help
Common problems
Fixture fails to operate
Verify that the fixture is wired properly, grounded correctly, and that the line voltage is correct.
Before use
- Turn off power at the circuit breaker or fuse box.
- Ensure the junction box is UL-listed.
- Verify the junction box is at least 1 3/4" deep.
- Ensure there is at least 3" of clearance space in the junction box.
- Gather required tools: safety glasses, screwdriver, ladder, and gloves.
Specs in practice
- Color Temperature
- Selectable via switch on the back: 2700K (soft), 3000K (warm), 3500K (neutral), 4000K (cool), 5000K (daylight).
Images and diagrams
- Figure 1: Shows compatible junction box mounting hole dimensions (3in and 4in JBOX).
- Figure 3: Illustrates the color temperature selection switch.
- Figure 8: Wiring diagram showing connections for power and dimming.
Model compatibility
- Compatible with 3" and 4" octagonal junction boxes (metal or plastic).
- Suitable for damp locations only.

Manual page author
Michael Turner
Technical manual editor
Reviews PDF manuals for structure, safety notes, and practical product details so readers can find the right information quickly.