Lighting / Fixtures
Kawoti 21519 1-Light Plug-in Wall Sconce User Manual
Quick guide for the Kawoti 21519 1-Light Plug-in Wall Sconce. Includes installation instructions for both hardwire and plug-in setups, safety warnings, and troubleshooting tips.
Table of contents
Manual images
Click an image to enlargeImportant Information
This manual provides instructions for the Kawoti 21519 1-Light Plug-in Wall Sconce. The fixture supports two installation methods: hardwire installation or plug-in installation. Please read all safety information before beginning.
Safety Information
- Turn off electricity at the main fuse box or circuit breaker before beginning installation.
- Do not exceed the recommended wattage.
- Do not replace a bulb when the electrical outlet switch is turned to the ON position.
- Do not immerse the lamp in water.
- This portable lamp has a polarized plug; if it does not fit, contact a qualified electrician. Do not alter the plug.
- For dwellings built before 1985, consult a qualified electrician regarding supply wire rating (140°F/60ºC).
Preparation
Before beginning assembly, ensure all parts are present. Compare parts with the package contents list. If any part is missing or damaged, do not attempt to assemble or operate the product.
Required tools (not included): Flathead screwdriver, Phillips screwdriver, pliers, electrical tape, wire cutters, safety glasses, ladder, wire stripper.
Hardwire Installation
- Preparing the mounting bracket: Unscrew the two support screws (H2) from the mounting bracket (H1). Remove the bracket from the fixture body (B) and keep the screws for later.
- Installing the mounting bracket: Fasten the mounting bracket (H1) onto the outlet box using two outlet box screws (H3).
- Removing the power cord: Remove the electrical tape on the wire connectors (H5), turn the connectors counterclockwise to remove them, and unwire the black and white wires from the cord. Remove the power cord.
- Making the electrical connections: Connect the black wire from the fixture to the black wire from the outlet box. Connect the white wire from the fixture to the white wire from the outlet box. Connect the bare copper ground wire to the ground wire from the outlet box, looping it under the green ground screw (H4). Cover wires with wire connectors (H5) and tape them together.
- Installing the fixture body: Place the fixture body (B) over the outlet box, align the holes of the mounting bracket (H1) and the canopy, then tighten the support screws (H2).
Plug-in Installation
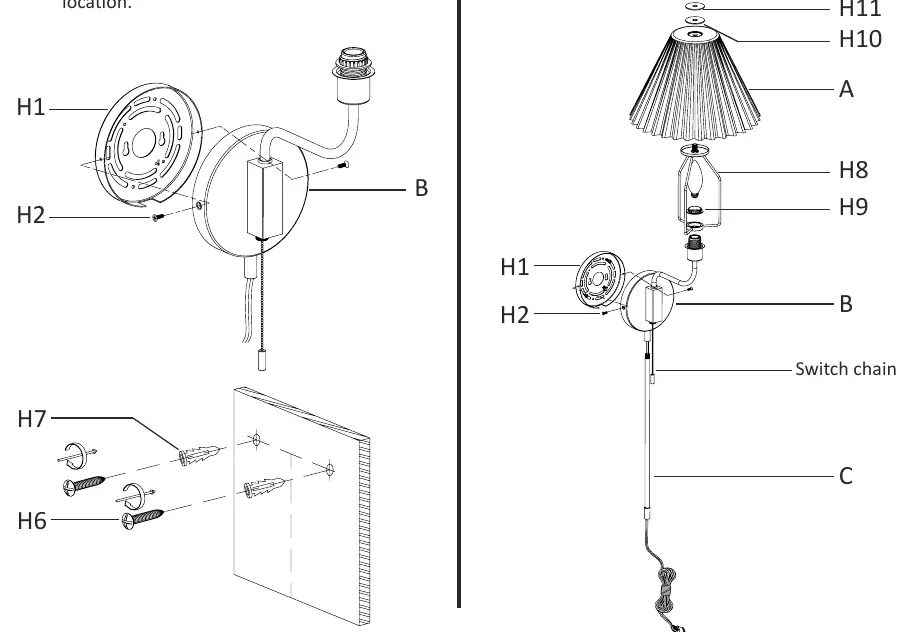
- Preparing for installation: Unscrew the support screws (H2) and remove the mounting bracket (H1) from the fixture body (B). Determine the location, mark the two key holes on the wall, drill holes, and insert plastic anchors (H7). Secure the mounting bracket (H1) to the wall using wood screws (H6).
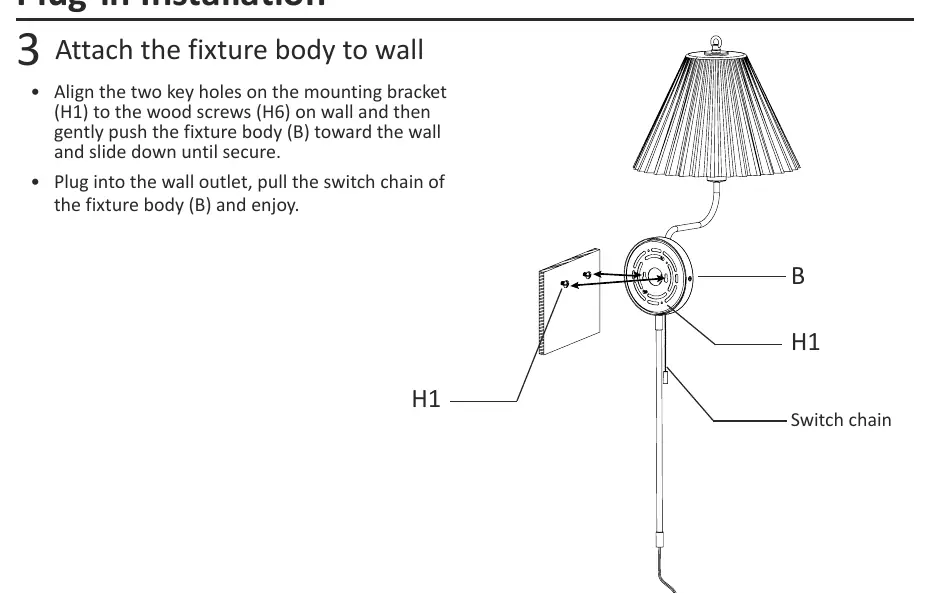
- Attaching the fixture body: Align the two key holes on the mounting bracket (H1) to the wood screws (H6) on the wall, push the fixture body (B) toward the wall, and slide down until secure. Plug into the wall outlet and pull the switch chain.
Bulb Installation
- Unscrew the socket ring (H9) from the socket.
- Place the glass shade bracket (H8) over the socket and secure it with the socket ring (H9).
- Install the light bulb (not provided). Use one 60W candelabra base (E12) type B bulb (recommended) or one 9W candelabra base (E12) self-ballasted LED bulb.
- Place the glass shade (A) over the bracket (H8) and secure it with the plastic washer (H10), washer (H11), and loop (H12).
- Tighten the decoration tube (C) to the fixture body (B).
Cleaning
Do not use chemicals, solvents, or harsh abrasives. Use only a dry, soft cloth to dust or wipe carefully. To clean, disconnect the power by turning off the circuit breaker or removing the fuse.
Troubleshooting
- Light does not come on: Check if the bulb is burned out, ensure the wall switch is on, verify wiring is correct, ensure power supply is on, check if the cord is plugged in, and ensure the circuit breaker is in the ON position.
- Fuse blows or circuit trips: Check for crossed wires and ensure wiring is correct.
Practical help
Common problems
Light does not come on
Check if the bulb is burned out, ensure the wall switch is on, verify wiring is correct, ensure power supply is on, check if the cord is plugged in, and ensure the circuit breaker is in the ON position.
Fuse blows or circuit trips when light is turned on
Check for crossed wires and ensure wiring is correct.
Before use
- Verify all parts are present (mounting bracket, screws, wire connectors, etc.).
- Ensure power is turned off at the main fuse box or circuit breaker.
- Gather required tools: flathead screwdriver, Phillips screwdriver, pliers, electrical tape, wire cutters, safety glasses, ladder, wire stripper.
- Determine installation method: Hardwire or Plug-in.
Images and diagrams
- Hardware list shows mounting bracket (H1), support screws (H2), outlet box screws (H3), green ground screw (H4), wire connectors (H5), wood screws (H6), plastic anchors (H7), glass shade bracket (H8), socket ring (H9), washers (H10, H11)...
- Hardwire installation involves removing the power cord and connecting wires to the outlet box.
- Plug-in installation uses anchors and wood screws to mount the bracket to the wall.
Model compatibility
- Do not exceed the recommended wattage.
- For dwellings built before 1985, consult a qualified electrician regarding supply wire rating (140°F/60ºC).

Manual page author
David Miller
Documentation analyst
Organizes user manual content into clear summaries, with attention to model details, product context, and everyday usability.