Lighting / LED Drivers
Luminii 0-10V Athena LED Driver 96W Installation Instructions
Installation and setup guide for the Luminii 0-10V Athena LED Driver 96W. Includes wiring diagrams, mounting requirements, and factory reset procedures for the integrated Lutron Athena Wireless node.
Table of contents
Manual images
Click an image to enlargeImportant Information
This document provides installation instructions for the Luminii 0-10V Athena LED Driver (96W). This device must be installed in accordance with Article 450 of the National Electrical Code and is suitable for dry locations only. Installation must be performed by a qualified electrician.
Key Specifications:
- Input: 120-277V AC, 1.1A, 50/60Hz
- Output: 24V DC, 4.0A
- Max Wattage: 96W
Installation Requirements
Proper operation requires adequate airflow. Ensure the driver is installed in a well-ventilated area free from explosive gases and vapors.
- Mounting: The driver can be mounted vertically or horizontally.
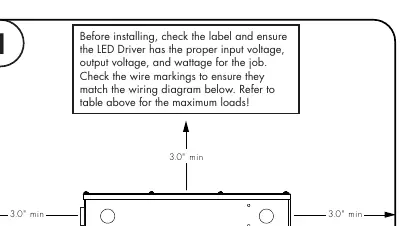
- Clearance: Maintain a minimum of 3 inches of clearance around the LED Driver to ensure proper air circulation.
- Wireless Node Clearance: Ensure the Lutron Athena Wireless node has at least 1 inch of clearance from any metal, such as conduit.
Wiring and Connection
Before installing, verify that the LED Driver has the proper input voltage, output voltage, and wattage for your specific application. Check wire markings against the wiring diagram provided in the manual.
- Remove the cover from the top of the driver housing to expose the wires. Screws for the cover are located inside the housing.
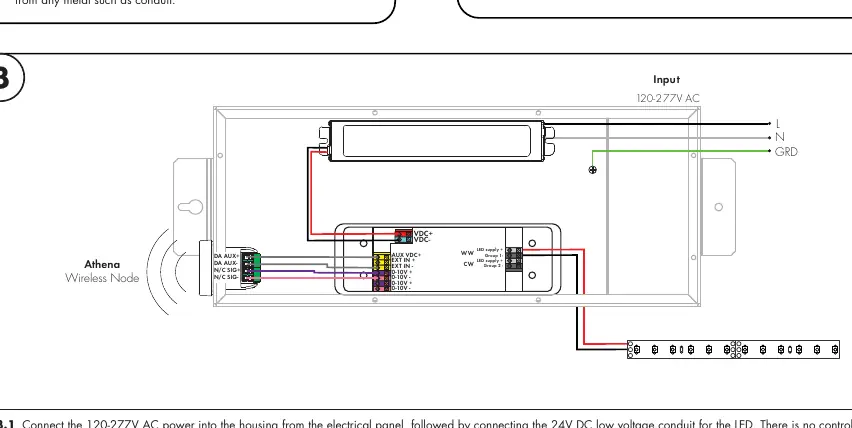
- Connect the 120-277V AC power into the housing from the electrical panel.
- Connect the 24V DC low voltage conduit for the LED.
- Note: There are no control wire connections to make, as the power supply is already connected to the Athena wireless node.
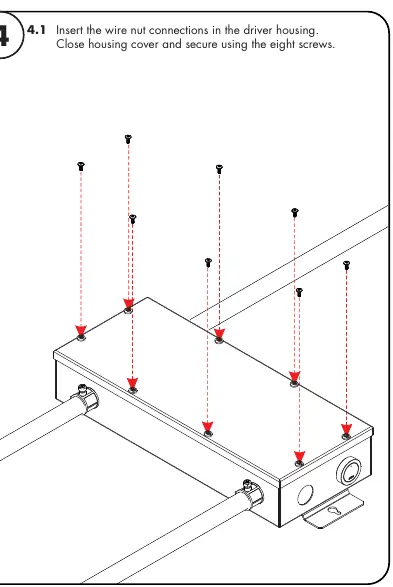
- Insert wire nut connections into the housing, replace the cover, and secure it using the eight screws.
Factory Resetting the Lutron Athena Wireless Node
If a node is not working or cannot be added to a new project, perform a factory reset using the Lutron App:
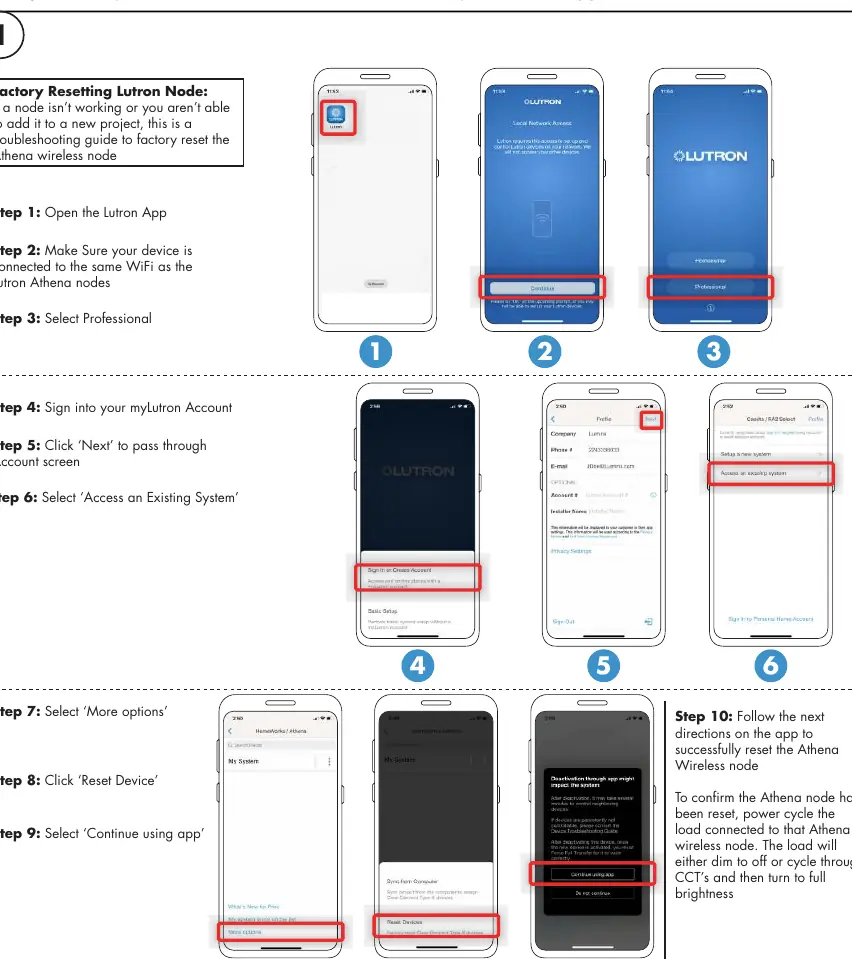
- Open the Lutron App and ensure your device is connected to the same WiFi network as the Athena nodes.
- Select Professional.
- Sign into your myLutron Account.
- Click Next to pass through the Account screen.
- Select Access an Existing System.
- Select More options.
- Click Reset Device.
- Select Continue using app and follow the on-screen directions.
- To confirm the reset, power cycle the load connected to the Athena wireless node. The load will dim to off or cycle through CCTs and then turn to full brightness.
Practical help
Common problems
Node not working or cannot add to project
Perform a factory reset using the Lutron App as described in the manual.
Overheating or poor performance
Ensure there is at least 3 inches of clearance around the driver for proper air circulation.
Wireless connectivity issues
Ensure the Athena Wireless node has at least 1 inch of clearance from metal objects or conduit.
Before use
- Verify input voltage matches 120-277V AC.
- Verify output voltage matches 24V DC.
- Ensure total wattage does not exceed 96W.
- Confirm installation area is well-ventilated and free of explosive gases.
- Ensure installation is performed by a qualified electrician.
- Check that the driver is suitable for the environment (Dry Location only).
Images and diagrams
- The wiring diagram illustrates the connection points for AC input (L, N, GRD) and DC output (VDC+, VDC-, LED supply, 0-10V control).
- Mounting diagrams indicate the required 3-inch clearance for airflow.
Model compatibility
- Suitable for dry locations only.
- Plenum rated in accordance with UL2043.

Manual page author
Michael Turner
Technical manual editor
Reviews PDF manuals for structure, safety notes, and practical product details so readers can find the right information quickly.