Lighting / Fixtures
User Manual for Malmbergs Spot V LED
Quick guide for the Malmbergs Spot V LED luminaire. Includes installation instructions, wiring requirements, safety warnings, and technical specifications for the 12V DC system.
Table of contents
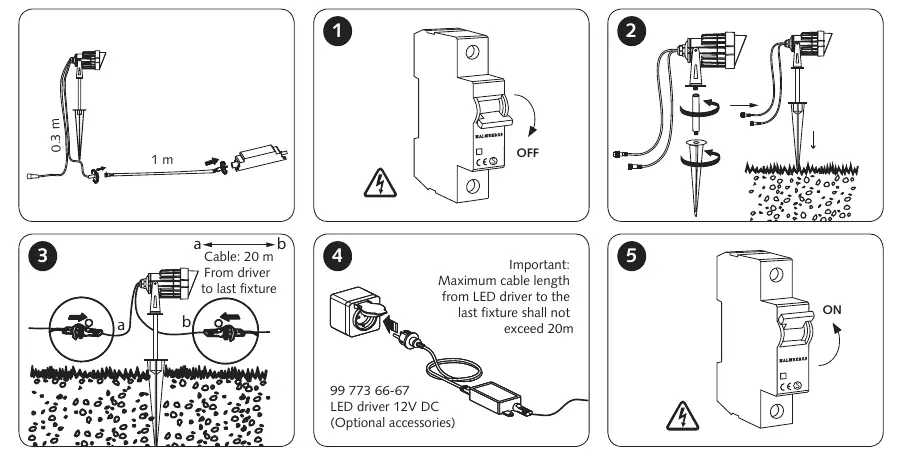
Quick guide from the manual
The Malmbergs Spot V LED is a 12V DC luminaire designed for outdoor or landscape lighting. It requires a compatible 12V DC LED driver for operation. Installation must be performed by a qualified electrician in accordance with local regulations. The system uses a parallel connection, and the total cable length from the driver to the last fixture must not exceed 20 meters.
Safety Instructions
- Qualified Installation: The luminaire must be installed by a qualified electrician.
- Power Supply: Always disconnect the power supply before installation, maintenance, or lamp replacement.
- Connection: The LED luminaire must be connected in parallel to a 12V DC LED driver. Incorrect connection may damage the fixture.
- Secondary Side: Never switch the power on or off on the secondary side (between the driver and the light), as this can damage or destroy the diodes.
- Handling: Do not look directly into the LED light source as it is very bright.
- Modifications: The luminaire must not be modified.
- Light Source: The light source is not replaceable. If the LED fails, the entire luminaire must be replaced.
Installation
- Turn off the main power supply at the circuit breaker.
- Install the fixture in the desired location.
- Connect the fixtures in parallel to the LED driver. Ensure that plugs and terminals are free from tension and torsion forces.
- Verify that the total cable length from the LED driver to the last fixture does not exceed 20 meters.
- Turn on the main power supply.
Technical Specifications
- Voltage: 12V DC
- Ingress Protection: IP44
- Max Cable Length: 20 meters from driver to last fixture
- Connection Type: Parallel
Practical help
Common problems
Luminaire does not light up
Ensure the LED driver is connected to the mains and that the 12V DC connection is secure and correctly wired in parallel.
LED diode failure
The light source is not replaceable. If the LED diode fails, the entire luminaire must be replaced.
Fixture damaged after installation
Ensure the power is not being switched on the secondary side (between driver and light) and that the connection is parallel, not series.
Before use
- Ensure the power supply is disconnected before starting installation.
- Verify that the LED driver is compatible with 12V DC.
- Confirm that the total cable length from the driver to the last fixture is 20 meters or less.
- Ensure the installation is performed by a qualified electrician.
- Check that all plugs and terminals are free from tension and torsion forces.
Specs in practice
- Parallel Connection
- All fixtures must be wired in parallel to the driver, not in a series chain.
Images and diagrams
- Step 1: Turn off the power at the circuit breaker.
- Step 2: Install the fixture into the ground.
- Step 3: Connect the fixtures in parallel.
- Step 4: Ensure the total cable length from the driver to the last fixture is under 20m.
- Step 5: Turn on the power at the circuit breaker.

Manual page author
Emily Carter
User documentation editor
Prepares concise manual descriptions and highlights the most useful setup, operation, and maintenance information for readers.