Home Appliances / Vacuum Cleaners
User Manual for Mastercraft 1010SSDAF Vacuum Cleaner
Quick guide for the Mastercraft 1010SSDAF vacuum cleaner. Includes assembly instructions for steel and poly tank models, HEPA filter installation, wet/dry operation setup, and safe maintenance procedures for hazardous waste.
Table of contents
Manual images
Click an image to enlargeQuick Guide and Safety Information
This vacuum is specifically designed for cleaning hazardous dust. It is intended for commercial use. Important: Do not use this vacuum until all safety instructions have been read. Improper use can cause damage to the unit or the special filters employed.
Safety Precautions:
- Always wear gloves and an OSHA-approved face mask when operating or cleaning the vacuum.
- Do not sweep, scoop, or shovel hazardous dust; use the vacuum only.
- Never attempt to bypass, substitute, or change filters in any way other than specified.
- Use only manufacturer-approved vacuum filters and bags.
- Hazardous materials must be disposed of properly in OSHA-approved poly bags or containers marked with a hazardous material warning.
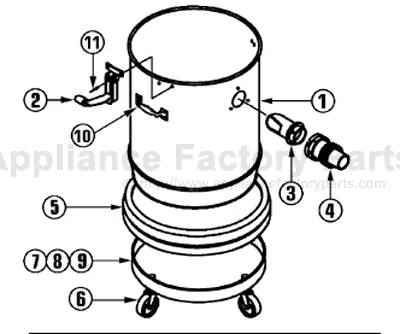
Steel Tank Vacuum Assembly
Unpacking: Open the carton, unsnap hold-down clamps, and remove the motor head, HEPA filter, and 2-ply intermediate filter. Remove all accessories from inside the tank.
HEPA Filter Installation:
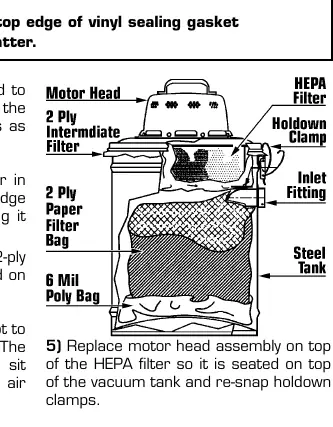
- Arrange a 6 mil poly bag in the bottom of the tank.
- Install the 2-ply disposable paper filter bag onto the inlet fitting, ensuring the cardboard is as close to the tank wall as possible.
- Place the 2-ply intermediate filter on top of the tank, folding the edge over the outside by approximately one inch.
- Insert the HEPA filter, ensuring the sealing gasket sits evenly on the tank rim for an airtight seal.
- Replace the motor head assembly and re-snap the hold-down clamps.
Wet Operation: To use for wet pickup, you must install the wet pickup conversion kit. Remove the dry filters, set the wet pickup adaptor on the tank rim, place the HEPA adaptor on top, and follow the HEPA filter installation steps.
Poly Tank Vacuum Assembly
Unpacking: Poly hazardous vacuums are shipped in two cartons. Unpack the vacuum, remove the motor head, pancake dry filter, and HEPA adaptor. Assemble the handle by inserting speed pins through the holes on both sides.
HEPA Filter Installation:
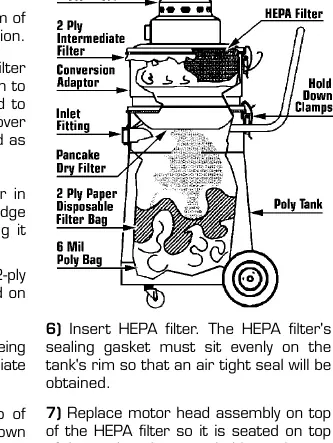
- Arrange a 6 mil poly bag in the bottom of the tank.
- Install the 2-ply disposable paper filter bag onto the inlet fitting.
- Place the 2-ply intermediate filter on top of the tank.
- Set the pancake filter on the tank, then place the conversion adaptor on top and engage the hold-down clamps.
- Insert the HEPA filter, ensuring the sealing gasket sits evenly on the tank rim.
- Replace the motor head assembly and re-snap the hold-down clamps.
Maintenance and Filter Replacement
When to Change Filters:
- HEPA Filter: Replace when loss of vacuum continues after checking for obstructions.
- 2-Ply Intermediate Filter: Replace with every fifth change of the paper bag, or whenever damaged/visibly dirty.
- 2-Ply Disposable Paper Filter Bag: Replace when 3/4 full to prevent breakage and spills.
Procedures for Removing Contaminated Filters:
- Carefully remove the motor head and wipe down all exposed surfaces with a damp cloth. Do not discard the cloth.
- Remove the HEPA filter cautiously to avoid puncturing the media.
- Remove the 2-ply intermediate filter and dispose of it along with the wiping cloth in an OSHA-approved poly bag.
- Install new filters as described in the assembly sections.
Practical help
Common problems
Loss of vacuum suction
Check for obstructions in the hose or wand. If clear, replace the HEPA filter.
Paper bag difficult to remove
Do not overfill the bag; replace it when it is 3/4 full to avoid breakage and spills.
Before use
- Read all safety instructions and procedures.
- Ensure the sealing gasket around the lid and top edge is free of dirt.
- Verify the 2-ply intermediate filter is in position.
- Wear gloves and an OSHA-approved face mask.
- Ensure the HEPA filter sealing gasket sits evenly on the tank rim.
Specs in practice
- 2-Ply Disposable Paper Filter Bag
- Contains bulk debris for dry pickup only; protects other filters.
- 2-Ply Disposable Intermediate Filter
- Extends the life of the HEPA filter.
Model compatibility
- Wet operation requires a Wet HEPA Conversion Kit (Part No 399205 for 14" vacuum, 394505 for 16" vacuum).
- Poly tank models require a HEPA adaptor for both dry and wet operation.

Manual page author
David Miller
Documentation analyst
Organizes user manual content into clear summaries, with attention to model details, product context, and everyday usability.