Home Appliances / Vacuum Cleaners
Mastercraft 1005D Vacuum Cleaner User Manual
Quick guide for the Mastercraft 1005D vacuum cleaner. Includes assembly instructions, wet/dry operation, filter maintenance, and troubleshooting steps.
Table of contents
Manual images
Click an image to enlargeQuick guide from the manual
The Mastercraft 1005D is a commercial-grade vacuum cleaner designed for both dry and wet pick-up. Before operating, ensure the unit is properly grounded on a 120V circuit. Always verify that the correct filter configuration (dry filter vs. wet adaptor) is installed for the intended task. Never use the vacuum to pick up flammable liquids or smoking materials.
Safety Instructions
To reduce the risk of fire, electric shock, or injury:
- Do not leave the vacuum plugged in when not in use.
- Do not use on wet surfaces with a dry vacuum configuration.
- Do not expose to rain; store indoors.
- Do not pick up smoking or burning items (cigarettes, hot ashes).
- Do not use without the appropriate filter or wet adaptor in place.
- Always turn controls OFF before unplugging.
- If using an extension cord, it must be #14 gauge or larger and not exceed 50 feet.
Vacuum Tank Assembly
The unit requires assembly upon arrival.
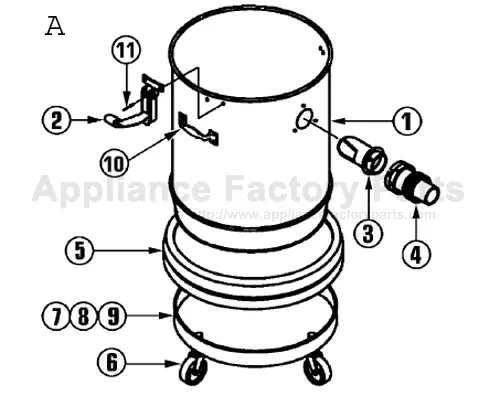
- 4-Caster Tanks: Turn the tank upside down. For Poly tanks, press casters into plastic sockets until flush. For Steel tanks, insert casters into the mount assemblies.
- Glidemobile Tank with Handle: Move the handle from the storage position to the operating position by pulling up and out, aligning the holes, and inserting the speed pins.
Hose, Wand and Tool Assembly
The hose and swivel connector are pre-assembled. To attach to the tank, line up the swivel connector slots with the retaining rivets on the intake and twist clockwise until locked.
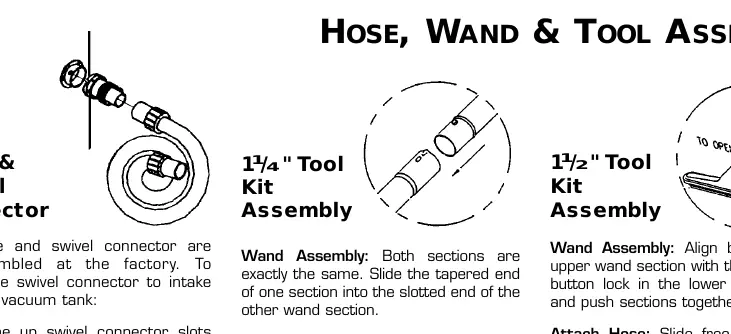
- Wand Assembly: Slide the tapered end of one section into the slotted end of the other.
- Tool Installation: Insert the tool into the tapered end of the wand. For 1.5" kits, align the button lock and secure the wand nut by turning clockwise.
Dry and Wet Operation
Dry Operation: Ensure the disposable paper filter bag is installed and the cloth filter is attached to the wire frame. Snap down the hold-down clamps.
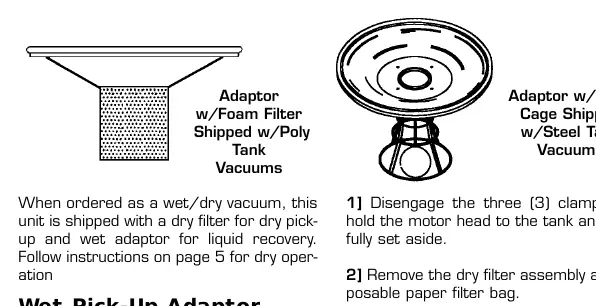
Wet Operation: Remove the dry filter assembly and paper bag. Install the wet adaptor (with foam filter) onto the tank. The safety float in the wet adaptor will stop suction when the tank is full.
Filter Maintenance
Dry Filter: Clean the cloth filter each time the tank is emptied by shaking off loose particles and brushing with a soft bristle brush. Do not wash the cloth filter.
Foam Filter (Wet Adaptor): Wash the foam sleeve with water and mild detergent after each use. Ensure it is clean and free of tears before re-installing.
Removal of Liquids
Do not store the vacuum with liquids inside. Run the vacuum for approximately 5 minutes after emptying to eliminate moisture.
- Tanks without Drain Valves: Remove the motor head and pour liquid from the tank.
- Tanks with Drain/Gate Valves: Position the valve over a floor drain and open to empty. Ensure the valve is free of obstructions before closing.
Troubleshooting
If the vacuum loses suction, check for a full filter bag, clogged hose, or worn gasket. If the motor fails to run, check the power source and circuit breaker. If dust blows from the exhaust, ensure the filter bag is installed correctly and is not torn.
Practical help
Common problems
Loss of vacuum suction
Check for a full disposable paper filter bag, clogged hose/wand, or worn gasket. Replace or clean as necessary.
Motor is not running
Check for a broken switch, defective power cord, or tripped circuit breaker. Contact an authorized service center if the motor is defective.
Dust blowing from vacuum
Ensure the disposable paper filter bag is installed correctly on the inlet tube and is not torn. Clean or replace the cloth filter.
Water blowing from vacuum
The tank is likely full of liquid; empty the tank. If sudsy liquid is being picked up, add a defoamer to the tank.
Before use
- Inspect the unit for shipping damage upon delivery.
- Ensure the power outlet is properly grounded (120V circuit).
- Verify the correct filter configuration (Dry vs. Wet) is installed.
- Check that the hose and wand are securely connected.
- Ensure the motor head clamps are snapped down securely.
Specs in practice
- 120V Circuit
- The vacuum must be connected to a properly grounded outlet.
- #14 Gauge Extension Cord
- Minimum wire size required if an extension cord is used; do not exceed 50 feet.
Images and diagrams
- Tank Assembly: Shows caster and handle installation points.
- Hose/Wand: Illustrates the connection of the swivel connector and wand sections.
- Filter Installation: Demonstrates how to secure the paper bag and cloth filter assembly.
Model compatibility
- Intended for commercial use.
- Do not use the wet adaptor for dry operation.
- Do not use the dry filter for wet operation.

Manual page author
David Miller
Documentation analyst
Organizes user manual content into clear summaries, with attention to model details, product context, and everyday usability.