Home Appliances / Vacuum Cleaners
Mastercraft 11-Gallon Air Compressor 058-8386-8
A quick guide for the Mastercraft 11-Gallon Air Compressor (058-8386-8). Includes setup, operation, maintenance, troubleshooting, and safety instructions.
Table of contents
Manual images
Click an image to enlargeQuick Start Guide
For immediate setup, follow these steps:
- Set the pressure switch to the OFF position.
- Turn the air pressure regulator knob counter-clockwise until it stops.
- Attach the hose and accessories (not provided). Use plumber's tape on threads to prevent leaks.
- Close the tank drain valve located on the bottom of the tank.
- Plug in the power cord.
- Set the pressure switch to the ON position and turn the regulator knob clockwise until the desired pressure is reached.
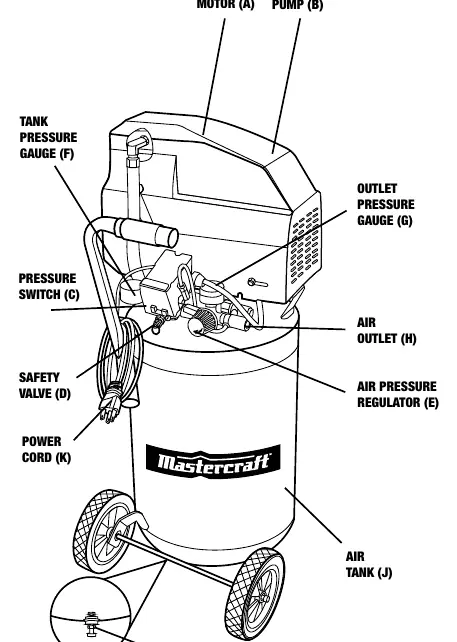
Product Overview
The Mastercraft 11-Gallon Air Compressor is designed for household use, featuring an oil-free pump and a 3 HP universal motor. It is ideal for tasks like fastening, greasing, and engine cleaning.
Assembly
Unpack the unit and inspect for damage. Ensure you have the air compressor, owner's manual, and air filter.
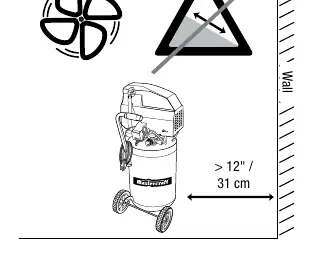
- Positioning: Place the compressor on a hard, level surface near an electrical outlet. It must be at least 12 inches (31 cm) away from any wall to ensure proper ventilation and cooling.
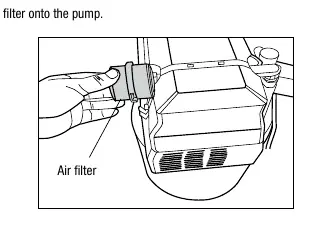
- Air Filter: Screw the air filter onto the pump.
- Hose Connection: Connect a 1/4" (6.4 mm) NPT air hose to the compressor's air outlet.
Breaking-in the Pump
This process is required prior to first use:
- Set the pressure switch to OFF.
- Open the tank drain valve to allow air to escape.
- Turn the regulator knob counter-clockwise until it stops.
- Plug in the power cord.
- Set the pressure switch to ON and run the compressor for 30 minutes.
- After 30 minutes, turn the switch OFF, close the drain valve, and set the switch back to ON. The tank will fill to cut-out pressure, and the motor will stop.
Operating Instructions
Before each start-up: Ensure the pressure switch is OFF, the regulator is turned counter-clockwise, and the hose is attached. If the unit was transported or turned upside down, let it sit upright for 10 minutes before starting.
Starting: Close the drain valve, plug in the power cord, set the switch to ON, and adjust the regulator knob clockwise to the desired pressure.
Shutting down: Set the switch to OFF, unplug the power cord, and reduce tank pressure by pulling the safety valve ring or using the outlet hose.
Maintenance
Regular maintenance ensures longevity:
- Drain the tank: Daily. Open the drain valve to remove condensation.
- Check safety valve: Daily. Pull the ring to ensure it operates freely.
- Clean air filter: Weekly. Clean the foam filter in warm, soapy water and dry thoroughly.
- Test for leaks: Monthly. Use soapy water on connections; if bubbles appear, tighten or reseal.
Troubleshooting
If the motor fails to start, check if the power cord is plugged in, the pressure switch is in the ON position, or if the thermal overload protection has tripped. If the motor runs continuously, the pressure switch may be defective or the compressor capacity may be insufficient for the tool being used. If the regulator does not work, it may be dirty or damaged.
Safety Guidelines
Always wear safety goggles. Do not exceed the maximum working pressure of your tools. Never touch the pump or manifold while the compressor is running as they generate high temperatures. Keep children away from the unit. Do not operate in wet areas or near flammable liquids.
Practical help
Common problems
Motor will not run or start
Check power cord, ensure pressure switch is ON, check for tripped thermal overload (wait 5 minutes), or check fuse/circuit breaker.
Motor runs continuously
Pressure switch may not be shutting off; if it doesn't shut off, unplug immediately. Also, ensure the compressor capacity matches the tool requirements.
Regulator does not regulate pressure
The regulator or its internal parts may be dirty or damaged; replace the regulator.
Low pressure or not enough air
Check for leaks at fittings using soapy water, ensure drain valve is closed, clean/replace air filter, or reduce air usage.
Moisture in discharge air
Drain the air tank after each use; drain more frequently in humid weather.
Before use
- Inspect unit for shipping damage.
- Ensure the compressor is on a level, stable surface.
- Verify the compressor is at least 12 inches (31 cm) from walls.
- Ensure the drain valve is closed.
- Check that the air filter is installed.
- Verify the power source is a dedicated 120V circuit.
Specs in practice
- Cut-in Pressure
- 105 PSI; the pressure at which the motor automatically starts.
- Cut-out Pressure
- 135 PSI; the pressure at which the motor automatically stops.
- Air Delivery
- 6.2 SCFM at 40 PSI / 5.2 SCFM at 90 PSI.
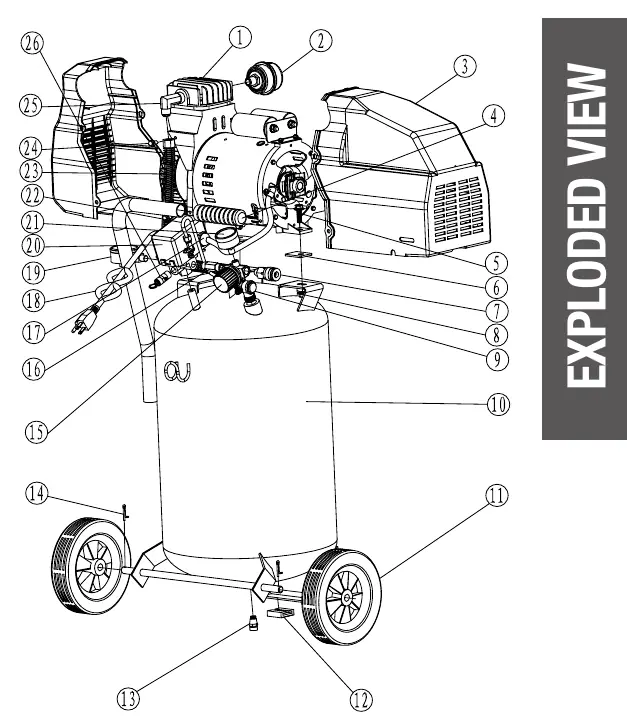
Images and diagrams
- Pressure Switch: Manually turns the compressor on and off.
- Safety Valve: Automatically releases pressure if the switch fails; can be pulled manually.
- Drain Valve: Located at the bottom of the tank to remove moisture.
- Air Pressure Regulator: Adjusts the output pressure to the tool.
Model compatibility
- Not designed for continuous or commercial operation.
- Use in dry areas only.
- Maximum 30-minute run time, followed by a 30-minute rest period.
- Requires a dedicated 120V circuit.

Manual page author
Emily Carter
User documentation editor
Prepares concise manual descriptions and highlights the most useful setup, operation, and maintenance information for readers.